1972 P6 V8 - The Lush

I'm not normally one for naming cars, cars are usually things that get me from A to B and I don't have much in the way of sentimental attachment to them. Of all the cars I've had over the years only one had a name, a Ford Escort 1.8TD, which gained the name Poo. If you've ever owned one of these, then the name will probably need no explanation, if not, when you put your foot down before the turbo had caught up, clouds of poo came from the exhaust :D

However, with this one, it's more than just an A to B car, it's a bit special, so it seems right to give it a name. That and most people I know keep asking me what I'm going to call it, so to shut them up :mrgreen: , I'm going to give it a name.

And that name? The Lush. Why?
1. It's fun.
2. It definitely likes a drink.
3. It's gert lush!

If you're from the Westcountry, then number 3 will need no explanation. If you're from elsewhere, this may help:
http://www.urbandictionary.com/define.p ... ert%20lush

The history of this car can be found here - I was lucky enough to be able to buy it with all of the major work done:
viewtopic.php?f=21&t=8425

However, there are a few little things that need doing over the winter, probably the most pressing of which is replacing the noisy gearbox. To that end, I picked up a replacement gearbox last weekend and made the most of this afternoon's nice weather by giving it a thorough degreasing and cleaning. Here it is drying in the sun:
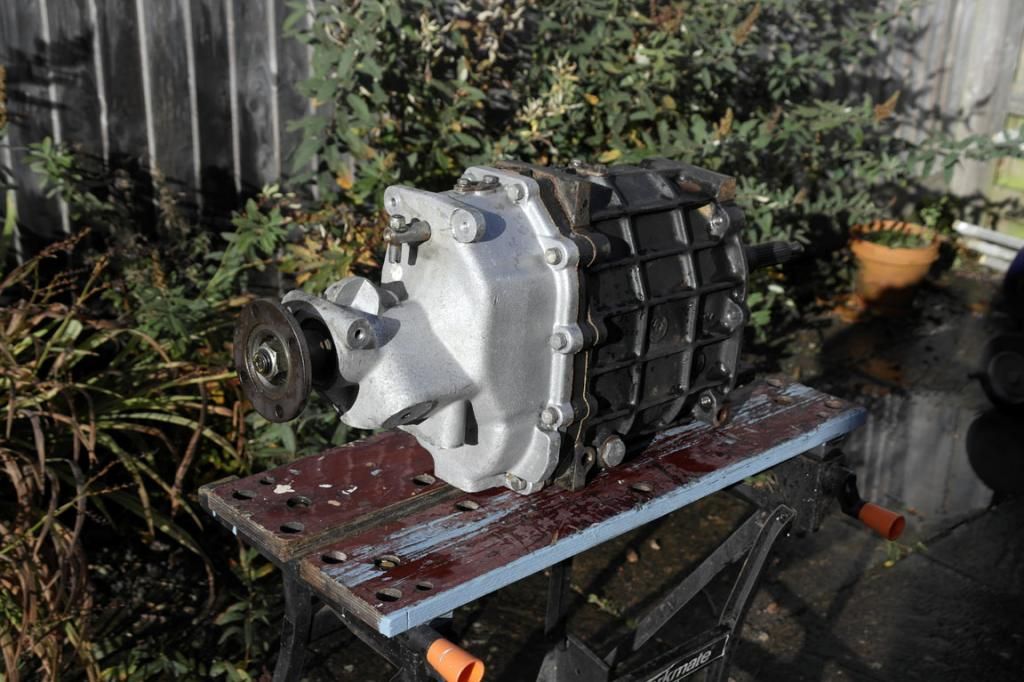

It took a little while to work out what it was originally out of, the serial number wasn't like any of the Rover boxes, but it turns out it's from a TR7. It's in very good condition - there's virtually no backlash in it, or any movement on the input shaft. I am planning on checking the endfloat before installation, but I'm fairly confident that it won't require reshimming. At least, I hope it doesn't as I don't really want to strip it down that far. I may also check and change the oil pump gears before putting it in, as I think I only have to remove the rear casing to do that job.

Interestingly, though, this box currently has normal gear oil in it, which may have contributed to it staying in such good condition. They guy I bought it off use to be involved with a TR7/8 rally team and he said that Ken Tomlinson, who built the works rally gearboxes, only used Motul300 gear oil as it had the exactly right specification for the LT77.

A spot of paint next, with fitting planned for later in the year. I'll try and change the speedo drive gear before fitting, to correct the under reading speedo - does anyone know where I might get the correct 20 tooth orange gear for this?
 
I would not re shim the backlash. I am not a specialist but If it has backlash, it would mean that the bearings are worn and reschimming is not the solution. Last week i opened 2 LT 77 boxes for a MGB V8 conversion from a friend. If you open it, you should check the reverse gear also. On 1 box i opened the reverse gear had lost some parts of the teeth and this damaged the other 2 gears and then the box is scrap. This box had minimal backlash. On the other box, also some damages were visible to the reverse gear. I will replace the reverse gear of the second box, this to avoid future damage to the other gears as it is not very expensive. An overhaul kit including bearings, oil pump, synchro rings is available from Ashcroft at GBP 140,- i believe. I overhauled several Lt77 and it is not too difficult and after replacing the bearings,in almost all overhauls, the fitted shim was the right one to avoid backlash.Decent Lt77 for 2wd for overhaul are becoming scarce here in Holland so you should be carefull with

Regards

Peter
 
Martin,

I forgot to answer your question on the speedo gear. The box i currently overhaul doesn't have a speedo gear so i was searching the internet and found Clive Wheatly who is MGB v8 conversion supplier. He offers speedo gears on his website but i don't know if he can supply the right one.
Good luck

Peter
 
Thanks for the tip about the reverse gear, Peter, I think I'll open this one up and take a look inside, just to make sure. I played around with it on the bench and I seem to be able to select all gears, so it bodes well in that respect.

Thanks also for the tip off about the speedo gear - I'll drop them a line and see if it is suitable. The proper 20 tooth gear seems to be unobtainable at the moment - I've had a good look around and no-one seems to have stock of them.
 
You could fit one of the american electronic speedo senders and receivers - That way you dont have to worry about the calibration of the speedo...
 
I could do that, but I was hoping not to have to spend that kind of money - the gear would be a whole lot cheaper, assuming I can find one.

However, when I eventually do the diff swap the speedo will be wrong again, although not by so much, so it may be a better idea in the long run. I may be forced down that route by the gear not being available in any case.
 
Hi,

When we did our conversion we had to use whatever gear we could get at the time, the one I got actually had a smaller ID than the correct one. We machined the ID out on a lathe and rebuilt the flats using Araldite, see pic., seems like a bodge but it’s been like that for nearly 5 years now.

We never got round to calibrating the speedo, you get used to the mental arithmetic after a while :) It was further out when we ran the standard Rover diff., got a lot closer to right when we fitted the Jag one.

Tim
 

Attachments

  • Drive gear 2.jpg
    Drive gear 2.jpg
    62.5 KB · Views: 1,592
Thanks Tim, that's interesting. Do you have any idea what it was off originally, please? That's more of the kind of solution I had in mind!
 
Hi Martin, how is it all going? have you now finished the gearbox swap, if so is it a vast improvement?

Look forward to some more updates, cheers Damian
 
The Lush - LT77 Rebuild

Hi Damian, I have indeed completed the gearbox swap and it has made a massive difference to the car. It's so much quieter, and also seems to be cooler inside - the old gearbox must have been getting quite hot, with all the friction in the knackered bearings. There's a massive amount of play on the input shaft of the old gearbox.

I ended up rebuilding the replacement gearbox in the end - once I had started to take it apart to assess the general condition and change the oil pump bearings, it seemed sensible to at least replace all of the bearings, so I'd know that it would last for some time. The first thing I had to do was to get the output flange off, for which I made a suitable tool:

Which consists of a long piece of flat bar, with two holes drilled in it to allow it to be bolted to the output flange, with a suitable notch to allow it to fit around the shaft. The tool in use:

It made removing the flange bolt a breeze! (Well, that and a big breaker bar :mrgreen: )

The tailhousing is removed first - with a bit of effort it will just slide off the shaft once the flange is removed. Getting the bearing out is a bit fiddly - I ended up bashing it out with an old screwdriver from the far end of the tailhousing. You have to be careful when doing this, though, not to damage the ferrobestos oil ring at the gearbox end. If you have to replace it, they're about £40 each! Thankfully mine was in good enough condition not to need replacing. After the tailhousing, all the 5th gear components are removed, which I then cable-tied together, to make sure nothing got mixed up.

The 5th gear end:


After removing the various parts from this end, the box is turned over and the main casing is then removed. Again, this took a bit of effort, as this box has been together for a very long time and the gasket faces did not want to part! After this is removed, this is what you see:


To dismantle the box completely, I think I had to remove the reverse gear and associated components first, to enable the layshaft to come out. Once the layshaft comes out, removing the mainshaft is possible - the mainshaft has to come out straight, as it comes out as an assembly with the selector mechanism, which has to fit through a hole in the casing with quite limited clearance.

All the parts were then cleaned and given a visual inspection.


During dismantling, I took some pictures to refresh my memory of how it all went together. I should have taken more, as I didn't have any close up pictures of how the main selector assembly goes together. Thankfully, at this link here:
http://forums.lr4x4.com/index.php?showtopic=52887
There is a very good close up of the final position of all of the selector components. This was invaluable when it came to putting this particular part back together, there would have been nothing worse that to get it all back together to find that I couldn't select all of the gears. As it happened, I loosely put everything back together and tried the selector before finalising the assembly.

I followed the method in that link for fitting the new bearings - each one was heated to expand it before putting it in place, as I don't have a suitable press. I ended up cutting out the bearing cup that fits into the input shaft - I didn't have a suitable puller, although I'll probably invest in one before rebuilding the R380, which is phase two of this project. I bought a full kit off ebay, but now that I've learnt that all of the bearings are standard sizes, available off the shelf, I'd get a gasket and seal kit from a car parts specialist and then get the bearings myself. If you want to do the same, what you need (for a suffix A or B (and possibly C) box) is:
2 x LM67048/LM67010 (Input shaft and mainshaft, 1st gear end)
2 x L44649/L445610 (layshaft)
1 x LM11749/LM11710 (mainshaft pilot bearing)
1 x 6205 (tailshaft bearing)

Reassembly was done with reference to the TR7 workshop manual, which can be found online, which was as much of a hindrance as a help at times. For example, if you follow the sequence of reassembly quoted in the manual (put layshaft in place then fit 5th driving gear to it with bush and circlip) then there's no way that you'll be able to get the mainshaft into place. I had to put the mainshaft in first, then put the reverse idler gear into place, then slide the layshaft into position. Other than this problem, the manual was generally helpful. The dial indicator method of determining the required selective washers is much better than the feeler gauge method described in the Land Rover manual, so I used that. I didn't start with the thinnest washers, as mentioned in the manual, just measured the thickness of the ones that were already fitted to the gearbox and based the calculations on that.

I also took the opportunity to replace the fibre oil pump gears with an improved steel version. The pump and gears that I took out were in reasonable condition, but I wanted to replace them with the stronger steel ones in any case.


Reassembly went quite well and once all was back together, I filled the 'box with Motul Gear 300 75W90. It's not cheap, but was recommended to me as being ideal for the gearbox, by someone who has rallied TR7's. It runs extremely nicely and the gearshift is extremely smooth, although I suspect that the rebuild has got something to do with that! It's interesting, though, that despite the rebuild, I still have to take it easy going from 1st to 2nd when the car is cold.

The next job is to fit a magnetic speed sender for the Dakota Digital box, as I can't get the SD1 speed transducer that I fitted to the gearbox to work with it properly. Then. after that's done, my efforts will turn to the stereo, with plans to fit some 6x9 speakers in the rear and either some 4 or 5.25 inch ones in the front.
 

Attachments

  • flange tool.jpg
    flange tool.jpg
    271.5 KB · Views: 1,161
  • tool in use.jpg
    tool in use.jpg
    247.6 KB · Views: 1,161
  • 5th end.jpg
    5th end.jpg
    331 KB · Views: 1,160
  • internals.jpg
    internals.jpg
    367.8 KB · Views: 1,160
  • cleaned parts.jpg
    cleaned parts.jpg
    373.5 KB · Views: 1,159
  • new_pump_gears.jpg
    new_pump_gears.jpg
    297.3 KB · Views: 1,158
After knocking up a cardboard template to see what size speaker pods I could accommodate on the doors, it looks like 4 inches in the front are going to be the order of the day. I've also spent some time over the extended weekend gluing the centre console back together with some JB Weld. By 'eck that's some strong glue! I don't think it's going to come apart again in a hurry.

The console is looking a bit tired now, though, so I've ordered one of these with the red stitching, which should improve the appearance somewhat:
http://www.ebay.co.uk/itm/RED-STITCH-CE ... 51c783d325

I'll also replace both the gearlever and handbrake gaiters with leather items, to improve the appearance further, before putting it back into the car. I haven't quite decided yet whether to go for brown, to match the interior, or red, to match the exterior of the car. Red is winning out at the moment, but I may yet change my mind!
 
Hi Martin, wow! you certainly have been busy, so glad the rebuilt box is a huge improvement and much quieter! I remember when I first drove the car after I finished the conversion from the BW35 box and thought wow its certainly different to drive but also thought what racket it made when ticking over, sounded like a cement mixer until you depressed the clutch LOL. Did you re-use the AP pressure plate clutch kit as I found it a bit a like a work out in the gym for a weight lifter, also one thing I was trying to do before I sold it was trying to get the clutch to bite with more travel in pedal as apposed to about 1" off the floor, I think that the master cylinder wasn't in the best place or the rod wasn't set up right possible, I did tinker with the idea removing it all and replacing with a combined unit that fits to floor but alas didn't get that far, same with a gearbox replacement, Doing rebuild is a tad out of my league so hats of to your for doing it yourself, great result too!
Look forward to more updates, interior upgrades sound fab, I like brown or even black perhaps, loving the centre consul upgrade too, I don't think I've ever had a P6 that didn't have a broken one. I do have a Rover P5b V8 in my garage but alas only as a spares car I obtained, I want the engine & auto box to put into a 2dr Morris minor, rainy day project :wink: all the best Damian
 
There were times when the gearbox rebuild was out of my league as well! I managed to muddle though though and the next one will be a lot easier :D

The guy I bought the car off had already bought a standard clutch plate to replace the AP Racing one, so he changed it over before I took the car away. I did test drive it with the racing clutch in there, though, and it was bloody hard work! The clutch mostly seems OK now, with the new gearbox, it has more travel, but it could still do with a bit of tinkering.

The Morris project sounds like fun! I've tried to persuade my wife that she wants a Ford Pop based hot rod, but haven't quite managed it so far. I almost had her at one point, though!
 
Excellent work Martin.
Looking forward to having The Lush,and you of course on the club stand at;
The Bristol Classic Car Show,Shepton mallet on 13/14th June.
 
I'll pop along to the show as well, be good to meet you all & see the car again, looking forward to it.
 
Thanks Dave, I'm looking forward to the show. I'm hoping to get all of the bits and pieces finished before then so it doesn't look half done!

It'll be good to meet you Damian.
 
Hi Martin, will you be at the show on both days? I'm attending Sunday so look forward to meeting you and seeing the car again :D
 
Back
Top