

You are using an out of date browser. It may not display this or other websites correctly.
You should upgrade or use an alternative browser.
You should upgrade or use an alternative browser.
2200TC Project
- Thread starter BrianMac123
- Start date
BrianMac123
Active Member
If you take the paint code to a motor factors that mixes paint they will make up a can for you. Will be a little 'bright' as car will have faded, but should be close. Other advantage is that the cans supplied are usually easy to use.... not a spray gun easy, but better than std cans (in my experience at least, they give a decent fan spray pattern, but still are a bit delivery heavy). If you are doing a whole panel it should be easy enough, esp off the car.
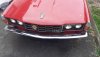
Ok, I flew into Halfords, the bloke said "You know that little shop beside the Bingo hall...", Yeah of course two minutes away from the house. Gave him BVLC 211, yes I can do that! I got a sample! £30 Holding off on Paint, I just gave it another good cleaning. And there's the rain. Thanks all.

Last edited:
BrianMac123
Active Member
With the front still off, I got in with an old wood chisel and wire brushes and gave it some rust converter and a drop of spray paint, old sheets to mask off. I'll do the light trims over winter. Oh and nice new shiny and "straighter" bonnet support. ")

Last edited:
BrianMac123
Active Member

Mick Rae
Active Member
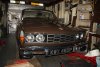
Brian, your car is looking very smart and shiny. You pictures shamed me at the weekend into some remedial effort - been driving the car a lot when there isn't any salt on the road -spent the winter dealing with mechanical and electrical oddities, getting used to driving it, any excuse to get out and about really. But my oily hand prints, and a lifetime of scratches and blemishes plus rather dull brown paint wasn't doing its looks any favours. Then I saw your pictures here. Overcome with guilt and envy, and having been a good boy and got on top of the garden over last few weeks, I washed and dried the car, then went all over and marked up all the scratches - there were a lot accumulated it seems. Indeed, there wasn't a panel that wasn't! Used a cutting compound to remove/decrease them. Then did it all again, as inevitably found more and more the closer I looked. After 4 hours of this torture I stopped for lunch - by now the sun had come out, and revealed just as many more that I had missed. So back at it until I could take no more of this. Then waxed all the paintwork and cleaned all the chrome. Took a whole day, was knackered afterwards, (there's a lot of surface are on a P6, as I now know)) but what a difference! Far from perfect of course, but major improvement, the downside is that by the end of the week it will be as filthy as ever - but not scratched so badly. I'm always amazed at what a few cloths and a bit of effort can achieve - but I'm still a long way off your level of detail and shine!
BrianMac123
Active Member
Thanks a lot Mick. I did most of that work in the garage over winter and a panel at a time, and I had a bit of help, and I used buffing pads on a drill. The grille went in the dishwasher, then oiled and dabbed with silver paint. The valence went in a soapy bath. scrubbed and buffed. Bumper done with a buffing pad and Autosol. Don't kill yourself, but that Mexico Brown comes up lovely if you want it to.
And I've just found out that my nunber plate is 580mm x 120mm, and I cant find any bigger than 520mm x 110mm (standard size). It was re registered here. so I need a new plate. I'd like to keep the raised plastic numbers style, but can't find any.
And I've just found out that my nunber plate is 580mm x 120mm, and I cant find any bigger than 520mm x 110mm (standard size). It was re registered here. so I need a new plate. I'd like to keep the raised plastic numbers style, but can't find any.
Last edited:
Mick Rae
Active Member
I reckon my paint is about as good as its going to get now Brian. Short of a respray, not on the cards just now! I got replacement plates of the correct size from a local motor factor - not raised plastic though, but I'm sure that deep pockets and google will work
Attachments
I'd like to keep the raised plastic numbers style, but can't find any.
I got mine from these guys - Home Page - FramptonsPortal
BrianMac123
Active Member
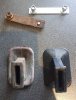
I have a Dubilier Condenser that might need changing, it attaches nicely to the servo bracket. What are you guys using and how?

redrover
Well-Known Member
I'd like to keep the raised plastic numbers style, but can't find any.
I can personally recommend Chestnut Registrations from Crosby (my hometown):
Black and silver number plates legal We offer FREE Postage,Vintage & Classic Old number plates for cars bikes motorcycles tractors military vehicles, metal and pressed aluminium number plates, black and white number plates
They offer various different letter styles (some of the letters changed slightly over the years apparently) on any sized plate you want. Made a lovely job on our MG:

Last edited:
BrianMac123
Active Member
I have a Dubilier Condenser that might need changing, it attaches nicely to the servo bracket. What are you guys using and how?
View attachment 21446
Anyone ever seen one of these? A Dublilier Condenser, it plays nice with the Servo bracket, I can't find anything like it anywhere!
BrianMac123
Active Member
Sorry to bother you all, I've hit a snag. I thought I'd have a look at the brakes today. First time the wheel has been off since I've had it... One of the front o/s wheel nuts has turned to mush, very soft metal. All the corners have mostly gone from the nut, by previous work. So I can't remove the wheel. The other nuts are fine, all undone. There's always one!! I can't hacksaw through it and I tried tapping it around. but the metal is so soft it's,taking slices off it! Any suggestions?
sdibbers
Well-Known Member
Try finding a slightly undersized socket and hammering it onto the nut. Then, tighten very slightly to break the seal. Now gently undo. You may need to rock the nut back and forth at first. I’ve had good luck with this method in the past. Of that isn’t working and you have a mig welder try welding a large nut to the original one.
BrianMac123
Active Member
Thanks Steve. I've made a complete dog's dinner of the nut. Tried everything, I tried a smaller ring spanner tapped on, stripped another couple of thou off the corners. I have it split right through on one side with a sharp chisel, and been hitting it in the right direction for a couple of hours with a lump hammer and large chisel. Wont bloody budge.Ton of wd40, heat, the works. I'm going to give the neighbours a break now!
Last edited:
BrianMac123
Active Member
Yes, that the plan for tomorrow! Just hoping the countersink won't be a problem.Yikes! Try splitting the other side of the nut.
I guess that's why the brakes aren't the best. Haven't been done in years probably.
Last edited:
arthuy
Well-Known Member
Try putting the other nuts on to take some pressure off it and try again.
A deep socket might then work if you can force one on.
Using a chisel to split the bolt might work.
I have had a set of Irwin bolt grips for years. They have paid for themselves time and time again.
A deep socket might then work if you can force one on.
Using a chisel to split the bolt might work.
I have had a set of Irwin bolt grips for years. They have paid for themselves time and time again.
mikecoombs
Active Member
If you've split the nut and it still won't budge its probably welded itself on ie. probably done up with a rattle gun. meaning the stud thread is probably stuffed as well. There are two types of nuts, the standard type with the thread right through, which may be tapered both ends and the later/rostyle nut that's a type of acorn nut. Some types of the acorn variety are known to weld on. There are a few specialist tools for getting stuck nuts off. probably the best choice is the right angle stillson plumbers use to get stuff off down holes. They are designed to grip round objects and normally have a square shaft you can get abig shifter on for leverage. Pipe wrench might also work if you can get it on. Busting the stud is annoying but replacement is pretty easy and you probably don't want to re use the current one as the grip will be crap even if you don't stuff the thread getting the nut off. There are special stud removers available but they are expensive and you will need a big one...Local garage might hire you one. If all else fails drill out the centre, press the stud out and replace it.
Just found your car picture. looks like you have the acorn type. When putting them back on use Never cease or similar. Not grease. That will prevent a repeat performance.
M
Just found your car picture. looks like you have the acorn type. When putting them back on use Never cease or similar. Not grease. That will prevent a repeat performance.
M
BrianMac123
Active Member
Thanks for your replies all, One thing in my favour, is how soft the metal is, I'll attack it from that angle first, i.e another split. If not I'll get the big guns out.
BrianMac123
Active Member

I took slices off the nut and split it, then rotated the wheel, i.e pushed the car an inch or two, until I had a good edge to work with, then lump hammer and chisel. Only five hours. I think the stud survived although it might need a Die spun over it. I'm afraid to ask the thread size after seeing an old post here. A dozen or so new chips on the wheel arch paint, which is rather annoying. And it seems our favourite parts stockists dont stock these wheel Nuts
Last edited: