Air conditioned 2000 TC

Hi Chris, the Alpineair unit is of the recirculating type, just like the original Rover - Delanair. The only difference between the two is that on the Alpinair the blower is horizontal twin fan, while on the Delanair is vertical single fan.
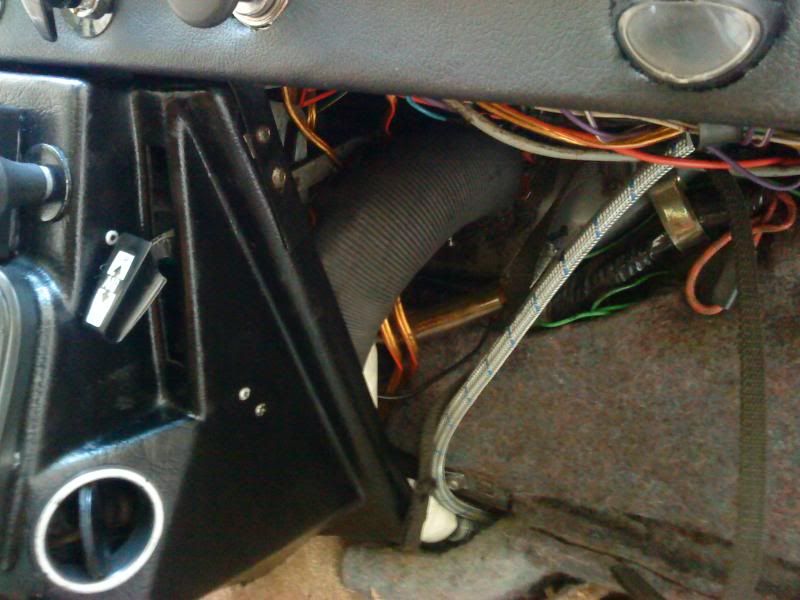
I never really liked the idea of recirculating only air. You just gave me an idea though! It is (just) possible to connect the A/C blower inlets with the car's air ducts within the bulkhead. Instant cool fresh air! While with closing the flap of the heater box, it will just draw air from inside the car, turning the system to recirculation if needed! I am also thinking that it would be better to source the incoming air from the heated air ducts and not the ones feeding the face vents, otherwise i must find a way to seal the system during the winter.
In theory, like this i could dispence with the A/C blower, liberating valuable space in there, but i am afraid that the Rover's heater blower is not powerful enough to be effective.
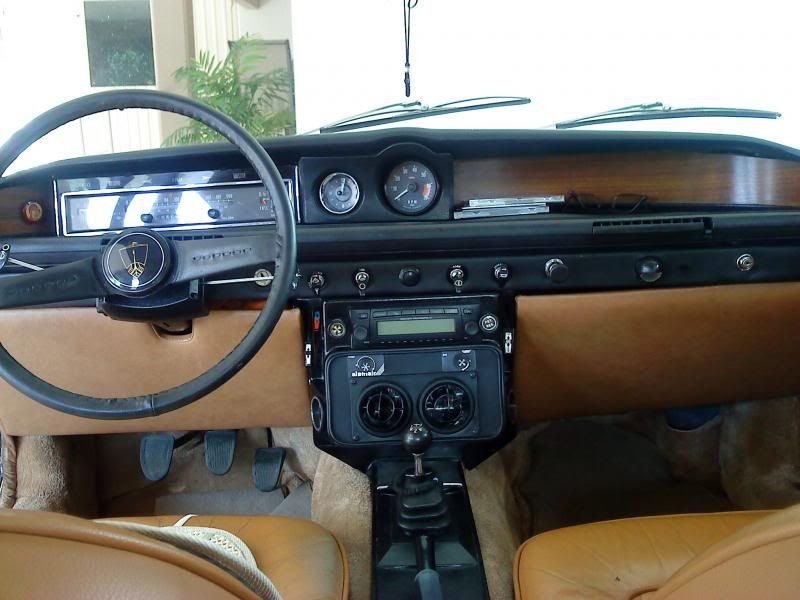
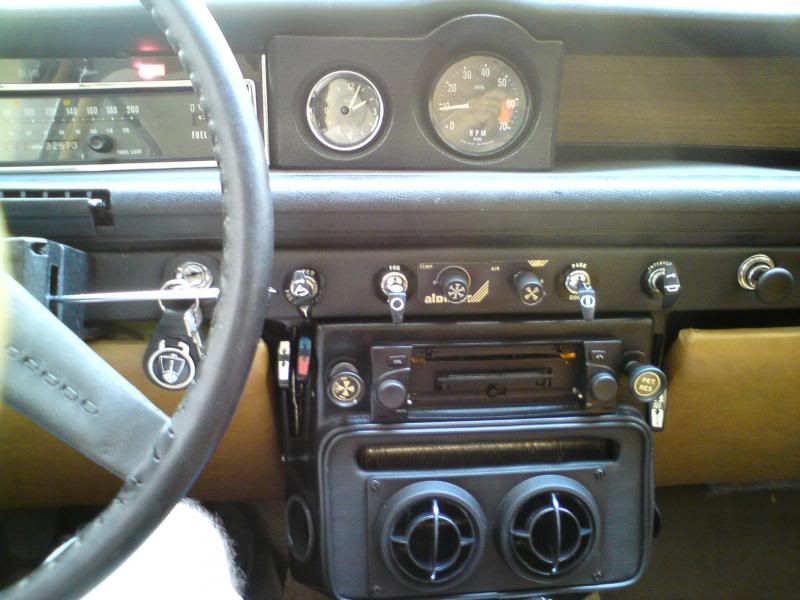
Regarding the relocation of the A/C switches, i was also thinking of it, mainly to use all the facia area as a big vent. However, i have to keep the switches as they are. The temperature control one is using a capillary probe to sense the evaporator temperature. The capillary is long enough to allow me to fit the switch at the switch rail, next to the others but at the moment i didn't wanted to mess with this too, having primarily to sort out the basic installation. I didn't use any other ON-OFF switch for the system. Both the temperature control and fan speed ones when turned off, isolate the system.

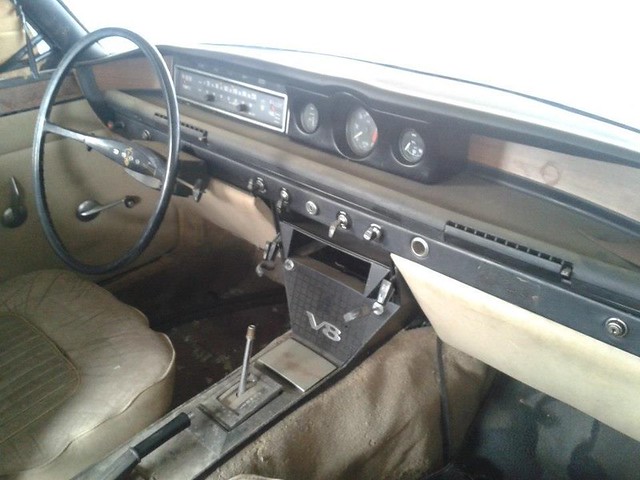
The console fitting is OK now. I did lengthen the hot-cold lever though by 1 cm. Now it looks and works as it should. The air distribution lever is fine. Also i skimmed a little the sides of the gloveboxes, after i removed the vinyl cover. They still look standard, but fit better now. With some carefull positioning i hope that they will open and close without rubbing their sides.
Still quite a lot to do! :roll:
 
Well, i liked the idea of cool fresh air, that i moved forward with the feeding of the A/C blower from the car's heater. It was relatively easy to tap into the demisting ducts within the bulkhead, and then i could just squeeze the new ducts to the A/C blower inlets. Everything is tight in there now, but it works. The demisting option is not affected. With the heater blower on, you can feel the air stream at the base of the windscreen, and almost nothing at the A/C vents. Naturally, the air does not want to make the right angle exit from the demister ducts to the A/C feeding ones. However, with the A/C blower on, there is no air stream felt at the base of the screen, and actually with the A/C blower on full speed, there is some suction through the demister vents as the A/C blower pulls more air than the heater blower can push.
Despite the various spacers that i used on mounting the gloveboxes, i am still not happy with their fit, even though now open and close properly. Using bigger vents on the facia might be a good idea to improve the system, and i am thinking of using the round Range Rover Classic vents. Perhaps something for the next summer?
I must admit that up to now i haven't used it much, something to do with the summer without extreme termperatures that we have up to now, and with the fact that i prefer the full rolled down window motoring at moderate speeds, and indeed wonder if it was worth the (huge) hassle and money, but when i needed it, surely it provided some comfort that i haven't had before.
There are still some refinements that i want to do on the electrical part of the system, and do something with the mounting of the ammeter and oil pressure gauge.
I 'll let you know the progress.

DSC00087_zps92ca54f2.jpg
 
For the ammeter and oil pressure gauge, there's no reason why they shouldn't live in the facia you've made for the A/C? They should seal into the panel OK and I expect they'd like having cool behinds(!). Alternatively you could use a P5 Coupe dial pod slung under the top shroud like I did on Lucky?

Chris
 
Chris, there is a very good reason why the auxiliary gauges won't fit into the A/C facia. Space, or more precisely, the lack of it, mainly in depth terms. A different protruding facia may work in this way, but it will impede airflow, something definitely unwanted, not to mention that the gearlever will hit the facia on 1st and 3rd. Anyway, there are enough reasons to rule this out.

Currently, my favorite solution is the triple auxiliary pod as seen on some Portuguese 3500s, with the ammeter and oil pressure gauge sitting left and right of the rev counter.

The more i look to the photo below, the more i think that it would look rather neat.

DSC00081_zps8db94a2b.jpg


This means that i will have to create myself something out of fiberglass perhaps. The clock could go into the right corner, recessed, just like on the P5. Although i am not sure yet if there is enough depth in there for this.

I was also thinking of your solution of the P5 pod, but while standing alone it is a nice piece of design, i am not too keen on the three different styled pods in a row solution. Last but not least, i am also thinking of using the complete series 2 dash. While I don't feel very comfortable with the loss of the strip speedo, a unique feature of the series 1 cars, my excuse is that the stillborn 2000S actually meant to carry the later dash.
 
You have an advantage here being left hand drive! RHD tacho pods are reasonably common on Ebay. So a hacksaw cut later and you have the basis of your triple pod. The angling of the gauge would need to be altered, but I'm fairly sure a simple covering of vinyl would disguise the join satisfactorily. I've thought about the P5 position for the clock too!

Major difficulty is that the gauge holes in the pod that you are left to fill are clock size rather than gauge size. That provides an opportunity for the oil pressure, because now you can have an MGB style double gauge and have temperature as well! Snag is that I've not seen any credible double gauges that include amps or volts or both.

Chris
 
Demetris said:
The more i look to the photo below, the more i think that it would look rather neat.

DSC00081_zps8db94a2b.jpg

It would certainly add a sense of symmetry to the dash/console arrangement.

Demetris said:
Last but not least, i am also thinking of using the complete series 2 dash. While I don't feel very comfortable with the loss of the strip speedo, a unique feature of the series 1 cars

Neither would I & it's something I would definitely not do. Far more satisfying to carry on in the way you have been & make your own modification to the layout.
 
The Rovering Member said:
It would certainly add a sense of symmetry to the dash/console arrangement.

That's exactly my thoughts Gary.

The Rovering Member said:
Neither would I & it's something I would definitely not do. Far more satisfying to carry on in the way you have been & make your own modification to the layout.

OK then, i 'll forget about the series 2 dash.

Chris, the angling of the gauge is i think more difficult to replicate, so i 'd better start with 2 LHD pods. I already have a spare one, and i am looking for another to butcher. The one on the car now will be stored intact in case i ever want to return it to standard. In any case the metal frame is the easiest part, but at the moment i am not sure what i could do with the plastic. I have a theory of making a mould and producing a fiberglass kind of thing that could be painted with crackle black paint, but that's just a vague theory. Unfortunately vinyl covering is out of question due to the complex shape. I 'll have to study a little more on this.

Also i recently found out about the difference in the size between the clock and the gauges. I had the MGB gauge fitted for years now, monitoring both the pressure and the temperature of the oil and it is the standard 2 inch size. However, now i am thinking that i will fit a pressure only gauge. The reason is that whilst the oil temperature is not strictly vital in my case, it's capillary tube adds a lot of hassle to the installation. Every time that i will have to remove the gauge or the pod, i will have to undo the capillary from the sump (creating a little mess in the procedure), pull it through the bulkhead, etc, etc. Not my idea of having fun. I will try and keep it simple.
 
i had a lengthy browse last night looking for 60mm gauges to fit the clock aperture in the rev counter pod. I found some! But more importantly they are extremely thin. So they might just fit your A/C front panel. Have a look at the range from http://www.speedhut.com/gauges/ If you have a play with the customisation facility you can make them look very suitable for our era of cars - great fun too!

Chris
 
I spend some time lately to refine the electrical part of the conversion. Now i had a bank of four relays bolted to the inner wing: Horns, starter solenoid, compressor, radiator fan. The fan relay is a double output one and i wired it in such a way to be able to turn it on from a switch inside the car independently from the A/C. I thought that since i have the electric fan sitting in there i might as well use it for cooling the engine in some extreme cases now that the aiflow through the radiator is not what it used to be with the A/C condenser and fan sitting at the front. Indeed, in some 1st gear crawl in difficult mountain roads in the summer it proved helpful. For the moment i used the heated rear window switch, as the element on the window doesn't work anyway.
In order to feed the relays i got rid of the awfully cheap in line fuse holders, and i fitted a second fuse box next to the original fitted on the car. It is fed from the main line returning from the ammeter. I also fitted a pair of 60 amp modern blade fuses on both ends of the ammeter line. Just to be on the safe side. These are hidden next to the (redundunt...) starter solenoid behind the headlights.

DSC00322_zps2cf81395.jpg


DSC00323_zps6daeaba9.jpg

I also have to remove the choke cable in order to tidy the fan control wire. :oops:

During use i found out that the airflow through the A/C facia wasn't good enough. The efficacy of the system was marginal and in humid weather it was too easy to have the evaporator packed with ice. The solution was a different facia that would allow the air to flow from the whole surface of the evaporator. So for a start i removed the controls to the switch rail in the dashboard and made an extra opening in the A/C facia. It's not final, but it works better now. The controls will definitely stay there for good, with new labels engraved at the same style with the rest of the Rover switches. I am tempted to not include the Alpinair name. I am still frustrated with their cockup in the design and build of the console. As for the facia i will eventually build a new one using a combination of vents to cover as much as possible of the area.

DSC00324_zpscfdd5f34.jpg

Glovebox gaps also visible in this photo. :evil:

I also made an attempt to fit an oil pressure gauge next to the speedo cluster. In my opinion it doesn't look too bad, and i can make it fit better. It will stay there until i will eventually build the triple central pod and move the clock to the far right corner, P5 style. I already have two spare LHD pods and i will use their metal frames for cut and shut work, but at the moment i have no idea what to do with the plastic part. Perhaps creating a mould for glassfibre? I really have no experience working with these materials.
DSC00325_zps1cbae0ec.jpg
 
Sensible electrical mods there.

I really like that oil gauge. With me wittering on about the P5 clock position you'd have thought I'd have thought of that!

Chris
 
thought you might like to see this photo found on Facebook of a rather superior approach to finishing the A/C module in the centre console......


Chris
 

Attachments

  • Reg Mason AC 01.jpg
    Reg Mason AC 01.jpg
    69.1 KB · Views: 1,545
Thanks Chris, but this is not really to my taste. The use of such wood in this way would always look out of place in any Rover, never mind the P6, at least in my opinion.

Think of it like this, in my view the interior of a late P5 is the absolute paragon in car interiors. Therefore i am trying to keep it there.
Moreover, i can see that he used a couple of Range Rover vents. I also have a set of those, and i am afraid that the airflow through them would possibly leave a lot to be desired. Remember that air condition in moderns use something like 6 times more vent area in order to be effective. As i found out this summer, a couple of good vents are not enough, never mind two restrictive ones. Anyway, now i started to use the heater a little, and the A/C just for demist a couple of times. Until next summer i have plenty of time to design and build something suitable.

billoddie said:
Sanden compressor...good choice :)

Of course, i did my homework. :wink:
 
I do have some sympathy with that view. As with this car, it's carried out very well but is really gilding the lily somewhat. The P6 design was getting away from the 'gentlemans club on wheels' look:


You'd have to carry the wood theme on from the air-con' unit too.
 
Oh dear! :shock: Am i the only one who thinks that the above looks like plastic?

Just compare with a P5 below...

1970-Rover-3-5-litre-Coupe-cockpit_zps46d6457e.jpg
 
Demetris said:
Oh dear! :shock: Am i the only one who thinks that the above looks like plastic?

No Demetris, you are correct, it is far too shiny and has no wood grain so it looks false to me
 
The other reason I put it up, aside from the aesthetics of shiny wood, is to show that this owner has brought the front face forward so that it almost covers the front ashtray. That part of it seems to work very well to me, but I'm unsure whether it would live with a manual gearchange.

Chris
 
As the summer is rather close, i thought about partly revising my A/C installation in areas that still felt half finished.
In the interior, i created yet another facia, allowing for more and better distributed air flow. The last one had the habit of sending all the cold air to the rear, leaving the front seat passengers not adequately cool. The new facia is a trully parts bin special, using a combination of Range Rover and Austin Morris vents and seems to work better. Also i had to take out the evaporator / fan unit, because it was rattling badly at the second and most useful speed. An adjustment of the fan motor endfloat and some additional damping material seems to have quietened the operation of the unit.
Under the bonnet, a proper twin snorkel air filter box is fitted, courtesy of sdibbers (Thanks Steven!), so i don't have to put up with the butchered original.

Despite all that, my plans for a modified heat/cool box are still alive, as it would make it a far superior installation. And even if the car is not used every day anymore, i firmly believe that it would be worth the effort, returning the interior into its almost standard look and function.
I have acquired the vital parts (heater box, a selection of evaporators, a powerful blower fan) but progress is rather slow. This means that i would be happy if it would be ready for next summer.

20160616_203100.net.jpg 20160616_203124.net.jpg 20170506_132837.net.jpg
 
Back
Top