Finally the project is underway.

nzwoodie

Member
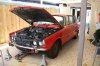
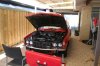
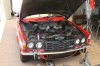
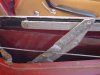
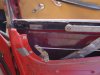
After buying the car in September 2015, and the subsequent problems that befell the family I have now been able to start to strip the car and start to get the important items sorted. To get it ready for registration it requires brakes, exhaust, wipers that work, a windscreen chip fixed and any other items that I discover on the way. Once it is legally on the road then I can start to sort the cosmetic side of things.
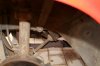
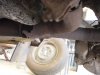
The car has been a country car as indicated by the bent nails holding the front shocks on!
I wonder what other little gems I'll find along the way.
 

Attachments

  • IMG_3523 (Medium).JPG
    IMG_3523 (Medium).JPG
    253.5 KB · Views: 76
  • IMG_3524 (Medium).JPG
    IMG_3524 (Medium).JPG
    167.6 KB · Views: 63
  • IMG_3525 (Medium).JPG
    IMG_3525 (Medium).JPG
    242.7 KB · Views: 68
  • IMG_3526 (Medium).JPG
    IMG_3526 (Medium).JPG
    136.3 KB · Views: 70
A little more done on the project, now I can see why the right rear drop glass was at the bottom of the door and wouldn't move. The problem I need advice on is how to remove the large screws holding the frame to to door shell.? It is obvious that someone has removed them at some stage over the last 40 years and not used the correct size driver. I want to save the glass as it has the British Leyland logo and the New Zealand Standards marks and is the original glass. I was told it had a exhaust leak at the front, can't imagine why when the pipe is like an open home for mice.
 

Attachments

  • DSC00742 (Medium).JPG
    DSC00742 (Medium).JPG
    155.3 KB · Views: 56
  • DSC00743 (Medium).JPG
    DSC00743 (Medium).JPG
    158 KB · Views: 55
  • DSC00746 (Medium).JPG
    DSC00746 (Medium).JPG
    167 KB · Views: 53
I now have the brake servo unit and front calipers off and ready to go to the specialist for reconditioning, still have to remove the rear calipers. Found that both front hoses had splits through to the inner tube so I'm pleased I had decided that all the hoses will be replaced. I have no idea how long since the car was in regular use, but after seeing the front brake pads it was taken off the road just in time, one is down to 1mm of material left.
 

Attachments

  • DSC00750 (Medium).JPG
    DSC00750 (Medium).JPG
    291.3 KB · Views: 23
At last the rear door window is back in the car and working correctly. Time to look at the left front window, which is firmly in the up position and the regulator is totally past it's use by date. I have a new regulator from Winns, but I wonder if anyone can offer advice as to how to lower the glass to access the screws along the waist line holding the rubber seal and frame. they have to be removed before the frame can be lifted out to install the new regulator.
 
Hi the NZWOODIE. Happy New Year.
Insofar as removing those big screws along the inner door waist line . When I did mine [long time ago], pretty sure the glass once lowered , didn't leave much wriggle room to get a big phillips in there.
Could try leaving overnight with a CRC coating and sacrifice the screw heads with an impact driver.
Gerald
 
Hi guys,
There is a glass stop bracket which is held in place with a Phillips screw, will give a bit more room to remove those door frame screws if you remove it.
Clive.
 
Happy new year to everyone. My problem is that the glass is fully up and the regulator is no longer working so I can't lower the glass to gain access to the screws. I might have to try and hacksaw the arms of the regulator to free the glass.
 
Generally speaking, I think that a knackered regulator would result in the glass dropping to the bottom of its travel - as with the other one that you sorted.
Have you already checked that the 'ingenious' previous owner hasn't inserted something (bent nail maybe!) into the mech to just jam it in the closed position?
If not, I reckon the hacksaw is probably the best bet as you intend to fit a new mech anyway.
Best of luck - and Happy New Year of course.
John
 
Happy new year to you John. I have managed to get the window down, but not far enough to get to those pesky screws. I tapped the sliding part of the regulator and it moved the glass. This front regulator is in one piece but the shaft that the handle goes onto just revolves and has lost all contact with the teeth on the quadrant. No nails stuck in it anywhere thank goodness. I'll try and look at it again tomorrow, was too hot today at 41ºc in the shade to be outside.
 
"was too hot today at 41ºc in the shade to be outside."
Oh tough - the sun was shining here all day - reached 5ºc at times:(.
 
I finally removed the left front window and found that the glass channel is rusted badly like the right rear one was, so I'm about to order the two front and the left rear. As postage from the UK is so expensive I decided I'd check and see what else I require to make a decent order. I had been told that the speedo didn't work so I wanted to check the right angle drive on the transmission. After removing the cover from the tunnel I was surprised to find there is no angle drive or cable in the car. I searched online for a drive Rover part number 277741 and found that one of the large parts suppliers are saying it is NLA but to use part number 120694 which seems to be for a Triumph TR4A, TR6 and MGB. I seem to recall seeing a comment from Harveyp6 that these are not interchangeable. Can someone confirm if this unit can be used or not?
Thanks Bruce
 
AFAIK all Triumph and MG (and Jag) use a different angle drive with a smaller fitting for the cable, so not useable on the P6. ISTR I saw Wins International listing both new and used for sale. It's a common failure so that's probably why you don't have one fitted. I had about a dozen left over from breaking p6's back in the day and I've sold the lot.
 
A progress report. The left front window is finally back in and working correctly. Not an easy job getting the old regulator out and I ended up having to cut the arms to remove the unit from the frame. After fitting the new lift channel came the problem of getting the assembly back into the frame, eventually with help of a good friend we were able to get in back into the frame. After a lot of effort I managed to get it back into the door and all bolted in place. Really pleased with the result. Now I need to concentrate on the rear calipers, we have got the right one off but so far have not been able to undo the large nut on the left one. Strange that the spanner that fitted the right side is too large for the left, what is the correct size? Looks like Saturday is going to be 40ºc so it will be a good time to get under the car and try and complete the removal. I would like to have the car legal for the road by Easter, but at the rate I'm able to work on it that maybe a bit optimistic.
 
Strange that the spanner that fitted the right side is too large for the left, what is the correct size?

Either the large one is the early type and the small one the later type, or they're both late, but the small one is missing the outer cage that should be fitted to it. The small ones with the cage are 15/16"AF, the larger ones are 1&1/16" or 1&1/8". I can't remember offhand.
 
the later NZd cars either came without the cage being fitted or they have been removed in nearly every brake assembly since. My '71 NZ car had the cage but none I have owned since did. Also none of the brakes I bought at the flynn Auction had them either and there were quite a few.
 
Went out and bought a selection of large spanners but still no luck. the 15/16 is small and 1" is loose. The cage is still on both the nut we have removed and the one still on the car. As the right side one came undone easily I beginning to suspect the left one is sized in the caliper. My helper will be here again on Sunday to continue the battle, so tomorrow I'll give it a spray of RP7 or CRC. What purpose does the cage on the nut have? As I have said before this car was based in a Victorian country town, to add to the front shocks being held on by bent nails the left drive shaft had the locktabs, but they were flat against the disk!
 
Have you tried a 24mm spanner?
I seem to remember a few with slightly deformed cages where the hex wasn't equal across different flats so spanners would only fit onto one position. Perhaps that's why it seems different?
The quickest way I found, albeit destructive was to pry back the cage on two of the flats and get the correct spanner onto the actual nut. A chunky steel tube etc over the spanner for leverage will make short work of undoing it.
I've never thought they were that functional, but there must be a reason, Harvey? I guess the outer cage is just the easiest way to secure the inner spring when manufacturing them?
By the way ATF makes for an effective penetrating fluid if you ever have nothing else around at the time ;)
Jim
 
Back
Top