Getting back on the road

For Demetris as well a Sdibbers...

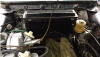
I have a plan for Lucky.. Since he's ultimately destined for Thailand, AIr Con is going to be essential. But I don't like the factory NADA set up - too complex for it's own good in my view. So I've acquired the extra NADA air con outlet to fit above the radio and graft onto the existing fresh air system. Then I've had an inspiration. Our pickup here in Thailand has a seperate and extremely powerful blower fan. I reckon a similar one would fit in the space between the heater box and the right side steering box once the wiper motor etc is re-located to the left side. That would allow me to dispense completely with the blower fan in the standard heater box. I reckon I can either source or have made an A/C evaporator to fit in that space. Then it is simply a matter of blanking off the new evaporator space from the air intake and making new ducts from the air intake to the fan and back to the new evaporator space.

This will allow all the existing heater controls to work as present. And I've got a temperature knob and thermostat from a Delanair system to control the cooling in the new evaporator box - that'll live on the main dash rail. So I will be able to have cooled air, ambient air or heated air as appropriate from all of the air vents.

Regrettably, it'll be a couple of years before I get further than words, but I promise to show you photo's when it's done.

Chris
 
Thanks Chris,

I have been already thinking about this :mrgreen: : http://www.classicroverforum.net/viewtopic.php?f=7&t=20607 at the middle of the page.
It is more or less as you describe it. The condenser would take the place of the fan, and the the fan would move to the right of the car. The architecture of the heater box will remain the same. The air will be drawn in from the top, move to the front and right to bypass the condenser, backwards into the fan, the fan will push the air to the left through the condenser, and up again towards the left to the mixing chambers and flaps. In this way the natural ventilation that bypasses the heater box will also be retained with the fan off, but with the fan on you can have cooled air also in the face vents. I was also thinking on taping to these vents in the dashboard to create a central one, as more is better with the A/C systems. On LHD cars this should be easier because there is no steering box and shaft in the way, just the steering relay. I am looking for a spare heater box to start playing with, but also for me this is not first priority.
 
Sounds a very wise direction. I'm with you Chris, the Delenaire unit is really ugly. I pulled it on mine this summer for that reason. Having a system as you've described or a evaporator somehow combined into the heater itself would be a much nicer option. Its a shock to see how little space there is for modifications on our cars behind the dash or around the heater box.
 
Went to Croissant and Carsthis morning in Morristown NJ. Nice show, lots of variety, including an awesome 1907 Cadillac single cylinder car. When I got back I thought I'd look into why Beryl always feels rather wallowy. I pulled the wheels to look at the Koni adjustable shocks that the PO had fitted. Whoever had fitted them had left the right hand one on the softest setting and the one on the left on the hardest setting. No wonder she was a handful at speed! I set them both at about 2/3 hard. Fitted them back and went for a test drive. Huge improvement in handling! I shouldn't be surprised, when I first got the car running I found the same mechanic had only put the split pins through the outer holes of the lower mounts. Ugh, terrible work!
 
The O ring for the oilway on the headgasket had failed so I pullled the head this weekend. While the head is out of the way I will pull the heater box and replace the foam gaskets. I reckon the gasket that the heater sits on has failed as well as I get a fair amount of fumes from the engine bay making its way into the cabin. That, and a strong draft when cruising from the cubby hole above the radio in the console. After reading the workshop manual it looks more involved pulling the heater than the head!

Also found a nice crack in the exhaust manifold. I might try a light bit of welding to fix that before refitting the head, I'll be back on the road before the new years hopefully. Depends how long I get in the garage this Xmas, I wouldn't mind seeing the Mrs too!
 
I've pulled the heater at last. I was pleased to see the bulkhead was nice and solid under there after I stripped the old degraded sound insulation. Well, the heater now has new foam gaskets on the flaps. I cleaned up and painted the housing and made a new gasket from closed cell foam for the heater matrix. I used that same foam for the main flap at the top of the heater (closed cell won't absorb water like the lighter weight open celled latex foam I used on the flaps internal flaps (Same as the original material as far as I can tell).

Unsurprisingly the foam gaskets between the heater and the bulkhead had turned to dust, with the standoffs holding the heater about 20mm off the bulkhead no wonder I could smell the engine and got so much heat and noise from the engine bay in there. I'm looking forward to controllable ventilation and less noise going forward. I ordered some 5/8" dynamat underhead insulation to fit to the bulkhead area before I replace the heater. Not only will it replace the old sound insulation that was just dust and vinyl membrane I think it will help reduce heat bleed through too.
 
Hi sdibbers
You will notice a big improvement to heater now that the flaps have been resealed.
Have done the same on all the p6s ive had.
Just a thought,have you ever had the heater matrix looked at? you will be surprised how blocked they become.Ive got a friendly radiator man who takes them apart to rod out tubes.
Had to turn heater down as can be too hot after!
Good luck
clive
 
I must admit I haven't had the matrix looked at, although I did flush it and it was very free flowing so fingers crossed I'm ok. I'm looking forward to having it cooler in the summer too with the heater sealed against the bulkhead keeping the engine bay heat out of the cabin.
 
You may be ok just depends on how well cooling system has been maintained.
Normal flushing only seems to clean header tank area due to inlet and outlet in same header tank, i dont want to put you off but all the u/k matrixes ive seen had blocked tubes once taken apart.
clive :)
 
Well, after a while day of fanning around with shims a lightly used camshaft and NOS cam bearing shells the valves are all in spec, possibly for the first time in decades! I also retimed the valve timing back to specs. The heater and bulk head sound proofing are back in place and the crack in the exhaust manifold welded up after the brazing repair failed within 500 miles.

So, I turned the key and she fired up beautifully. No tappet noise, smoother than before even, and the sound proofing made her feel a good few years younger. That's when the better half came out and said 'is there meant to be a puddle of oil under the engine. Bollocks! The engine had only run a couple of minutes. I looked around and the oil line to the top tensioner had failed at one end under the crimp. Oh well, I'll call Mark Gray on Monday and hope he has a good one in stock. Shame as she sounds so much better than before. I didn't even get to see if the heater was working better. Pics to follow
 
unstable load said:
sdibbers said:
That's when the better half came out and said 'is there meant to be a puddle of oil under the engine.
You're lucky....mine would ask that even if it was bone dry, just to watch my reaction... :shock: :? :mrgreen:

I'll hide this post from her in case 'er indoors gets ideas :)
 
sdibbers wrote,...
I must admit I haven't had the matrix looked at, although I did flush it and it was very free flowing so fingers crossed I'm ok.

As long as the fins have not turned to turned to dust or crumble as soon as you touch them, you should be ok.

Ron.
 
Hey Ron

Yes, the fins looked in very good condition, as was the interior of the heater. I should've taken photos but I got caught up in the work. I can tell if it's working until I get a new oil line. I might just see if a local place can make up one locally for safety. This is the second one to fail on me.
 
sdibbers said:
... a new oil line. I might just see if a local place can make up one locally for safety. This is the second one to fail on me.

This is what i did, i had a new one made in a hydraulics shop. 40 year old rubber hose is just a 40 year old rubber hose.
 
sdibbers said:
I'm looking forward to controllable ventilation ...

Also have a look under your dash for these slits in the ducts that feed the face vents. Originaly they were taped up, but don't expect the original tape to be still up to its task.

DSC00287.jpg
 
Demetris said:
sdibbers said:
I'm looking forward to controllable ventilation ...

Also have a look under your dash for these slits in the ducts that feed the face vents. Originaly they were taped up, but don't expect the original tape to be still up to its task.

DSC00287.jpg

Demetrius, good point! That hadn't occurred to me. I'll check those up later this week, I still need to reconnect the levers to the heater unit. I have to admit to just shutting the garage door yesterday after the Exxon Valdez moment.

Here's the photos I promised, sorry I didn't record all of the fun, but here's the gist of things I guess.

As I pulled the heater unit you could see how little of the original foam gasket had turned to dust. No wonder I couldn't control the heat or get rid of the engine smells in the cabin:


The Bulkhead looked nice and clean after I scraped off the worst of the foam. I was nervous in case I discovered rust under the heater. A quick cleanup and a lick of paint was added after this photo was taken.


The heater was pretty good too, once the foam was removed there wasn't much rust inside or out.


Matthew (my step son) and I made a brown paper mask to workout how we were going to cut up the Dynamat under hood insulation.


And here's the heater back in place, you can just about see the silver Dynamat material in the background. Since I took this photo I've added more Dynamat to the vertical wall below the heater.
 

Attachments

  • Crumbly.PNG
    Crumbly.PNG
    1.8 MB · Views: 304
  • Clean bulkhead.PNG
    Clean bulkhead.PNG
    1.9 MB · Views: 301
  • Not too bad.PNG
    Not too bad.PNG
    1 MB · Views: 304
  • insulation mask.PNG
    insulation mask.PNG
    1.7 MB · Views: 304
  • all back in.PNG
    all back in.PNG
    1.5 MB · Views: 305
PS, I did have a photo with the rest of the insulation in place. Next thing will be to test it out when the engine is fit again.
 

Attachments

  • finished job.PNG
    finished job.PNG
    1.3 MB · Views: 290
Back
Top