JVY MOT 2011

JVY

Active Member
I am gutted :cry: Having put my P6 in for it's MOT on Saturday, the news is grim. Here is exactly what the Refusal & Advisory forms said:-


VT30 Refusal of an MOT Test Certificate

001 Windscreen has damage to the swept area in excess of a 40mm circle outside zone ‘A’ [8.3.1d]

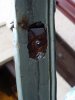
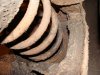
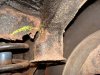
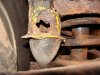
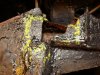
002 Offside rear Coil spring mounting corroded and seriously weakened [2.4.C.3c]

003 Nearside rear (Above Bump Stop) Coil spring mounting corroded and seriously weakened [2.4.C.3c]

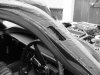
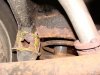
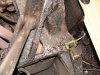
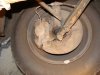
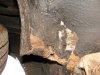
004 Nearside front (Affects Front Lower Arm Inner) Body or chassis has excessive corrosion, seriously affecting its strength within 30cm of the body mountings [6.1.3]


VT32 Advisory Notice

005 Front brakes only just met the front brake imbalance requirements. It would appear that the braking system requires adjustment or repair. [3.7.A.2d]

006 Headlamp main beam warning lamp not working

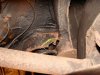
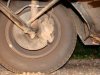
007 Both N/S/F & O/S/F Floor Holed & Corroded Where It Meets The Lower Inner Wheel Arch

008 O/S/R Bump Stop Missing
 
Oh dear :(

You may have to take welding lessons

That's all fixable, but the welding may be quite involved.

What are you going to do?

Richard
 
Have you had a look round to see how bad it actually is? maybe post some pics here for advice?

Rich.
 
Well I made a start on the windcreen yesterday as I have a replacement. However, this is the easy bit. The garage said they would phone today to give me a quote for the welding work. I don't expec this to be cheap! My initial thoughts are to have a go myself. Though I do have a MIG lying in the garage, I have never done any welding.

Will try to get some pic's underneath ASAP - I am stuck at work today.

Yesterday, when I took out the old windscreen, I found some interesing holes in the front pillers. They had both been covered with filler and I am not sure if they should be there or if was some previous repair? They are both in the same position on NS & OS and look to be exactly the same size? The NS one has plate behind it with the remains of rivet that was holding the chrome side strip on.
 

Attachments

  • A piller hole NS.jpg
    A piller hole NS.jpg
    50.4 KB · Views: 1,962
  • A piller hole OS.jpg
    A piller hole OS.jpg
    67.3 KB · Views: 1,962
Sorry to hear the news JVY.

As has been said, let's see some pics, although corrosion around suspension points is always a gotcha.

Brakes will probably be caliper pistons, or even a partially restricted flexi hose. Is there a noticeble swerve to once side on hard braking? My car did this for a while and still passed an MOT.

Windscreen scratches can be polished out, headlamp beam warning will be a bulb so easy fix there.

Main concern will be the rear spring mounts I guess, although the 004 lower arm mount sounds interesting. The chassis is pretty solid there so must be a fair bit of corrosion. The front splash panel corrosion is a favourite place to go. Depends how long it's been like that and how far it has spread.

Dave
 
I've repaired the pillar areas on several P6s. Water runs down the inside of the stainless trim & eventually corrodes the metal round the rivet hole.

Often the unseen cause of water in the footwells as it comes down the inside of the A-post & out into the floor usually through some perforations / rust holes in the bottom of the inner sill. Such water ingress is an oft - debated topic. I'm in a minority when I suggest that the window rubbers don't do a lot - many people replace them to try & cure a leak - but I don't see how the geometry would let water in, almost regardless of the seal's condition.

Get out your welder & have a go! :D
 
Don't forget the Advisories are just that, advisories, you don't need to sort them right away, so it's basically just the windscreen, the two spring seats and the suspension mount that need doing now.

If I were you I would break out that welder and do some practice, then get stuck in. It's so much cheaper to do this sort of work yourself that it's a no-brainer, plus you can sort the advisory welding, and those screen pillars too.

Following incidents on at least one recent post, make sure you've got a fire extinguisher to hand when welding, you can't be too carefull.

As suggested post up some pics of the affected area and we can offer repair advise.

Probably the best source of mig welding info http://www.mig-welding.co.uk/
 
Steve,

That is not much really.

Remember that most MOT welding is pants and not worth the grief because the dont cut the rust out.

I have some new headlamps in the garage.

The brakes will be one or more of the pistons starting to sieze. basic strip down and clean up will fix it.

I will come have a look at the bits needing done, having welded loads of P6 I doubt your's will be to scarey.

Colin
 
Thanks for all the help and advice offered. It might be enough to keep me off the drink every time I think about it.

Would certainly appreciate you taking a look Colin. I will see if I can jack up the car this evening and get some pictures.

In terms of the brakes advisory, I was bit surprised - apart from a slight judder when braking at speed that seems to come from the NS, the brakes seem to be working well (certainly don't feel any pulling and they pull the car up well). Hopefully, cleaning up the calipers/pistons and bleeding them will do the trick. In the 3 years I've had the car, I have been a bit naughty and never replaced the brake fluid.

The main beam switch is just an advisory that the headlamp flasher switch is knackered. It's always been like that, just never been picked up on at MOT before. It switched the main beam on OK when you push it into the up position but pulling back to flash the lights doesn't work (assume it's the common fault that the contacts have burnt out because on "flash mode" I don't think it switches the lights through a relay but puts the high current through the switch?).

From what you have all said it's starting to sound a bit less scary.

Need to take a look at that MIG and find out what model it is and see what parts I might need to get it going. Apart from a welding mask and gauntlets what other basic kit do I need to start welding (clamps, CO2?)? Also, what type of steel will I need and where am I likely to be able to source some locally?
 
In terms of the welder, you may find it is either a No-Gas type, or has a No-Gas option, this is probably the easiest way to get started as you won't need any gas bottles, just a roll of no-gas wire and you're off. Obviously you'll need mask and gauntlets, you're standard fold down mask will be fine and probably £10 or less, don't skimp down to a hand held one, you already need at least 2 free hands to work !! Fancy auto-darkening ones are nice (I love mine) but for now it's £50 that could be better spent on the car.

Just checked on http://www.toolstation.com, mask £9.84, gauntlets £2.82 And a small roll of no-gas wire is £11.98 at machine mart, so if the welder will do it, £25 and your set.

You may also need appropriate tips for the welding torch, you need the correct size to match the wire, but they're only a few quid for a pack.

Obviously if you search around on Ebay you'll probably beat all these prices, but at least you know what sort of money you're looking at.

In terms of sourcing steel, most car body panel stockists will sell you sheets of steel, often in various shapes and guages, I generally use 18 guage for this sort of thing, thick enough to be easy to weld and last a long time, not too thick to bend and cut easily. The cheapest supplier will be a local steel stockholder but you'll probably need to buy an 8'x4' sheet, which is how I buy it, but it's BIG and certainly waaaay more than you need. Things like old computer cases / washing machines etc. are great for practicing on, just grind the paint off first.

Oh, and of course you need the P6 owners most important tool..... Angle grinder and cutting discs ! :LOL:
 
Hi Steve
A few years ago i had a quote £250 to weld a repair section into the boot ( not on a p6 ) I bought a mig with the £250 and got a beaten up wing from the scrap yard , cut it into strips and welded them together until i got the hang of it . playing with settings , wire speed ect . The weldings the easy bit ( assuming access is o.k ) the preparation is the time consuming and most important bit . The mig has since payed for it's self over and over . If you have a "machine mart" close they are great for consumables , wire , gas , tips ect . Have a bash , all you've discribed is out of site when done . You'll only get better at it .
stina
 
i got an autodark helmet on ebay for £23... I know i'm a little inept in terms of skill and couldnt get on with gasless etc, but at that money it's so much a better option than a normal mask!

screwfix erbauer cutting disks are brilliant value ( 1mm ones are best) - was put onto that by our metal sculture friend. Work out about 60p each iirc.

Rich.
 
stina - YES !!

But you made a great point, the majority of areas that need welding on a P6 are unseen once all the panels are fitted, this mean your welds just need to be strong, not pretty (although the two do generally go hand in hand), as Colin suggested earlier, cutting all the old rot out first is vital to a long term repair, remember all the P's

Proper Preperation Prevents P*ss Poor Performance !

It can be scarey cutting big chunks of what often appears to be sound metal out of a car, but if you want the repairs to last you really need to get back to good sound steel, with as little surface rust as possible.
 
Sorry to read about this Steve! Having seen your car, it's hard to believe that it needed as much as this. However, my car threw up a good few surprises at MOT time, after I decided that I'd get a tiny little hole cut out of the the real wheel arch, and a new piece welded in properly as I wanted a quality repair. However, when this was cut out, we discovered that there was not much sign of the inner D post, and that the space had been filled with coal, yes COAL! :shock: Anyway, the garage made a proper job as per my request, and that's that job attended to for a very long time, hopefully. As regards the missing bumpstop, one of mine was missing, but it got through an MOT, and we fitted a new one after getting it back from the MOT station. JVY will be back on the road in no time! Hope you get it all sorted soon! :D
 
Thank you all once again for the kind words and support.

I managed to get the car jacked up this evening and got some pictures, Luckily the MOT-man seems to have clearly marked the offending bits with yellow chalk. It doesn't seem too scary now as the areas he has marked off are quite small (not allowing for the amount of metal I might have to cut out though!).

Just occured to me that my angle grinder is knack'd & will have to by a new one plus somes cutting discs.

I took some pic's of the welder and was pleasantly surprised that the innard gubbins seemed to be OK. Though, I will need to see if I can download a manual to see what current it can output. The MIG came from someone who said he used it for repairing sills. So, hopefully it is up to the job and works.

Anyway, here are some pic;s of what I found. Hope that the comments explain things OK.

One thing that worries me is getting the car safely jacked up high enough to get in at the top of the rear spings - might need to get a higher lift jack. Also, will it be safe to weld in this area with the petrol tank still in place :?: At least access to the front area near the lower arm is quite good as is the front floor areas (though these are advisories I am thinking I should just sort this out and it might be an easier thing to tackly first).

Stina's suggestion of getting some metal from a scrapyard sounds good but my Missus wasn't too chuffed when I told her that Richard on the forum said I was to chop up our washing machine :D
 

Attachments

  • OS coil spring 1.jpg
    OS coil spring 1.jpg
    64.7 KB · Views: 1,147
  • OS coil spring 2.jpg
    OS coil spring 2.jpg
    71.9 KB · Views: 1,147
  • OS coil spring 3.jpg
    OS coil spring 3.jpg
    63.5 KB · Views: 1,147
  • OS coil spring 4.jpg
    OS coil spring 4.jpg
    66.5 KB · Views: 1,147
  • NS bump stop 1.jpg
    NS bump stop 1.jpg
    60.3 KB · Views: 1,147
and some more pic's of underside.
 

Attachments

  • NS bump stop 2.jpg
    NS bump stop 2.jpg
    61.8 KB · Views: 1,143
  • NS lower arm 2.jpg
    NS lower arm 2.jpg
    72.4 KB · Views: 1,144
  • NS lower arm 3.jpg
    NS lower arm 3.jpg
    75.3 KB · Views: 1,144
  • NS brakes 1.jpg
    NS brakes 1.jpg
    51.7 KB · Views: 1,145
  • OS brakes 1.jpg
    OS brakes 1.jpg
    58 KB · Views: 1,143
pics of the MIG welder
 

Attachments

  • MIG 1.jpg
    MIG 1.jpg
    53.5 KB · Views: 1,145
  • MIG 3.jpg
    MIG 3.jpg
    53.7 KB · Views: 1,145
  • MIG 4.jpg
    MIG 4.jpg
    79.5 KB · Views: 1,144
  • MIG 5.jpg
    MIG 5.jpg
    41.8 KB · Views: 1,144
  • MIG 7.jpg
    MIG 7.jpg
    53.3 KB · Views: 1,145
and more pic's of the MIG.
 

Attachments

  • MIG 9.jpg
    MIG 9.jpg
    57.1 KB · Views: 1,143
  • MIG 11.jpg
    MIG 11.jpg
    43.9 KB · Views: 1,143
  • gear box selector rod.jpg
    gear box selector rod.jpg
    71.1 KB · Views: 1,144
nearly forgot, pic's of the front floor OS and NS that I got advisories on.
 

Attachments

  • NS footwel.jpg
    NS footwel.jpg
    55.1 KB · Views: 1,143
  • OS front floor.jpg
    OS front floor.jpg
    63.5 KB · Views: 1,143
Back
Top