My mean green hornet

Thanks Martin, unique is definitely what I'm after :)
Today I got a few things done, not enough considering its my only day off..
I had planned to finish the gearbox mounting, but some tooling had other ideas.

To get a smooth, single handed manual bend on the 3mm wall 25mm diameter tubing, I heated the tube with MAPP gas for a short time.
This then bent really nicely


Upon notching the ends, one of my hole saws broke and halted progress. I'll have to finish it off next chance I get

Jim
 
Liking the wheels !!!!!!!!! Are they Torque Thrust 2 ?
I was going to go with Torque Thrust D but in the end went Minilite. Those wheels of yours will suit the car.
 
Basically Torq Thrust 2 yup, now made by Rev as American Racing lost the rights to manufacture them I believe..
Torq thrust D are really nice too!
These have anthracite coloured spokes and centres although they are lighter than I thought they'd be.
Not a problem as they look so good in the flesh. Very happy!
Now to make everything fit..
Jim
 
Starting getting down to business changing the panel profiles for functional and aesthetic reasons. Functionally I'll be creating more space for the wheel clearance and the formation of new rear arches. Aesthetically I wanted to keep one central swage line to be sensitive to the original design.
Luckily I have a scrap door to practice on first. The lower cut was from last year when I was playing around with the idea, it's directly on the factory swage line. I have decided however to raise the swage as it didn't look right with the panel pulled out so low. At the moment I'm fairly happy with it, but am going to weld in a filler piece today and fill, rub down and prime just to get a clearer image.


Last edited:
Today I had a mostly free day to work on the car.
First thing I needed to do was drill two laser cut 3mm thick 70mm diameter steel discs I bought. These were for shimming the engine upwards slightly to gain more clearance for the remote oil filter and hydroboost. I lifted the engine up and just slipped them under the mounting rubbers.
This was the main issue holding up finishing other aspects such as final gearbox mounting, diff etc. No photos of this as I forgot to take any, but now happy with how everything sat I turned attention back to the ZF crossmember.
I decided to yet again change the design slightly, moving the crossmember upwards of the volvo box rear mounting bolt holes rather than below. This means I have as much clearance for dual exhausts as physically possible.
I haven't had time to either make or buy a tube notcher like I wanted to, so resorted to very careful use of a holesaw on the 3mm wall seamless tube. After a little clean up with a flap disc both ends were ready to weld. I had bought weld on polybush ends a while back for this purpose, complete with grease nipples :)

The crossmember tacked together and assembled to check fitment and measure for mounting tabs.


And here it is in place


Next I need to seam weld the ends on fully, weld the laser cut mounting tabs into the tunnel, and weld the bolting plate to the tubing.
Then I will finally be done with the gearbox mounting!
Jag diff mounting is all ready to go, I just need to spend a day welding it together and bolt it up.

Jim
 
More door panel progress, the scrap practice door is one piece once again. This is all to see if visually this will work in the metal, hence tomorrow I'll lay a spread of filler and block it to a reasonable level to really see what it could look like. I didn't get this quite right and of course plan to only make one cut and one filler piece per panel.
You may or may not have noticed the door handle position has also changed


Jim
 
Martin, if you look a few posts up at the photos before I welded the fill piece in, the door shows more curve. This is really how I envisage it. Trouble with this panel is I'd already cut it too low last year and had to try and deal with it from there with my lack of panel tooling and practice. There will only be one swage line, the higher one, below that slightly curving down and in towards the sill in one sweeping shape.
I had a 12 hour day instead of what should have been a 6 today so no filler work will be getting done tonight, but I'll post the results as soon as I do, showing a closer representation of my idea.
Plan of action is to hopefully utilise a cnc brake belonging to a friend of a friend to perfectly form the filler sections, which can then either be bonded or welded in and keep the lines and profiles all equal.
If that's not a goer I'll get hold of a bead roller and English wheel and make them manually.
Northern Soul's work is excellent but I want to do something a lot more subtle, most importantly nipping back in at the sill and creating a sleeker muscle look
Jim
 
Last edited:
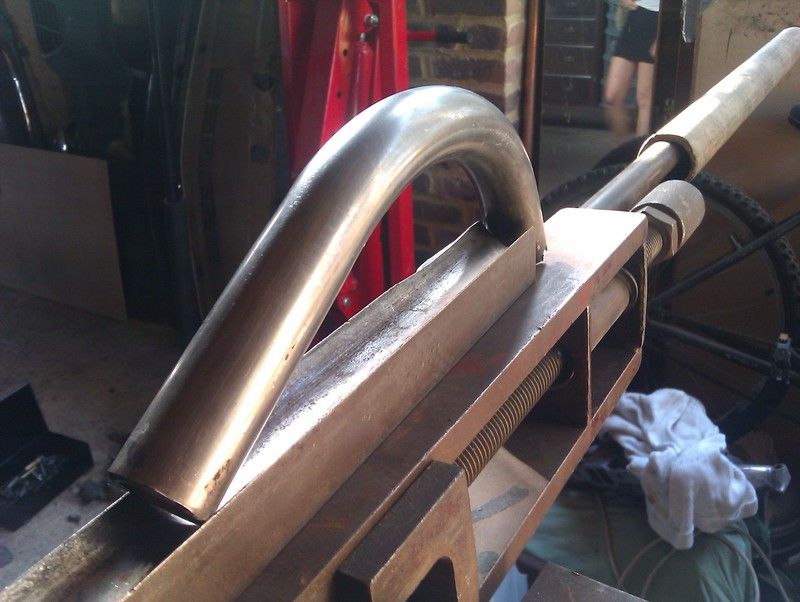
More new parts arrived this week, mostly to do with the hydroboost.

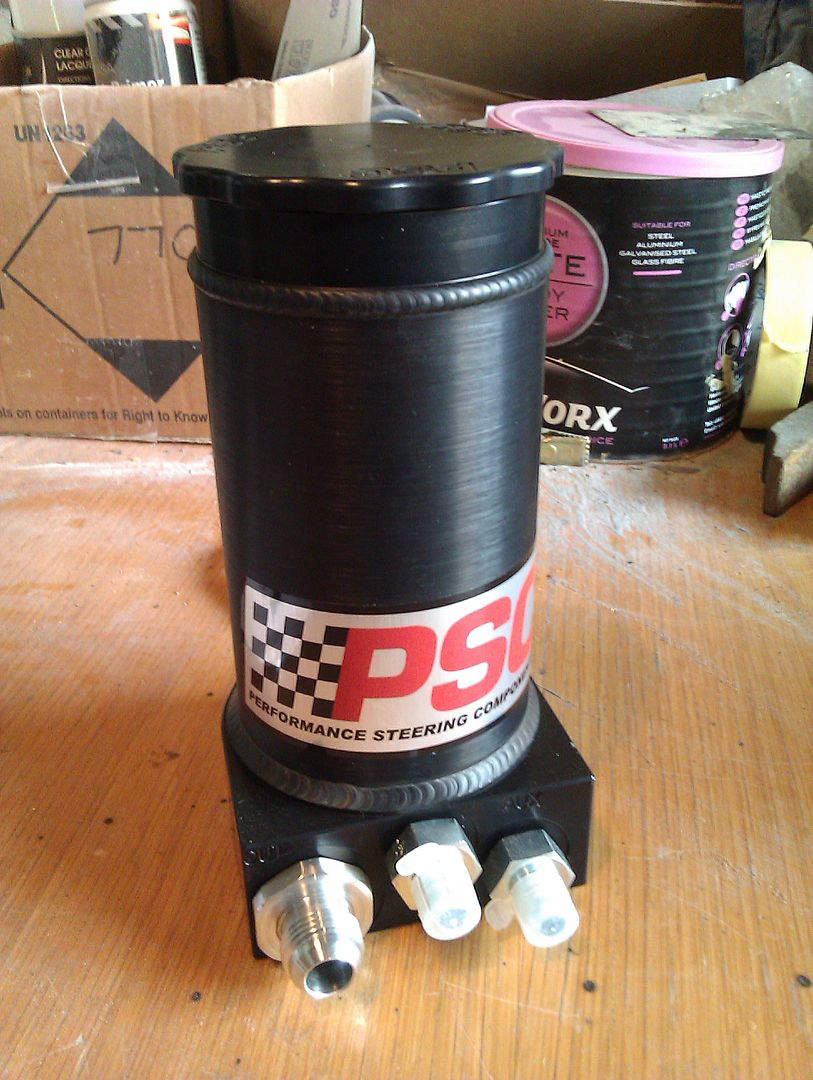
Vented Billet aluminium power steering reservoir with AN fittings


Aluminium 1 1/8" bore dual master cylinder with built in proportioning valve


It also has a port for brake light switch :)

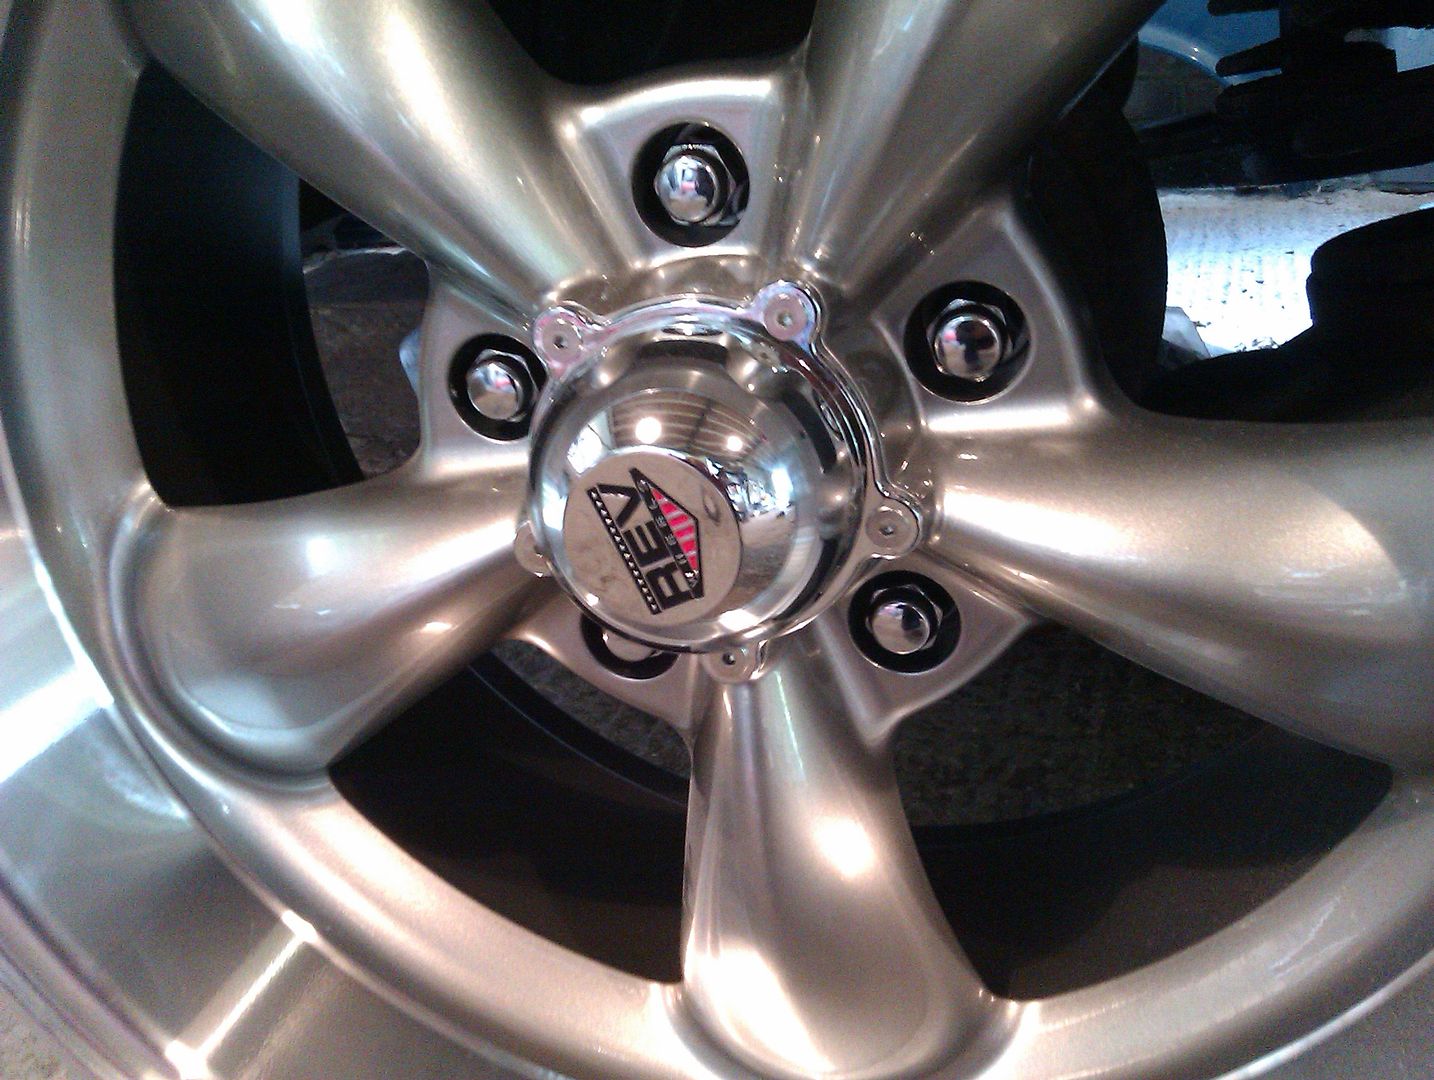
Chrome plated steel tapered ET wheel nuts. These have the 60 degree taper plus an extended sleeve, the best option for locating and securing these type of wheels.


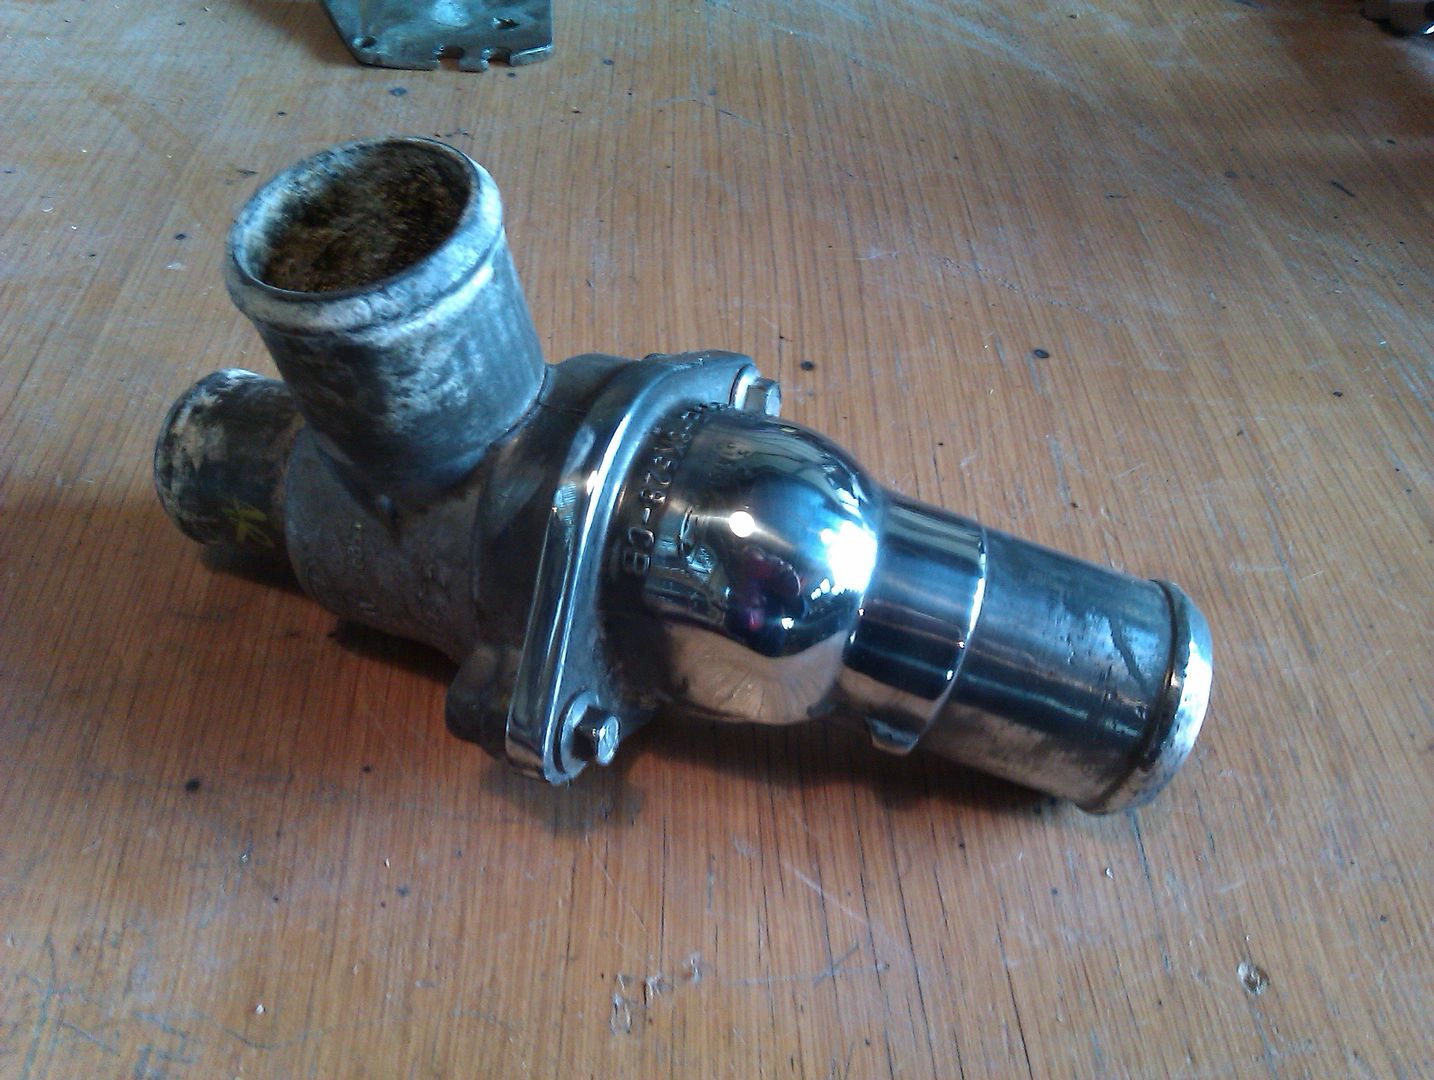
I bought a Ford/Jag remote thermostat housing a while back, and thought i'd give it a quick test polish recently. I'm using this as the 4.6 water pump works in reverse.


But it's not all fun and games. Whilst removing underseal in the tunnel to ready it for welding new gearbox mounts, I couldn't help noticing a previous owner's poor repair, more and more until I could stand it no longer and got the cutting disc out!
This is definitely where the water ingress was occuring early in my ownership. Time to sort it out properly. I will likely cut more away as another repair to the floor pan was just lap welded with a few inches overlap over the original steel and seam sealed from inside. It's not awful but it's not good either. Did I mention fibreglass too?


I've been promised a full large Fairmax gas bottle so have been waiting on that before I fully weld the diff or gearbox mountings up. I might as well do it with a proper regulator and better gas flow!

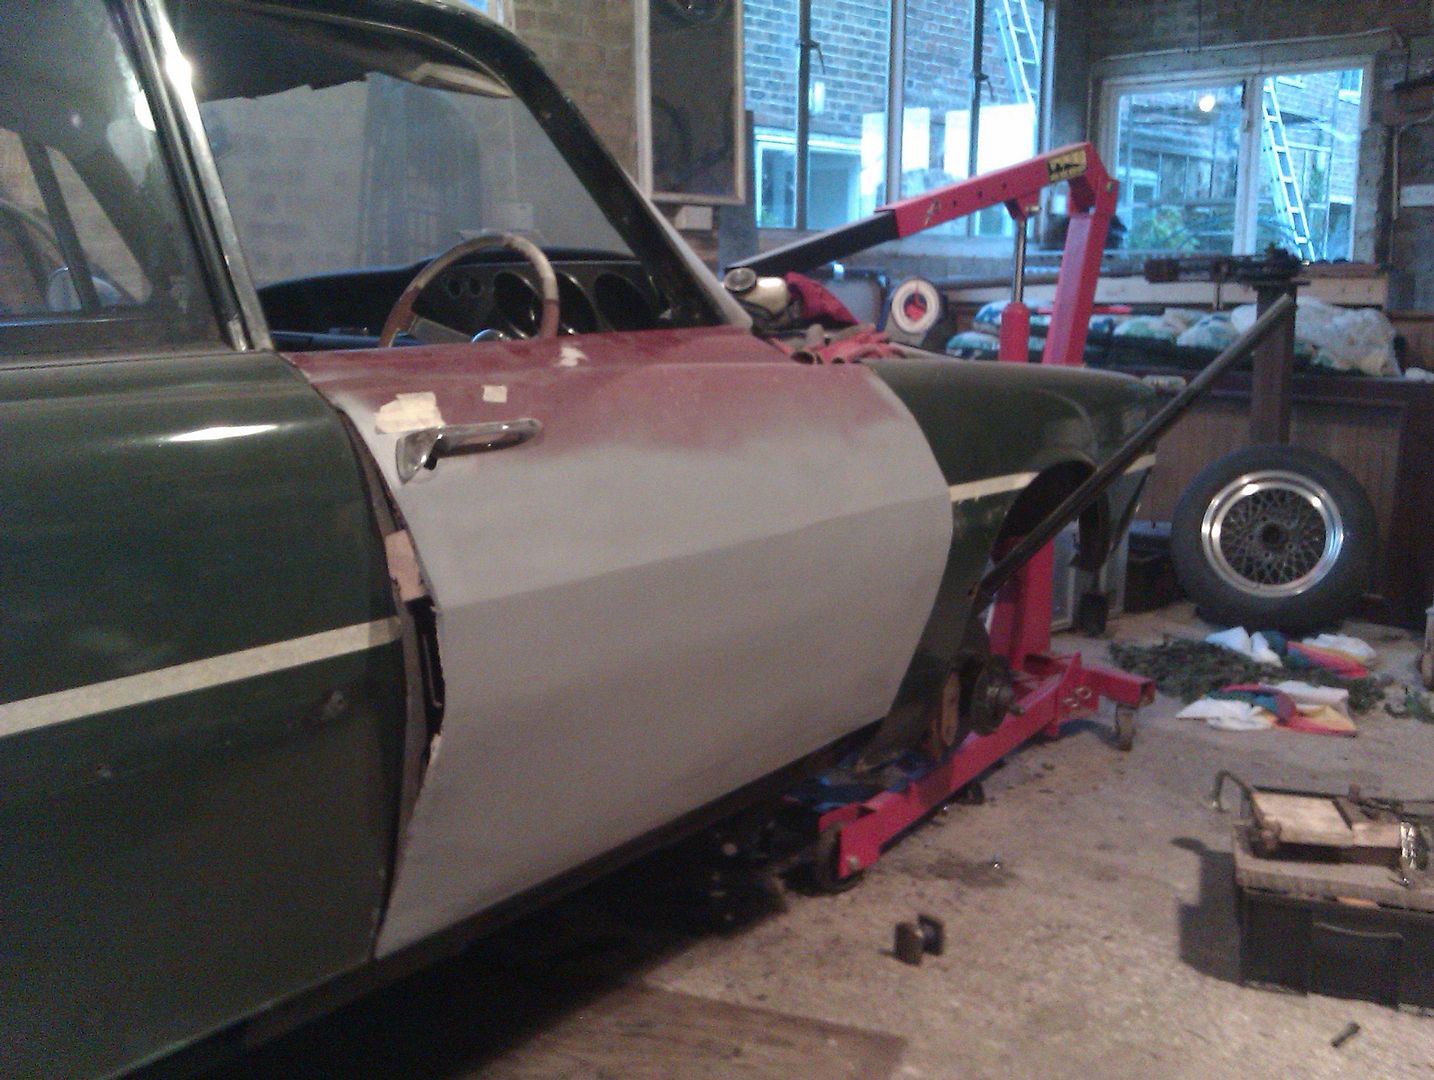
Oh and I did do a very quick bit of filler work to the modified door to get a better impression of the shapes. I'm going to find another couple of scrap doors to practice on before I commit to the final panels. I'm only showing this as a learning curve/work in progress, please don't judge the project on this, the final panels I'll make sure are perfect!


My crazy summer of work has all but ended now so I can spend some much needed time on the car. All I've really managed to get done all summer is buy parts and prepare and plan how to execute the finished product.

Jim
 
Jim,

With what welding proces are you going to weld the doors?. I tried to weld a door with MIG but this warped the door panel. I then ask a friend to redo it with TIG which gave a much better result.
Less heat and a softer weld

Peter
 
Not a bad idea Peter. I am also borrowing a nice Lincoln tig setup when I get the mig gas bottle, and the owner has promised to teach me the basics.
If I do indeed get the door fill pieces made by cnc brake I'm tempted to bond them on the front face then weld the sides. Next to no heat into the panel that way.
I'll try a few different techniques on the next practice panels!
Jim
 
More deliveries today in the shape of a set of Hawk hps pads for the Outlaw front calipers. Edited because I just re read what I'd written in a clearly distracted mood, which made me laugh out loud. Something about having two pads spare out of this set of four :D

s-l1000.jpg
 
Last edited:
It looks like photobucket is down so I'll just upload on here today.
Last week the Nodiz ignition control arrived along with another ford coilpack and connectors.
This system is very similar to megajolt, but with some nice upgraded touches. It has on board coil drivers so no need for EDiS and associated wiring. Bluetooth connection for easy monitoring and tuning on any mobile,tablet, laptop etc. Fully mappable 3D ignition.
For the cleanest installation I wanted to be able to use the stock 4.6 bell housing sensor. The only things visible in the engine bay will be the two ford coil packs which I plan to locate at the back of the engine.
The Nodiz box will be mounted in the cabin somewhere, most likely glove box.

I also recently bought a bead roller and have been having fun with some sheet metal, more on this soon
Jim
 

Attachments

  • image.jpeg
    image.jpeg
    224.6 KB · Views: 20
Been stripping engine bay and prepping areas for new steel.
Contemplating changing the headlamp bowls for the plastic versions when it all goes back together with halogens.
Received my new aluminium radiator and twin fan shroud, but unfortunately they've sent an unmatched set-I'm either getting a replacement or decent part refund to re-weld the mounting tabs..It is however very good quality and fits the space beautifully, it's a Nissan 200sx item made by Supeed which get rebranded by lots of expensive radiator brands.

I've designed a tubular propshaft safety loop for the tunnel which will bolt through the floor. This will add to the 1" tubular theme of the gearbox crossmember and diff ladder bars underneath

It turned out that my preferred rear tyre size is not common in the UK at all, bad preparation on my part. However I've finally found a reasonably priced pair of Michelin Pilot Sport 2 in 275/40r17 so have just ordered those.
The fronts will be the updated successors Michelin Pilot Sport 4 in 245/40r17 and regarded by many as the best street tyres currently available.
Cannot wait to get the wheels wrapped in the new rubber!

One more highly exciting piece of news is that tomorrow I'm expecting delivery of a desktop cnc machine! I got involved with their Kickstarter campaign last December and it has finally come to fruition. The first things to make once I've mastered using it is a billet aluminium hydroboost to Rover base unit bracket, serpentine alternator and pas brackets.

Jim
 
Quick update as I've finally got some tyres on the front wheels. Michelin Pilot Sport 4, 245/40r17.


Sidewall is nice and square with still enough protection from kerbs, ginger cats etc, so Michelins must be on the narrow side for the larger sizes.
Track at the bottom outside edge of the tyres is now approx 160cm (this is at full droop, positive camber land)


Rear wheels are going to get Falkens I think, Michelin don't do 275 any more :(
The remainder of my spare time has been spent learning how to use the CNC, steep learning curve with much trial and error especially milling aluminium. There is progress..I'll post some photos when I manage to machine a reasonably good part!

Jim
 
Haha, he was a street cat from Athens we adopted while living there. He's been in England for a few years now :)
Yeah I wanted to get the best I could, partly because they're brand new wheels, partly so I can rule out tyres when initially testing the car after changing essentially almost everything, and partly because I always used to run part worns due to a consistant lack of funds.
It's a shame I couldn't get Michelin for the rears, but I've heard very good things about Falken
Jim
 
Well he owns the neighbourhood here, so he's got to be bilingual, or just an incomprehensible bully!
Seriously though, he does still respond to Greek. We were playing some Greek music at Christmas and he just began purring uncontrollably
I've just worked out he's been here for 5 years now, not sure where all that time has gone! He must be about 6, loves to be around when anything is being worked on or built, I'm fairly sure he has the soul of an Ancient Greek builder or engineer.
 
Back
Top