

You are using an out of date browser. It may not display this or other websites correctly.
You should upgrade or use an alternative browser.
You should upgrade or use an alternative browser.
My mean green hornet
- Thread starter corazon
- Start date
TyroleanRover
Active Member
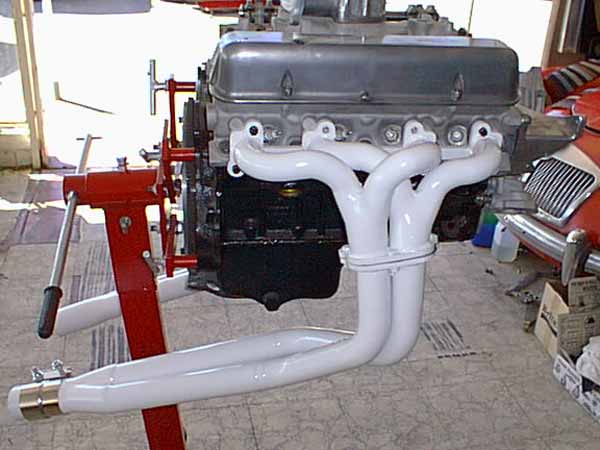
Are these the headers of your dreams
 ?
?corazon
Well-Known Member
Well I can't find the image I was thinking of, or have imagined it exists!
I thought it was a Kindig build along these lines

But cobraboy is right about practicality and maintenance. It wasn't my first choice look anyway, plus the engine block and manifold are going to be a burnt metallic copper gold colour so it needs to all work together and not be to crazy visually.
Just for aesthetics not much can beat the look of heat discoloured polished stainless for me

Jim
I thought it was a Kindig build along these lines
But cobraboy is right about practicality and maintenance. It wasn't my first choice look anyway, plus the engine block and manifold are going to be a burnt metallic copper gold colour so it needs to all work together and not be to crazy visually.
Just for aesthetics not much can beat the look of heat discoloured polished stainless for me
Jim
corazon
Well-Known Member
I've been making sure I do at least an hour each day to get the car stripped down fully.
After I get the last couple of panels and screens off, it's basically just suspension and steering left.


I was pleasantly surprised when I uncovered this area

Really the only bad areas of the shell are the 4 corners of the sills/floor pans which have been poorly repaired in the past, and the usual area behind the headlights, not bad for a '72 car. Oh and that small hole under the driver's tread plate on the door step
I'll be updating much if not all of the wiring I think, I know a guy who knows a guy. There's so much in the way of new electrics going on the car, some of the old wiring would be defunct, plus I'm changing to a modern fuse box anyway that it makes sense to start afresh.

There's a fair amount of weight in that loom, deceivingly so
Jim
After I get the last couple of panels and screens off, it's basically just suspension and steering left.
I was pleasantly surprised when I uncovered this area
Really the only bad areas of the shell are the 4 corners of the sills/floor pans which have been poorly repaired in the past, and the usual area behind the headlights, not bad for a '72 car. Oh and that small hole under the driver's tread plate on the door step
I'll be updating much if not all of the wiring I think, I know a guy who knows a guy. There's so much in the way of new electrics going on the car, some of the old wiring would be defunct, plus I'm changing to a modern fuse box anyway that it makes sense to start afresh.
There's a fair amount of weight in that loom, deceivingly so
Jim
Last edited:
corazon
Well-Known Member
Roof off amongst other little hardware bits. Suspension and steering next up and then it should be ready for blasting, I’ll be getting it done in March as a compromise between less moisture in the air and my time constraints.
Since it can be fairly faceless on here (usually a good thing haha) I thought I’d throw in one for putting a face to the name game too..


I also got some poly engine mounts to match my poly gearbox mounting. These are 4mm taller and as I’m raising the engine slightly should be just about right and mean no need for the steel shims I was using.


Jim
Since it can be fairly faceless on here (usually a good thing haha) I thought I’d throw in one for putting a face to the name game too..
I also got some poly engine mounts to match my poly gearbox mounting. These are 4mm taller and as I’m raising the engine slightly should be just about right and mean no need for the steel shims I was using.
Jim
corazon
Well-Known Member
After the first set getting lost in the post, I finally received a pair of good used sport bullet mirrors from the states today. They’re a rare dual remote pair from a 70s Monte Carlo, so once I set them up correctly I should be able to control them both from the driver's seat.
I couldn’t resist giving one a quick scuff and spray in the colour the car will be, Fathom Green metallic


Jim
I couldn’t resist giving one a quick scuff and spray in the colour the car will be, Fathom Green metallic
Jim
corazon
Well-Known Member
Yeah it's one of my absolute favourites from the 60's muscle car era, such a unique colour with different characters in differing light conditions. I hope my bodywork mods will do it justice when the topcoat time comes around!
Uncensored pics shall be uploaded as soon as I get the car back from the blasters (the blasted car back?) and on the jig!
Jim
Uncensored pics shall be uploaded as soon as I get the car back from the blasters (the blasted car back?
) and on the jig! Jim
corazon
Well-Known Member
Excellent service from Andy (eight of them) on building my hybrid ZF 22/24 box. Attention to detail is spot on, even down to using the 24 ID plate on the 22 box casing
I can’t recommend him enough. I won’t divulge the exact price as I supplied both boxes and everybody’s service is tailored to what they want/have/need, but he is very reasonable indeed!
Thanks again Andy


This will be getting painted ASAP, drivetrain will all be a burnt copper/gold shade, probably Mazda evolution gold
Jim
I can’t recommend him enough. I won’t divulge the exact price as I supplied both boxes and everybody’s service is tailored to what they want/have/need, but he is very reasonable indeed!
Thanks again Andy
This will be getting painted ASAP, drivetrain will all be a burnt copper/gold shade, probably Mazda evolution gold
Jim
corazon
Well-Known Member
The prolonged cold and wet weather is meaning the car has still not gone for blasting. It is top of the priority list as soon as a better spell arrives.
My mind has been left to wander in the meantime, and having the stripped shell stare at me every time I'm in my workshop, I've decided on a plan of attack for the rear arches. I'd always thought I'd fabricate these from scratch to suit, but more recently have been thinking about a quicker solution with the same look and simpler execution-certainly when having to make two exactly the same..
This has culminated in buying a factory arch from another vehicle. It is very close to what I'd envisaged making, and first mock ups seem to be very promising. It is a mk2 Capri panel.
Here it is against the car, sitting back on the Vitesse rims at the rear whilst on ramps. Then a couple of photos against the torq thrusts at the front to get an idea of the look.


Jim
My mind has been left to wander in the meantime, and having the stripped shell stare at me every time I'm in my workshop, I've decided on a plan of attack for the rear arches. I'd always thought I'd fabricate these from scratch to suit, but more recently have been thinking about a quicker solution with the same look and simpler execution-certainly when having to make two exactly the same..
This has culminated in buying a factory arch from another vehicle. It is very close to what I'd envisaged making, and first mock ups seem to be very promising. It is a mk2 Capri panel.
Here it is against the car, sitting back on the Vitesse rims at the rear whilst on ramps. Then a couple of photos against the torq thrusts at the front to get an idea of the look.
Jim
corazon
Well-Known Member
Roller Rockers just arrived from Harland Sharp in the states. These are still available for Rover V8 but not listed anywhere for sale, you need to contact them directly.
After shipping and import tax etc they’re still half the price of Yella Terra

Changing jobs means I’ve got a few weeks off in May, so plan to make good progress on the car. Rollover jig is being made and will arrive next week, as soon as it does I’ll be taking the shell for blasting. Then the real metalwork can begin!
Jim
After shipping and import tax etc they’re still half the price of Yella Terra
Changing jobs means I’ve got a few weeks off in May, so plan to make good progress on the car. Rollover jig is being made and will arrive next week, as soon as it does I’ll be taking the shell for blasting. Then the real metalwork can begin!
Jim
Baron von Marlon
Member
It's all looking great so far
corazon
Well-Known Member
Rollover jig due to arrive today any minute. I’ve just finished removing all suspension from the car, so will give it a quick test on the jig before I trailer it to the blasters.
Front springs with a light empty shell wasn’t something I was particularly looking forward to, but all went fairly smoothly.
I used a combination of tools and techniques. A 10t Porta power ram, new “horseshoe” type spring compressors and a ratchet strap.
You can’t catch more than 3 coils with this type of compressor but seems to do the trick nicely, and feels very secure.
The main problem I encountered was the passenger side spring was bowed outwards, I presume it’s fractured, which meant the coils were too close to fit the tool in properly. Luckily I got around this in a number of ways and got that one out with no surprises!
That spring is pictured extreme left and you can tell something is not right if you look at the top coil angle. It also sounds different if you drop it on it’s side from an inch or so, more of a rattle.
All this is getting upgraded to an adjustable spring seat design similar to cobraboy and Alex’s projects.


Jim
Front springs with a light empty shell wasn’t something I was particularly looking forward to, but all went fairly smoothly.
I used a combination of tools and techniques. A 10t Porta power ram, new “horseshoe” type spring compressors and a ratchet strap.
You can’t catch more than 3 coils with this type of compressor but seems to do the trick nicely, and feels very secure.
The main problem I encountered was the passenger side spring was bowed outwards, I presume it’s fractured, which meant the coils were too close to fit the tool in properly. Luckily I got around this in a number of ways and got that one out with no surprises!
That spring is pictured extreme left and you can tell something is not right if you look at the top coil angle. It also sounds different if you drop it on it’s side from an inch or so, more of a rattle.
All this is getting upgraded to an adjustable spring seat design similar to cobraboy and Alex’s projects.
Jim
Last edited:


unstable load
Well-Known Member
Looking good!
Let battle commence.
Let battle commence.