Project ARJ...Part 2

brannigan

New Member
Hello all. As some of you may have read in previous posts ARJ has a new owner (ME :D ) and I thought I would share my amateur mechanical efforts. I've never tried working on a car before but I'm keen to give it a try.

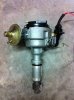
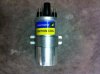
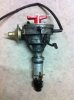
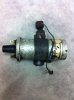
The car is still running on the distributor borrowed from a very nice P5B so I removed it tonight along with the coil so I can fit the nice new electronic unit I purchased. I'm pretty sure the car still isn't happy with being sold as it took me an hour of swearing and blood sacrifice to remove the two bolts holding the coil in place. Surprised I managed to get them off without snapping them but I'll fit new bolts when I put it back together.

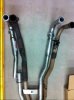
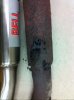
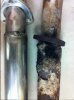
Just need to clean up the WD40 from the mounting point and then start putting it back together. Below are some pictures of the old and new units.
 

Attachments

  • photo 5.JPG
    photo 5.JPG
    96.2 KB · Views: 2,355
  • photo 4.JPG
    photo 4.JPG
    92.5 KB · Views: 2,355
  • photo 3.JPG
    photo 3.JPG
    90.9 KB · Views: 2,355
  • photo 2.JPG
    photo 2.JPG
    102 KB · Views: 2,354
Is that a modified SD1 electronic dizzy?

I have one of them if it is, and they are very good indeed.

Richard
 
Thanks for starting the post. It will be good to follow ARJ's new exploits :) . Looks like you are off to a good start as I reckon getting your ignition electrics all sorted is good sensible thing to tackle first. I've tried swearing at siezed bolts before; it doesn't seem to free the bolts but it makes you feel better :D . Often a good soak in WD40 and leaving them overnight is enough to unstick them. When I put bolts back in, I often put a little smear of copper grease on them to make sure taking them back out the next time is a lot easier.
 
The distributor was sourced from H&H as a recon unit but looks brand new. They say it is from the land rover/range rover engine. Fingers crossed it runs as good as it looks. Decided to go for this solution as it was about the same cost as reconditioning the old unit. I think the shaft in the old unit is slightly bent which was the cause of the weak spark across some of the HT leads. Also explains why it wouldn't run properly when cold.

ARJ is a bit rough round the edges and while I want to try and turn it into a good looking car I'm not concerned about keeping it original where it can't be seen. If I could just get it to accept that it lives in Dundee now :D
 
Finally managed to swap the distributor and coil. Spent a bit of time trying to work out how to do it but finally settled on running a new wire to the coil from the back of the fuse box.

Car didn't start and I spent quite a few hours with a volt meter trying to trouble shoot the problems but when I fitted a nice new battery tonight the car started first time. :D Moral to the tale is that size DOES matter.

The thermostat is sticking closed so that is my next job. Hopefully that should be a bit easier to deal with.
 
Good news and well done. Good luck with the thermostat. I've never changed the thermostat on a V8 so can't give any useful advice I'm afraid.
 
brannigan said:
The thermostat is sticking closed so that is my next job. Hopefully that should be a bit easier to deal with.

Be very careful with the thermostat housing bolts as they are prone to shearing. I replaced the thermostat on my V8 last year and one of the bolts sheared despite lots of soaking beforehand.

brannigan said:
If I could just get it to accept that it lives in Dundee now :D

Most people here won't get that. I'm back in Dundee this evening with Lady C for a works meeting.

Dave
 
Will have to drill a hole. Have obtained a QH (QTH100) thermostat which doesn't have a hole but should be the right part assuming I use my drill.

I wasn't planning on doing too much to the car in the first half of this year as I'm under strict instructions to finish renovating the bathroom before I spend every weekend in the garage.....I'm in trouble.....ordered a new front exhaust section today. When I was messing about trying to get the car to start with the new distributor I noticed that there was a pool of liquid on the floor under the engine bay. Turns out that if your exhaust had a big hole in it then the petrol from the false starts drips on the floor under the engine. I knew it needed replaced but I'm pretty sure I can fit a finger in the hole its so big.
 
did you go for an 88 degree one or a lower one? To me it seems that although everyone suggests 82 or even 74 are good, i've found pae runs much better at 88 degrees which is the proper temp i believe (I was put off initially by a dodgy temp sender making 85 degrees just into the red on the temp gauge!)

Rich
 
The petrol shouldn't really go through the over flow.

the float should shut off and the petrol return to the tank via the return on the return line on the driverside carb. Keep an eye on it and if it happens again you might need to check the floats. Obviously you were cranking the engine over a fair bit when this happened.

I will have a spare float if do need one. normaly when they fail they sink and petrol gushes via the overflow pipe/

If the stat fitted has a jiggle pin you can swap it over but sure that it can drop down and get stuck partially blocking the stat open..
 
82 degree thermostat. To be honest I think I need to double check the timing and the distributor vacuum has a second port on the back for which I just obtained a blocking plug. It wasn't fitted when I did the test drive, Either of these could be causing the overheating but regardless I want to drain and flush the coolant and then fit a new thermostat. Its not an expensive thing to do and I figure changing the coolant and thermostat can't do any harm.

Really don't want to get into the carbs just yet. I've only been tinkering with cars since I bought ARJ about eight weeks ago and I need to deal with a few more simple things to build my confidence. I did turn the car over a lot with the old small battery and no doubt that was the cause of the petrol.
 
Removed the old front section of the exhaust today. Probably for the best as the car was really loud. I thought the holes were all on the drivers side but now that it's off I can see that the passenger side was holed as well. Only slight issue I have is that I snapped one of the studs. Hopefully I can re-drill and tap it without taking the manifold off. Looking forward to hearing what the car sounds like with its shiny new system.
 

Attachments

  • photo 6.JPG
    photo 6.JPG
    52.7 KB · Views: 2,057
  • photo 7.JPG
    photo 7.JPG
    47.4 KB · Views: 2,057
  • photo 8.JPG
    photo 8.JPG
    56.5 KB · Views: 2,057
Drilled a nice hole through the middle of the broken stud, put in the stud extractor, turned it very gently and the manifold snapped. :(

Needless to say I'm not happy. From looking at the mess of the thread in the hole I think the stud must have been cross threaded when it was put in. Looks like I need a new manifold. Does anyone have any experience on the replacement units from JR Wadhams? Are they better than second hand units?

Paul
 
brannigan said:
Does anyone have any experience on the replacement units from JR Wadhams? Are they better than second hand units?

Paul

I don't know, but I would think that they are used manifolds with new studs fitted, so if you can fit studs yourself then a secondhand manifold can be had cheaper, although I did look for one for a long while for someone I knew who wanted one.
 
I will ask Tom if he has one, he does have an old engine lying round the back.

I did something similar a few years ago, it is easy to break them.


Colin
 
Had a bit of a break during the bad weather. Garage was freezing.

Now things a are a little warmer I decided to see if I can sort out the rear diff extension mounting bush. The prop shaft is sitting low and Colin wedged a tin lid in there as a temporary fix but it was starting to give up and the bolts were hitting the cross member again.

Managed to get the long bolt off with the usual blood sacrifice and bad language and then all became clear. Someone must have had it apart years ago and put it back together again in the wrong order. One of the big washers and the shim were at the very top next to the nut so the extension was sitting a good 10mm too low without taking into account the perished rubber.

I'll try and get it together again later in the week in the correct order. Should raise the prop shaft by 15-20mm

Paul
 
arthuy said:
It is the diff pinion bush, I read some old posts and may be a tigerseal fix.

DSC00053.jpg

I checked back on ARJ part 1 the bush is what you need to change. Diff pinion bush (620089), the metal insert will be detatched from the rubber, I think I need one for Poppy.

Have you been out and about?
 
Been out for a few runs but nothing too long. The car is making a squealing noise on anything other than very gentle acceleration. I'm fairly sure the diff is low on oil and the bearings are the cause so the plan is to fit the replacement bush and fill it up with EP90 to see if that helps. Didn't want to put many miles on it in case I caused damage.

From the diagram 553976 and 620088 were fitted to the top of the bolt directly under the top nut!
 
Back
Top