

You are using an out of date browser. It may not display this or other websites correctly.
You should upgrade or use an alternative browser.
You should upgrade or use an alternative browser.
Rob's long term Supercharging project
- Thread starter 1396midget
- Start date
1396midget
Well-Known Member
yeah, it's one of those 'how did it stay together anyway' situations.
It does probably explain why, if you jacked it up under the rear cross member, the doors didn't open as well. Hmm.
Does anyone have measurements for where everything should be? I'd hate to weld it back up wonky...
It does probably explain why, if you jacked it up under the rear cross member, the doors didn't open as well. Hmm.
Does anyone have measurements for where everything should be? I'd hate to weld it back up wonky...
Dave3066
Well-Known Member
1396midget said:Does anyone have measurements for where everything should be? I'd hate to weld it back up wonky...
Rob
You could always take measurements from the other side to give you an idea. I have a NOS replacement sill panel waiting to go onto my car. I'll take some measurements and let you know dimensions. There are several threads here that are worth looking at. Apart from my 3500S resto thread (which looks much the same as your level of corrosion) have a look at testrider's, sawdustcaeser, quattro and sowen's (if it's still on here). sowen's thread included some strengthening around the jacking points to allow a conventional jack to be used. Quattro's thread on Sparky shows some very useful views of the entire base unit in pretty good condition.
I started out fabricating most of the large repair panels for the sill and cabin floor but it takes ages and I was starting to lose momentum so I bought a few NOS replacement panels instead.
Finally, if you haven't found him yet it's well worth spending some time having a look at Tony Chamberlain's site http://www.tonybmw.co.uk/. The man is a panel beating genius

Good luck with the repairs.
1396midget
Well-Known Member
thanks Dave. Give me some reading to do when all the old people are asleep tomorrow
I've no idea if the other side is right. I've stopped cutting now and will do measurements next.
Measurements of a NOS panel would be great but don't rush.
Have a good Christmas everyone!
I've no idea if the other side is right. I've stopped cutting now and will do measurements next.
Measurements of a NOS panel would be great but don't rush.
Have a good Christmas everyone!
Baron von Marlon
Member
Good luck with the weldathon! Merry Christmas to you too.
1396midget
Well-Known Member
I have spent all today's rainy afternoon reading Dave's, Testrider's, Sawdustcaeser, Quattro and Sowen's threads. Wow. Making me feel buoyed up and raring to go!
From those threads I reckon I've got the best chance with buying inner sill sections, I'll need cover sills anyway.
Plan is to buy them ( though I'll have to be a bit sneaky as now I have a wedding to plan for, which I'll admit is pretty much entirely my fault) then cut bits out sufficiently to fit the new bits in, beefing up the jacking points in the process.
Don't need the car for this particular wedding, the MG has got that covered, which is just as well as there's a top joint and de dion tube to fix too...
1396midget
Well-Known Member
well, it's been a while. Almost a year, in fact. But I have updates! It would have been faster if I'd not got carried away with the midget, which now sports rear radius arms, rear disc brakes and a host of other goodies like LSDs and things.
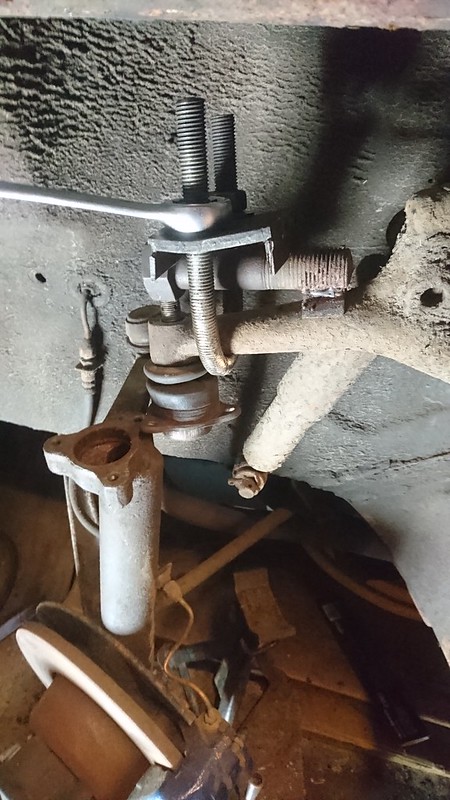
But I've got the top joint sorted out
 DSC_0368 by 1275midget, on Flickr
using the DIY tool again. If it needs to do another one it needs strengthening as it's bent a LOT doing this one. needed a pretty BFH to get the damn thing out of the top of the strut as well.
I've also been welding like a mad person. I'm on my second bottle of gas now, but getting lots better at MIGing things together. I've got it set reasonably high so it just burns away anything too rubbish to weld to.
Inner sill patched up to what was good and left:
 DSC_0002 by 1275midget, on Flickr
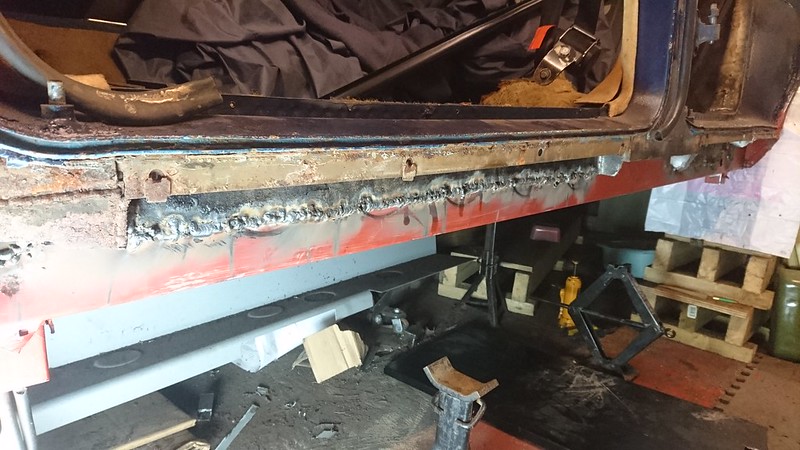
outer sill all joined on.
 DSC_0364 by 1275midget, on Flickr
lots of welding gone into here. I've also re-done the jacking points so I can jack from underneath - there's a bit of it in the bottom corner there.
Jacking point before the outer sill went on:
 DSC_0348 by 1275midget, on Flickr
the outer sill welds on through the old jacking point hole to that flat plate. You can see some of the excellent stuff used to stick the cover sill on in this pic.
 DSC_0350 by 1275midget, on Flickr
that square bar has had a hole made for it in the outer sill, which fits upwards round it and is welded on.
You can just about see the remainders of the jacking points in this pic
 DSC_0568 by 1275midget, on Flickr
I haven't decided if I need to close off the bottom of the squares or not.
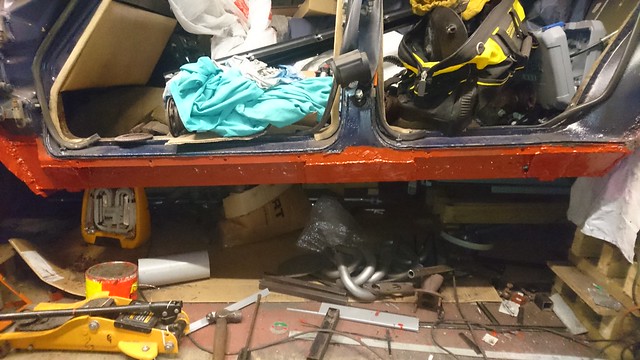
Door gap is much improved. And it doesn't change now when you jack it up...
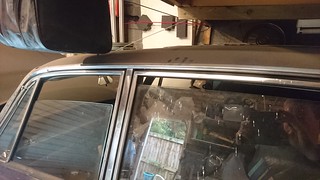 DSC_0363 by 1275midget, on Flickr
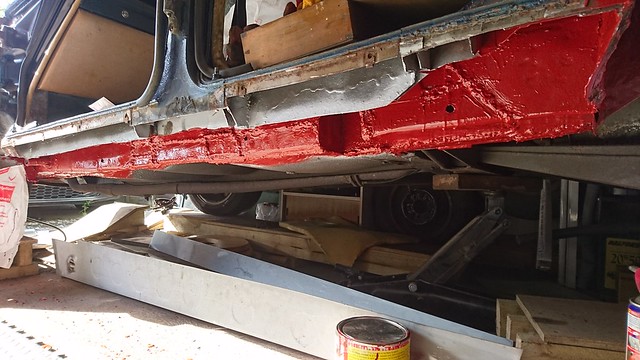
and one from underneath. Loads better than the bucket of rust that was there before. The paint is epoxy red primer - bondaprimer. It's really thin but dries like a skin. Only time will tell if it works, but it will have a coat of underseal on top.
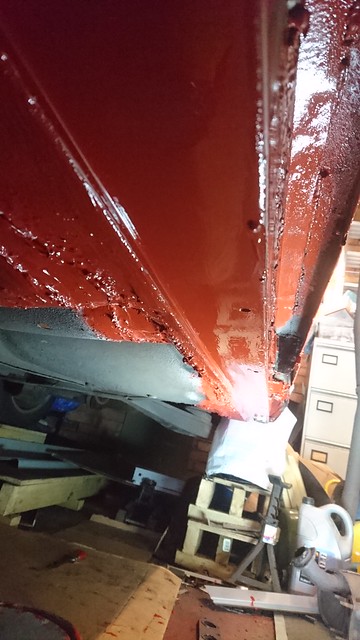 DSC_0371 by 1275midget, on Flickr
with the end plates almost done, I've had to make up quite a bit at the front and the back as it had all disappeared rather
 DSC_0569 by 1275midget, on Flickr
I still need to have another go at the rear bit that hides behind the door, I've fixed that now and cut another chunk out and re-welded a bit in - no pic yet, I'll grab one later. It needs a hole drilling in it to SCREW the cover sill on (not silicone and weld like the previous ones!)
front is done - below.
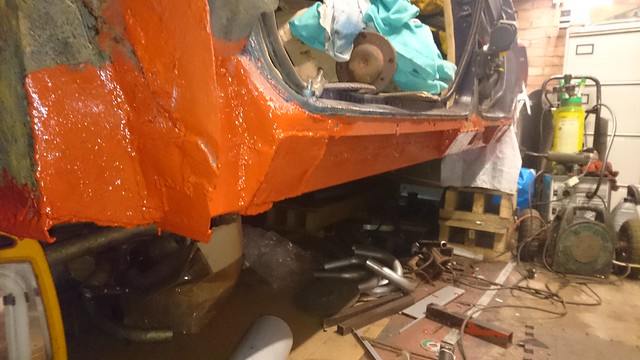 DSC_0570 by 1275midget, on Flickr
again, I've had to guess at the shape of the front, I've copied what a lot of modern cars have which is a little flappy bit under the rear of the front arch, not sure why, but it looks nice. It might need a bit more work on here when the wing comes back from the shed just to make sure it all fits (previously bottom of wing was welded to the base unit (helpful!)
Now it just needs a coat of underseal/waxoyl in here, and more squirting in through the holes I drilled in the inner sill, and the cover sill painting, then THIS SIDE IS DONE!
It's very much next on the list, as I've told myself no more upgrades to the MG until this is running again. The big blue beasty will live again.
But I've got the top joint sorted out
DSC_0368 by 1275midget, on Flickrusing the DIY tool again. If it needs to do another one it needs strengthening as it's bent a LOT doing this one. needed a pretty BFH to get the damn thing out of the top of the strut as well.
I've also been welding like a mad person. I'm on my second bottle of gas now, but getting lots better at MIGing things together. I've got it set reasonably high so it just burns away anything too rubbish to weld to.
Inner sill patched up to what was good and left:
DSC_0002 by 1275midget, on Flickrouter sill all joined on.
DSC_0364 by 1275midget, on Flickrlots of welding gone into here. I've also re-done the jacking points so I can jack from underneath - there's a bit of it in the bottom corner there.
Jacking point before the outer sill went on:
DSC_0348 by 1275midget, on Flickrthe outer sill welds on through the old jacking point hole to that flat plate. You can see some of the excellent stuff used to stick the cover sill on in this pic.
DSC_0350 by 1275midget, on Flickrthat square bar has had a hole made for it in the outer sill, which fits upwards round it and is welded on.
You can just about see the remainders of the jacking points in this pic
DSC_0568 by 1275midget, on FlickrI haven't decided if I need to close off the bottom of the squares or not.
Door gap is much improved. And it doesn't change now when you jack it up...
DSC_0363 by 1275midget, on Flickrand one from underneath. Loads better than the bucket of rust that was there before. The paint is epoxy red primer - bondaprimer. It's really thin but dries like a skin. Only time will tell if it works, but it will have a coat of underseal on top.
DSC_0371 by 1275midget, on Flickrwith the end plates almost done, I've had to make up quite a bit at the front and the back as it had all disappeared rather
DSC_0569 by 1275midget, on FlickrI still need to have another go at the rear bit that hides behind the door, I've fixed that now and cut another chunk out and re-welded a bit in - no pic yet, I'll grab one later. It needs a hole drilling in it to SCREW the cover sill on (not silicone and weld like the previous ones!)
front is done - below.
DSC_0570 by 1275midget, on Flickragain, I've had to guess at the shape of the front, I've copied what a lot of modern cars have which is a little flappy bit under the rear of the front arch, not sure why, but it looks nice. It might need a bit more work on here when the wing comes back from the shed just to make sure it all fits (previously bottom of wing was welded to the base unit (helpful!)
Now it just needs a coat of underseal/waxoyl in here, and more squirting in through the holes I drilled in the inner sill, and the cover sill painting, then THIS SIDE IS DONE!
It's very much next on the list, as I've told myself no more upgrades to the MG until this is running again. The big blue beasty will live again.
Last edited:
1396midget
Well-Known Member
What's the logic behind doing it that way? I needed to belt the joint/pillar gap quite a bit with a big hammer to get it to separate and didn't want the top of the pillar flobbering about while I did it. Maybe I've missed something... Done both sides now though so hopefully don't need to do it again! If anybody wants to borrow the splitter thing then let me know; Dave F's had a go on it.
I need to build an exhaust manifold next because it needs to turn round in the garage to get at the other side and I suspect starting it up with no manifolds on at all will be a bit too exciting.
I need to build an exhaust manifold next because it needs to turn round in the garage to get at the other side and I suspect starting it up with no manifolds on at all will be a bit too exciting.

Dave3066
Well-Known Member
If anybody wants to borrow the splitter thing then let me know; Dave F's had a go on it.
Yes I can vouch for the effectiveness of this tool. In fact I used it as a template to make my own
Dave
1396midget
Well-Known Member
Having got bored with upside down welding, I've built an exhaust manifold.

It's made of half inch U sections of pipe cut up and welded together. It uses a Rover K series collector with integral Lambda sensor in it, and the bottom half of a Rover 214/216 exhaust to fit to it. Big fan of 2-piece manifolds, makes it much easier to put together!


I have to say, for a first attempt, it looks pretty good! The bottom half is too long and will probably catch on the floor, so that needs sorting. This is the 'easy' side though, the side without the starter motor and the clutch gubbins....
It's made of half inch U sections of pipe cut up and welded together. It uses a Rover K series collector with integral Lambda sensor in it, and the bottom half of a Rover 214/216 exhaust to fit to it. Big fan of 2-piece manifolds, makes it much easier to put together!
I have to say, for a first attempt, it looks pretty good! The bottom half is too long and will probably catch on the floor, so that needs sorting. This is the 'easy' side though, the side without the starter motor and the clutch gubbins....
1396midget
Well-Known Member
aaargh. The driver's side is WORSE. I'm into the floor and half way up the inner sills. It's a rotmonster! sad times. Still, on with the welding mask and off we go again...
I reckon I 'might' be able to fit a water-air charge cooler, and agree that fuel injection is the way forwards. I'd love to do a proper old skool supercharge with SUs , but there just isn't enough space.
When I said the supercharger the other way up, I should have been more clear, I meant like this:
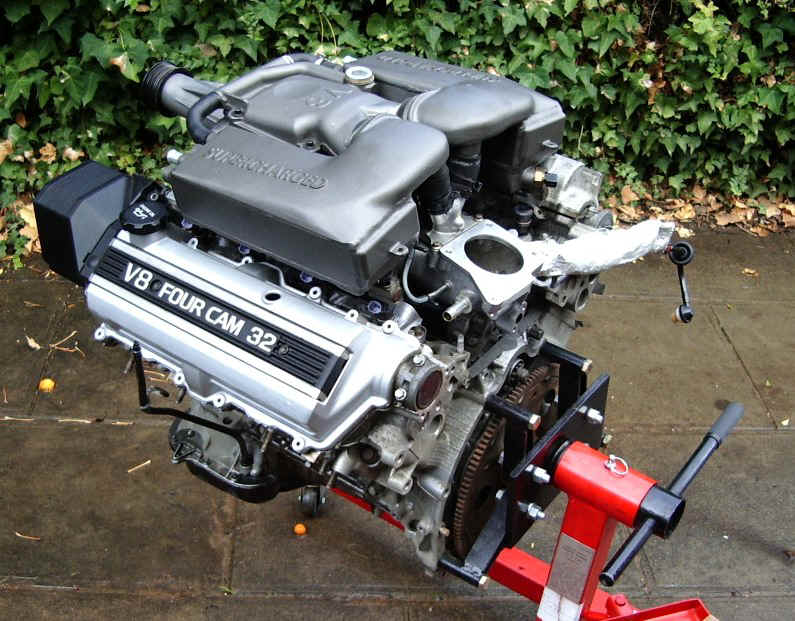
it's going to be HOT. I thought if I could get something that looks like (but isn't) a heater matrix in the manifold somewhere, something flattish that would be full of water, an electric pump and a second radiator just behind the V8 one, I could have a pretty decent stab at cooling the inlet charge.
The air-water-air charge coolers are apparently more efficient that an air-air, but obviously much more difficult to make, but a lot smaller. There's not enough space in the front of a P6 for a big air-air intercooler, but there is for a rover metro radiator (that I just happen to have!)
Could always go without a cooler, but that seems engineeringly unsatisfactory, if you see what I mean, in for a penny in for a pound etc!
Belt is an issue, I'll have to look how some of the cobra guys have done it, as I don't think I'd get away with just a V-belt!
I need to know more about the jag supercharger on the lexus v8 as I'm currently having the lexus v8 put in my p6
1396midget
Well-Known Member
Jag charger is an M112 or M90 I think. After further research If I do go down the Forced induction route, then I'd be looking at water/methanol injection to keep charge temps down. It's a lot easier than fabbing up intercoolers and stuff. Kits can be purchased for not all that much money. As far as this project goes, I'm STILL welding. Jeez. Inner sill totally replaced, outer sill added on. Next job is to cut the D post off completely and rebuild the internals of the rear end. Then tank out and mend all round the inner wheel arch. Sigh.
Slowly but surly Rob, you will get there!!
Ron.
Ron.
1396midget
Well-Known Member
Time for another (very small) update. Started competing in Sprints and Hillclimbs in the MG, so that's soaked a lot of time out. But today, I managed to weld the outer sill on properly. Well, 3/4 of it. I ran out of MIG wire... sigh.... Slowly but surely we're getting there. I've also started drilling the spot welds out of the D post. Onwards and upwards. There's now a big monster seam weld all the way along the bottom of the sill, and the shell feels massively stronger.