Slack bottom timing chain on S2 2000SC 1970

John Platt

New Member
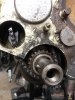
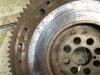
Please see below pics of my bottom timing chain, as I’ve got really bad tinnitus i couldn’t hear any chain tinkering, honest!
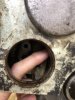
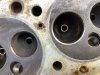
The pic with my finger pushing the chain is nearly a 1/4” pasted the edge of hole. Mileage is 100k plus.
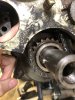
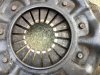
I’ve already got the intermediate chainwheel cluster nut loosened, as engine is on a stand.
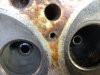
I think the bottom chain is badly stretched, comments please?
Enough to consider replacing both chains?

The WM says in order to remove chainwheel cluster, you need to first remove the distributor & drive, before removing the oil pump & auxiliary drive assembly. However can I remove the oil pump & auxiliary drive together in one assembly c/w the dizzy still attached?

I had a really difficult time starting her up last year, resorting to a bulb & static timing set up to get the dizzy in roughly right place for initial start up, but then couldn’t really set the timing with a strobe, as timing was violently jumping all over the place, with rough tickover as well.
 

Attachments

  • 67EE2C55-36B0-4F36-9198-AA84A4063EB7.jpeg
    67EE2C55-36B0-4F36-9198-AA84A4063EB7.jpeg
    1.9 MB · Views: 26
  • FFB401FC-A72A-4539-A38E-2577BB863331.jpeg
    FFB401FC-A72A-4539-A38E-2577BB863331.jpeg
    1.7 MB · Views: 26
  • C3F5B035-CF01-4CD5-9294-E35186A5D8E2.jpeg
    C3F5B035-CF01-4CD5-9294-E35186A5D8E2.jpeg
    1.3 MB · Views: 25
Well the timing scatter would certainly be caused by the loose chain!

It’s been a while, but I believe you can remove the aux drive housing with the dissy attached. I can’t remember if you have to remove the fuel pump as it has a slipper lever than runs off a cam on the aux shaft.
 
As far as I remember I just disconnected the oil hoses at the block and moved the assembly backwards leaving the dizzy in place.
 
Thank gents, I’ve took the fuel pump off anyway, as going to fit a new E10 service kit. And I’ve already disconnected the oil hoses, so will remove whole assembly tomorrow. So I take it that there way too much slack on the bottom chain?

It‘s weird what some people do, cos I’ve got like-new timing tensioners, but old chains. I’ve got the engine almost fully stripped down, finding mains & big end bearings have been replaced & are in good nick, so leaving, as expenses are going elsewhere.

This engine refresh started with me finding exhaust valve gap on pot 3 was less than 2 thou, so decided to I take the head off, finding the exh valve was ok, but 2 water galleries have corrosion, see pics. P6 owners club guys recon I need to get them sorted as l’ll likely have sealing problems, but as far as I was concerned it wasn’t leaking before removing the head.

Also the flywheel has rivet scouring (about 1.5mm deep), & there’s a deep groove on the fingers on clutch cover, which is a concern as to why? Even though I’m going to replace, but again clutch seemed ok to me. Thanks again for comments. John.
 

Attachments

  • ED34B42B-6D46-4EEB-9660-096A250344B7.jpeg
    ED34B42B-6D46-4EEB-9660-096A250344B7.jpeg
    3.2 MB · Views: 16
  • 9303EDE8-3C02-444E-A20D-456AA988A3F9.jpeg
    9303EDE8-3C02-444E-A20D-456AA988A3F9.jpeg
    3.9 MB · Views: 17
  • 7B5EEAF4-192B-44FD-8F38-BC367D287FFC.jpeg
    7B5EEAF4-192B-44FD-8F38-BC367D287FFC.jpeg
    4.1 MB · Views: 17
  • 9ED23020-3655-4CE4-BA26-C4B072B4E9EB.jpeg
    9ED23020-3655-4CE4-BA26-C4B072B4E9EB.jpeg
    4 MB · Views: 17
I almost forgot, the little oil strainer underneath the tensioner oil feed pipe, mines disintegrated, is there a known none p6 replacement?
 
Something else worth looking at - I have seen some front end noises caused by a chain guide breaking where it was bolted to the block, and slipping partly into the sump,and rattling. A missing guiide wont help keep the chain tight.
 
Might want to drop your sump, and see if you can find any spare bolts in there.. I did, and found one. Not sure where it's come from, but I think it's had a replacement chain tensioner at some point, as it appears to be the same size, despite no bolts missing..
 
This engine refresh started with me finding exhaust valve gap on pot 3 was less than 2 thou, so decided to I take the head off, finding the exh valve was ok, but 2 water galleries have corrosion, see pics. P6 owners club guys recon I need to get them sorted as l’ll likely have sealing problems, but as far as I was concerned it wasn’t leaking before removing the head.

I faced similar coolant passage erosion when I did the first engine overhaul on my 2000TC. I ended using an aluminum epoxy that I "borrowed" from the shop where I was working at the time. It was meant for gas turbine engine repairs, so I have no idea how it compares to the regularly available stuff now. After filling, I drilled the passage back out and milled the head flat. I inspected how well the repair had held up the last time I had the head off the engine. With 20 years of service over 60,000 miles, the repair had held up perfectly.
 
I almost forgot, the little oil strainer underneath the tensioner oil feed pipe, mines disintegrated, is there a known none p6 replacement?

I lost my nylon oil strainer the last time I did work and had to find a replacement. It was not easy. I tried the usual sources and finally found one from Pierre Janusz (Rover Parts Service). He indicated that the one I got was his last. No one else indicated that they had a used or NOS one available.
 
I’ve found a engine specialist who repair industrial marine engines using some form of ‘Ali metal filler’, that they say it’s long lasting & a strong repair @ £45 + VAT to clean up the corroded areas & metal fill, plus another £45 + VAT to skim. Good value in my opinion. And same price to skim a flywheel!

Re the nylon oil strainer, I read on a very old thread here, about someone who found a replacement from ‘an old engine’, which was a good fit, but they didn’t state which engine.

Re the clutch cover fingers with 2mm deep scoring, has anyone seen this before?
And do they know the cause?
seems to me to be a none rotating thrust bearing.
 

Attachments

  • 20ABA95B-6245-4650-AA06-9BDCCC92BF09.jpeg
    20ABA95B-6245-4650-AA06-9BDCCC92BF09.jpeg
    4.1 MB · Views: 2
I would say you’re right. A seized clutch release bearing would certainly do that. I’d inspect the face of the release bearing sleeve where it presses against the pressure plate.
 
I would have thought the clutch cover would have a trust ring on the fingers, not the sleeve direct acting.
 
I would have thought the clutch cover would have a trust ring on the fingers, not the sleeve direct acting.
The early clutch covers had a thrust ring on the fingers. Later cars went without the thrust ring and have a different clutch withdrawal sleeve. Both versions work in early and later cars as long as you match the clutch cover to the proper withdrawal sleeve. Personally, I would think that the thrust ring version would be more durable. Both cover/sleeve versions seem to be available.
 
"Both versions work in early and later cars as long as you match the clutch cover to the proper withdrawal sleeve."

It can be slightly more complicated than that, as the withdrawal sleeve housing on very early cars needs some machining. I’d have to consult my notes on the exact details.

Yours
Vern
I believe it’s mentioned in the manual Vern
 
Yes, it is. I wrote an article on the subject awhile back. Two covers are commonly seen, with & without the thrust pad (there are other differences, but that’s the visual one) Gearboxes up to suffix G use the cover with thrust pad — that should be SC cars up to engine suffix H & TCs up to engine suffix C if the engine/gearbox pair has remained intact. Past that the cover without the thrust pad is fitted. The throwout sleeves measure 2.093” & 2.513”, respectively.

The change coincided with the change to the needle bearing gearbox.

The machining comes into play when you have a very, very early engine & gearbox, which used a third cover that was not supplied past early 1966. Gearboxes below suffix D (and there was no B or C) used that cover. The throwout sleeve for was 2.218 long, and to fit the newer cover it had to be shortened to the 2.093 dimension & the housing also shortened.

So there you have it.

Yours
Vern
Thanks Vern. The manual is not a lot of help on this issue as it does not even talk about the version of clutch cover without a thrust pad, just the early version with the unstrapped thrust pad and the version with the strapped thrust pad. I remember replacing the clutch in my '65 SC but cannot recall having to machine down or replace the throw out housing. It was probably close to 40 years ago, so I might have forgotten some of the details.
When replacing the clutch plate and cover on my '68 TC this last round, I measured the thickness of the housing and determined that no machining was necessary. I ended up switching from a cover with a braced thrust pad to one with no thrust pad simply because I was not able to find a cover with the pad at that time. I learned that I needed the different thrust sleeve only as I was beginning reassembly. Of course once I had everything together I found a place where I could have purchased a cover with the thrust pad and saved some money.
 
Back
Top