Hi Peter.
Thanks for your feedback.
TBH, I would think twice if I was going to do it again! (still far from finished)
Yet, I know I wouldn't want to pay someone to get it to the standard I would be happy with.
I found that the number one thing to get a good result was time.
And patience.
Lots of it.
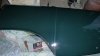
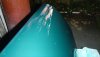
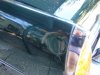
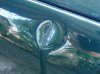
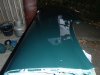
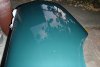
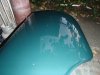
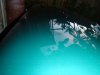
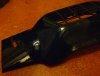
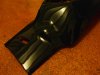
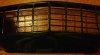
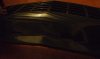
I mean, what you see here is the result of a lots of tiny tiny processes...
Some things I did pick up were... In preparing the panel, you have basically three options
1) Either have minimal disturbance of the painted surface so that it remains even and uniform over the entire surface.
2) Take it back to full bare metal...
3) The third way...that of "spot working" problematic areas actually runs out to be the most difficult.
What tends to happen is that by working such areas, you create ever so tiny irregularities or vagaries in contour.
The upshot is when the paint goes on and it dries, these areas represent themselves...and then its rub back and do it again basically. (I was caught a few times).
In the prep process, you think things are coming along nicely, but when that paint goes on, what you thought would be acceptable...isn't.
In retrospect, I would have used a primer putty under the paint which hides/smooths and fill such vagaries a LOT better than the simple primer filler I used which has a lot less hiding power.
I know this because on the front passenger door I happened to use some primer putty that a mate had, and it was a lot easier to get the smooth result I needed.
Paint choice was also another thing.
I know a lot of people prefer 2 pac, but this wasn't an option for me as I was just spraying the panels under my house and didnt have the protective gear to use this paint.
Even if I had of, I still would have declined its use.
It's great at hiding stuff, but I feel its finish looks out of place on older vehicles as its very "jammy"...even plasticky almost.
Consequently, I used straight enamel.
It meant lots of wet sanding back with 2000 grit to get the paint smooth, so that when it is buffed, it is glass smooth.
And it means regular waxing of the surface...which I kinda like doing anyways.
I could of put a clear over the top of the actual paint, which would add protection and longevity, but there was mention from some people that clear tends to yellow over enamel.
Really, the only secret is what you hear all the time...preparation.
And that takes LOTS of time...i could see why a top paint job costs the $$$ it does.
Thanks for your feedback.
TBH, I would think twice if I was going to do it again! (still far from finished)
Yet, I know I wouldn't want to pay someone to get it to the standard I would be happy with.
I found that the number one thing to get a good result was time.
And patience.
Lots of it.
I mean, what you see here is the result of a lots of tiny tiny processes...
Some things I did pick up were... In preparing the panel, you have basically three options
1) Either have minimal disturbance of the painted surface so that it remains even and uniform over the entire surface.
2) Take it back to full bare metal...
3) The third way...that of "spot working" problematic areas actually runs out to be the most difficult.
What tends to happen is that by working such areas, you create ever so tiny irregularities or vagaries in contour.
The upshot is when the paint goes on and it dries, these areas represent themselves...and then its rub back and do it again basically. (I was caught a few times).
In the prep process, you think things are coming along nicely, but when that paint goes on, what you thought would be acceptable...isn't.
In retrospect, I would have used a primer putty under the paint which hides/smooths and fill such vagaries a LOT better than the simple primer filler I used which has a lot less hiding power.
I know this because on the front passenger door I happened to use some primer putty that a mate had, and it was a lot easier to get the smooth result I needed.
Paint choice was also another thing.
I know a lot of people prefer 2 pac, but this wasn't an option for me as I was just spraying the panels under my house and didnt have the protective gear to use this paint.
Even if I had of, I still would have declined its use.
It's great at hiding stuff, but I feel its finish looks out of place on older vehicles as its very "jammy"...even plasticky almost.
Consequently, I used straight enamel.
It meant lots of wet sanding back with 2000 grit to get the paint smooth, so that when it is buffed, it is glass smooth.
And it means regular waxing of the surface...which I kinda like doing anyways.
I could of put a clear over the top of the actual paint, which would add protection and longevity, but there was mention from some people that clear tends to yellow over enamel.
Really, the only secret is what you hear all the time...preparation.
And that takes LOTS of time...i could see why a top paint job costs the $$$ it does.
")