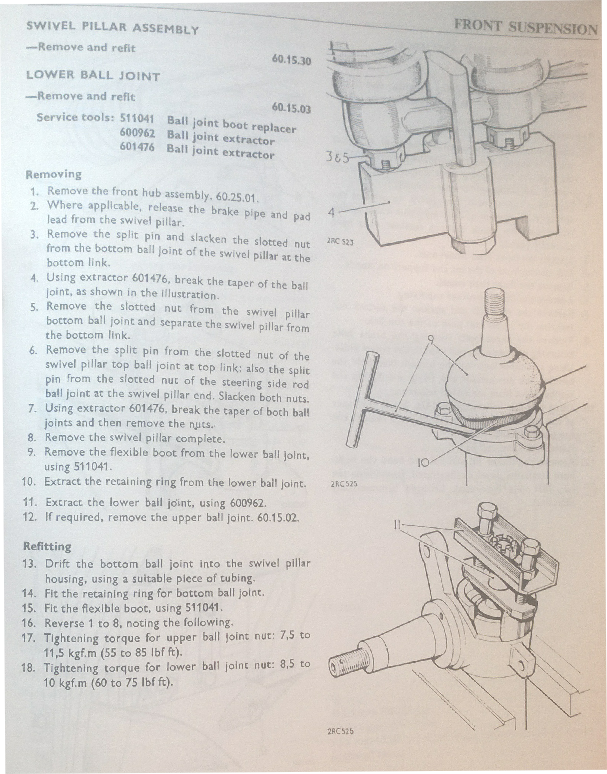
Upper and lower ball joint puller

sdibbers

Well-Known Member
#21
That DIY ball joint repair method is ingenious! What is actually happening here? Does the injected hot plastic fill the void between the ball and the worn socket, then cool down and become a new snug socket surface?
Yep, I saw this being used on a restoration TV show (I think Wheeler Dealers). It really seems a good idea, acetal is common material for modern ball joint sockets.
 
#22
You do need to get your ball joint assessed first as the ball end can wear out of shape in which case the new acetal doesn't last long...There are a small number of people still about that actually dismantle and rebuild them with new components, popular with trucks as the whole part is normally much more expensive.
 
#25
would the suspension uprights with the ball joints either end be the same on the 4 pot and the V8's?

I know the brakes and dampers will be different.
 

MikeMelb

Active Member
#26
The RCCA club in Melbourne has both types of tools, amongst others.
Indeed and very useful they are too!
Our mechanic Michael of Kryton Automotive used the club tools to remove and replace the lower balljoints. The right hand one came out a lot easier than the left which broke and needed to have the pin welded and heat applied.
Not sure why one would want to rebuild them if you can get new ones from Wins International for 29pounds each. Unless you want originality with castellated nuts rather than the nylock nuts on the new ones.

Will be returning the tools to RCCA on Monday, if any-one in Vic needs them.
 
#28
"Unless you want originality with castellated nuts"

The OEM joints were being supplied with Nylocks & no cotter hole by the early 80's.

Yours
Vern
 
#29
whilst i carry on with my work on my 3500s, i managed to come across some suspension uprights for a small amount of cash. They both came with knackered upper and lower ball joints. I had a puller made that i thought would work. A cylinder piece 60mm in dia and 3mm wall thick. A 10mm plate welded to the top with a hole in the centre for the ball joint. With a breaker bar, i thought i'd nailed it. Oh no i hadn't. It broke the 10mm thick bar and wouldn't budge the ball joints. In the bin that idea went.

I thought about it and decided to drill out the ball joint.

ball joint.jpg

The circular ring on the ball joint itself was cut of with a 1mm disc in a angle grinder. You can just about cut half of it away (see marks on the upright) and then with a bar i can 'break' the stalk out. The cut marks can be cleaned up once the ball joint was out.

Next was to drill out the remains. where the stalk was, i cut a serious of holes in the joint finishing with a 22mm drill bit. This then allowed me to cut a 'pie shaped' piece out of the remains to relieve the pressure on what was left. I then levered the remains out with ease.

Top ones came out really easy. Now all i need to do is clean the suspension upright with a flap disc and paint it before working out how i will be pressing the new bottom ball joint in. Top one will be easy with longer bolts to draw it it.
 

harveyp6

Well-Known Member
#30
Don't use long bolts to install the top joint, it will bend those ears down and that will stop the joint going fully home. Use a chisel with the point ground flat and go around the lip all the way around, keeping the joint square.
 

SydneyRoverP6B

Well-Known Member
Staff member
#31
To drive the bottom ball joint in, with the swivel pillar held firm allowing no movement, remove the boot on the new ball joint. Do not file or remove any of the fine splines around the perimeter of the ball joint. Using a suitable piece of pipe that will sit squarely on the shoulder of the cup (not the flange), and a good hammer, drive the joint into the pillar. It will take a while, and it may feel like you are making no progress, but it will come eventually. Make sure you keep the ball joint square as you go, particularly at the beginning.

Ron
 
Top