

cdnp6
Member
4 Cylinder Reserve Fuel Tap Leak
Richard asked that I post this as a sticky Last November, Sorry for the delay.
For a 4 cylinder car with a leaky fuel tap, replacing the O-ring can be a fairly easy fix.
Make sure you get a fuel resistant O-ring or you will be doing this again!
On these cars, the reserve is in the engine bay and fairly accessible.
I siphon out the fuel tank and with the car on a level floor, don't lose a lot of petrol during the procedure.
Be sure to have a bucket handy to place under the car to catch any fuel that does spill.
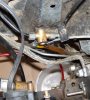
There are three fittings in the pic (red, yellow green arrows) that you will be using.
I start by loosening the screw of the attachment at the yellow arrow to release the control cable. Don't unscrew it all the way as the small screw can fall out.
Loosening the nut at the green arrow, you can get enough give to pull the control cable out of the attachment. Get ready to catch the attachment as it is not held in place.
Then, loosen and remove the small screw at the red arrow. Keep a finger or two on it as it to will fall under the car and can be easily lost.
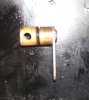
Now the arm can be pulled out.
Heres a pic of the arm out of the tap.
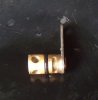
Here you can see the channel the top screw sits in.
Replace the O-ring, replace the arm and top screw. Ensure the top screw is sitting in the channel.
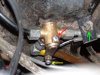
Reattach the control cable, test and adjust so it stops in the right spots.
Richard asked that I post this as a sticky Last November, Sorry for the delay.
For a 4 cylinder car with a leaky fuel tap, replacing the O-ring can be a fairly easy fix.
Make sure you get a fuel resistant O-ring or you will be doing this again!
On these cars, the reserve is in the engine bay and fairly accessible.
I siphon out the fuel tank and with the car on a level floor, don't lose a lot of petrol during the procedure.
Be sure to have a bucket handy to place under the car to catch any fuel that does spill.
There are three fittings in the pic (red, yellow green arrows) that you will be using.
I start by loosening the screw of the attachment at the yellow arrow to release the control cable. Don't unscrew it all the way as the small screw can fall out.
Loosening the nut at the green arrow, you can get enough give to pull the control cable out of the attachment. Get ready to catch the attachment as it is not held in place.
Then, loosen and remove the small screw at the red arrow. Keep a finger or two on it as it to will fall under the car and can be easily lost.
Now the arm can be pulled out.
Heres a pic of the arm out of the tap.
Here you can see the channel the top screw sits in.
Replace the O-ring, replace the arm and top screw. Ensure the top screw is sitting in the channel.
Reattach the control cable, test and adjust so it stops in the right spots.
 Any other suggestions?