Tom W
Active Member
Slight change of plan.....
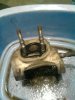
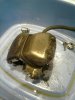
I'm thinking of leaving the callipers in place for the time being, and just removing the pads to see if the auto adjuster mechanism looks like it's doing it's thing. The callipers themselves look fairly new, with almost no surface corrosion, so hopefully everything inside will be OK. I need to replace the O rings on the calliper securing nuts, as they've split so I'll do that before tightening everything up.
I don't want to take too much apart that I don't understand yet, so will see where new pads and bleeding the brakes gets me.
 Hopefully the welding is so bad, it might just break off with a little persuasion :roll: