3.9 Camshaft into stock 3.5..

Hi

Just about to fit a replacement camshaft (3.9), followers and timing chain to my 75 3500auto, along with resealing the timing case and ancillaries and I`m a bit confused.

I`m working on the basis that the 3.9 cam is a drop-in replacement for the stock item. Will i render the mechanical fuel pump obsolete with this new camshaft?

Thanks
 
Hi James,

Peter is right on the money, the eccentric for the fuel pump is not part of the camshaft. It is a separate item that sits in front of the timing set, but behind the skew gear for the distributor drive. For engines not running the mechanical fuel pump, the eccentric is just replaced by a suitable spacer. In your case, just transfer the eccentric from your existing camshaft to your new one. :wink:

Ron.
 
I had always assumed that the fuel pump was driven by a cam ground onto the end of the camshaft.

Thanks gentlemen, you have put my mind at rest and I can look forward to some weekend wrenching.

Cheers
 
rottenlungs said:
I had always assumed that the fuel pump was driven by a cam ground onto the end of the camshaft.

Thanks gentlemen, you have put my mind at rest and I can look forward to some weekend wrenching.

Cheers

Just to be sure you're aware , the 3.9 cam will require a metric in place of the original imperial bolt in the end of the cam that holds fuel pump drive and cam gear in place . You may already be aware of this , but i'd rather say than read about lack of said bolt stopping play ! :)
 
Re: 3.9 Camshaft into stock 3.5.. - more questions

Hi all

Hope you can help me. A couple more questions about the camshaft change:

1) The new camshaft has some kind of coating, presumably to prevent rust. Do I need to clean that stuff off before I install it?

2) One of the inlet manifold bolts (one of the ones nearest to the timing case has sheared off. Any recommendations as to how to remove it. I have stud extractors and a welder at my disposal. All else fails, I`ll have to take the head off and take it to a machine shop, but I would prefer not to. Tempted to try the extractor as I can get easy access with the drill and a nice angle to try and get it out. I`ll soak it with oil and ponder things for a day.

Aside from that so far so good. I was stunned at the amount of timing chain stretch that had occured. The sprockets are in very good shape, however, I can`t see any sign of erosion of the teeth on either gear.

Thanks again
 
I certainly would not clean the coating off. New camshafts need an EP lubricant such as Camlube ( in fact I just use EP90 axle oil ) smeared on them liberally to prevent damage during the first 10 minutes or so of running. The proper technique with a new shaft is to run the engine for at least 10 minutes at no less than 2000 rpm . This minimises the loading on the noses of the cams which is highest at idling speeds , and enables them to bed in without damage
 
rottenlungs said:
Hi Stina

Is this the bolt you mean?

http://www.rimmerbros.co.uk/Item--i-ERC5749

Thanks
Hi James .
Sorry i didn't get back sooner , i was looking for a response to my quote about the metric bolt , but seem to of missed this post . I can't say for sure that that is the correct bolt/size , Although i suspect it is ( Harvey may come back and say for sure ? )
I'm vague as my bolt came with the 3.9 cam shaft kit , so i didn't have to order it . I just know the later 3.9 cam requires a metric threaded bolt .
As for the gloopy coating on your cam , leave it on there and coat it in any running in stuff in a sachet they sent with it :D
 
HI Stina et al.

Thanks for your guidance, Chris. I bought a pot of cam install lube along with the shaft, so I have the lube covered. I`ll leave the black coating on the camshaft alone (I notice the bearing surfaces appear to be uncoated.

Stina, to my surprise, the bolt from the old shaft (stock 3.5) fits the new one (3.9 aftermarket) so maybe they are making these camshafts with retrofit in mind. It was from Rimmers.

The next drama (along with the broken inlet manifold bolt) Is the cam followers . I can't actually get any of them to come out of the holes from above. I tried twisting then and pulling them upwards with a pair of grips but they all seem to bind tight and I don`t want to damage the bores they run in.

According to the Rover maintenance book the followers can be removed from below so now the cam is out I`ll try that. I hadn`t really planned to take the sump off but hey, in for a penny, in for a pound!

Thanks again.
 
O.k , Pull them up ( the lifters ) so as they just hold tight in their bores ( as you've said don't force them up and out , you'll will score the bores ! ) then wiggle the cam out taking care not to knock the lifters down , or to knock the cam bearing surfaces about . ( if the motor is still in the car you may need to loosen the engine mounts and jack the motor up , or remove the valance to get clearence to remove the cam ( i should do it first so as not to be trying to do it with the cam half out , how do i know that !!? ) Then cut a long gift wrap , kitchen roll centre tube , or whatever in half and insert into the bottom of the cam bore , knock the lifters down into this then draw them out with a long magnet , sorted , with out dropping anything into the sump :wink: :D

Edit , Ps . Does that bolt just "fit" or are you sure it's the right one that won't pull the threads when you put the 30ld ft on it ? You may be right but i'd want to be sure . Sorry if i'm being over cautious and you know for sure :D
 
Hi Stina

Yep, the cam is out and the lifters are basically hanging in there. I really like your trick of putting a 1/2 tube in along the cam bore. I`ll give that a go. To be honest, the sump gasket is in a bit of a mess so if I drop one down inside it`s not the end of the world. It would give me a reason to take it off and clean everything up.

I`ll double check the thread on the cam. I transferred the bolt from the old to the new and it felt correct up to hand-tight. It didn`t feel sloppy. I`ll try putting some torque on it carefully and see what happens.

As is typical with old cars, these projects escalate don`t they. I was looking at SU needles to suit the new cam. From what I`ve read a BBW might be a suitable candidate.

Thanks again
 
I wont take the credit for the half tube idea , that was Mr Stan Vaultsman . Tis a good'un though , and oh yes , they can run away with your time and money :shock: :LOL:
 
Well, I finally managed to get a bit done on the top end rebuild. Stina, sadly the carboard tube trick didn`t go to plan. The first follower came out ok, then when I got the second one out, the tube must have softened a bit with oil and tipped to the side. Oh well, so exhaust off, sump off, baffle plate off. Finally all followers are out.

I also had to swap a (NZ$25 for a spare) head, which I have now done. That has got me out of the snapped inlet manifold bolt crisis.

So far, the new cam is in, the new followers are in. The timing cover, oil pump (packed with Vaseline) and water pump are back on.

Left to do:
Torque up the case / pump bolts once I have the power steering pump back in place.
Pushrods , rockers and covers.
Pulley and throttle linkage brackets
valley gasket , inlet manifold and water piping.
Flush and reconnect power steering pump.
Distributor + fuel pump.
Baffle plate and sump.
Radiator / fan shroud etc.

"Reassembly is the reverse of removal", right?!

Incidentally, is it just me or is the Rover Repair Operations Manual wrong when it comes to the refitting head bolts instructions? I think it is telling porkies about which holes get the long head bolts. Diagram shows bolts 1,2 and 4 as having the long bolts, but 4 doesn`t seem right.
 
rottenlungs said:
Incidentally, is it just me or is the Rover Repair Operations Manual wrong when it comes to the refitting head bolts instructions? I think it is telling porkies about which holes get the long head bolts. Diagram shows bolts 1,2 and 4 as having the long bolts, but 4 doesn`t seem right.

That's correct, 1, 2, & 4 are the centre 3 bolts in the row closest to the inlet manifold which is where the long bolts go.
 
Are you going to prime the oil system with a drill so you know it'll have pressure as soon as it fires ?
 
James,

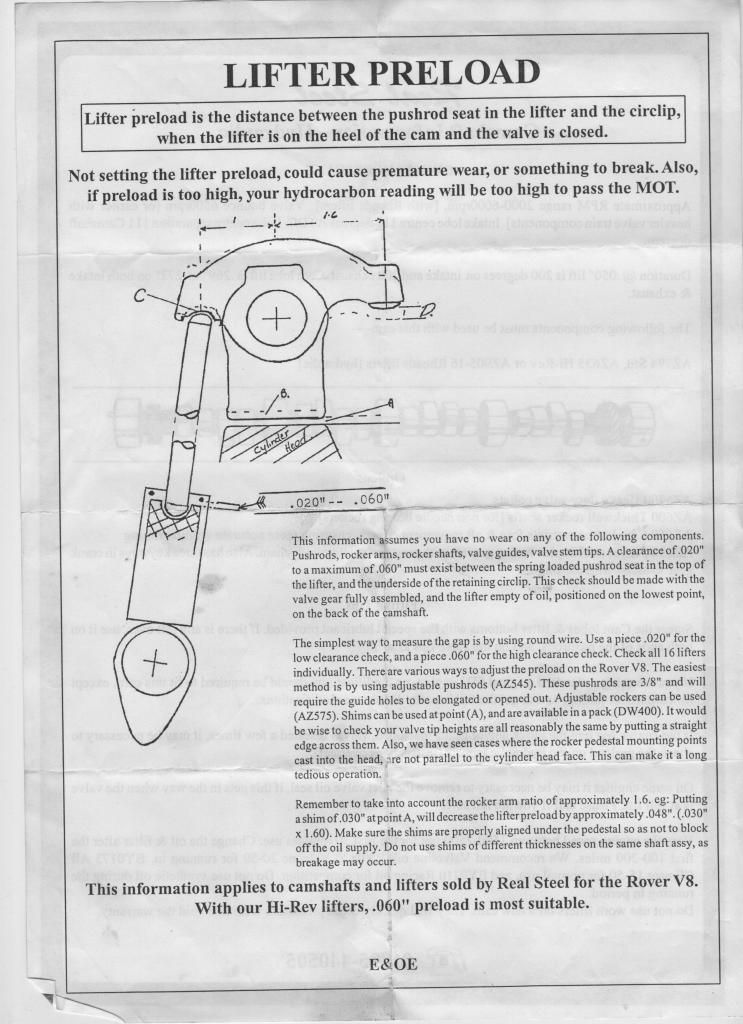
It may be wise to check the pre loads of the lifters. It is not mentioned in the WSM but lots of people see the need of checking and adjusting it (with shims under the rocker shaft mountings.
Attached you find an instruction.
Regards
peter

preloadsettingjpeg.jpeg
 
Harvey, I must have been high on degreaser last night. I`m sure the head bolt pattern looked wrong. I think I must have misinterpreted the diagram, as I could see where the deeper structure of the head requiring the longer bolts. I hope I haven`t cocked it up.

Stina, I`ve seen the screwdriver blade and rubber hose contrivance for using a drill to prime the pump. I`m going to give that a go tomorrow.

Peter, the preload thing is interesting. I had read a couple of articles on this, I do have some 0.6 welding wire which might work as a testing tool. Especially as the head is different, it might be worth doing. Do the lifters need to be fully pumped up with oil for the check to be meainingful?

However, it`s going to have to wait until tomorrow as Inspector Morse is on tonight so I shan`t prise my backside off the sofa tonight! There have been a couple of good W123 Mercs in it. My mrs is driven slowly insane by me spotting cars in the background on these shows.

Thanks for all your support.
 
James,

I believe the lifters should not be full with oil as it will be more difficult to fit it all and do the measurements. I have only done this with new lifters.
Regards

Peter
 
Back
Top