Peterv
Active Member
Being new to this Rover thing I've discovered they had some unusual and quirky ways of building the P6. All rather fascinating but none more than the De Dion setup at the rear. Having scoured this forum looking for what's involved in giving said item an overhaul, I managed to build up enough info to start this minor job.
My one was leaking (oil in the rubber boot) and creaking. Ordered the kit, waited a month or so and made a plan. As mentioned various times in this forum, photo's are good. Actually they're great, you know, picture=thousand words stuff. And that is what I found lacking for a De Dion novice like me.
Sooooo, had my camera handy and started my little adventure.
Now, this is my first post here so still finding my way around and if it turns out a little odd, please forgive me. Also, the way I did the overhaul isn't gospel by any means. There are many here that can do this job in their sleep. I'm just sticking my photo's up for anyone else tackling this job for the first time to have something to work with.
My car is a 73 New Zealand assembled P6B that started life as an auto. (just in case that makes a difference or not )
)
Here I have raised the car on the rear jacking point (solid rust less car) to allow the wheels to swing together compressing the tube to its shortest.
Also have removed the large hose clamp and drained the oil from behind the boot.

Have removed the bolts and the nuts from the studs. For some reason, or not, there were 3 studs on one side and one on the other.

Now I have lowered the car back onto it's wheels, thereby pulling the suspension apart again releasing the tube. (too easy, where's the catch....?)

This is where I cleaned out the tube elbows of years of built up road dust, Wire brushed them out and treated them with my favourite rust penetrator-preventer-sealer stuff. (technical term). No problems with these, just thin surface rust.


Rover special tool #1

Rover special tool #2


This is where the fun begins. Cleaning and seeing what I've got to work with as far as a 47 year old De Dion tube goes.

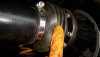
Little bit of scuffing/wear here (other end of the tube was the same). If you were to to jack the car up by the De Dion tube, this is where the weight if the car will bear upon. I suspect the yellow bush is a plastic but I'm probably wrong. (again)

And spotless this side.

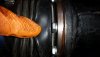
Cleaned out the air hole. This is to allow air to enter and leave the inside of the rubber gaiter/boot when the suspension is working.
All cleaned up ready to assemble. Replaced all the bolts and studs with new high tensile bolts and lock washers. (don't throw your studs away though)

This is the position where the seal sits on the inner tube at normal road height when on the car. It squishes (another technical term) in and out when driving so the shiny part of the inner tube must be free from any defects otherwise the new seals will just leak again. Same again with the other end of the tube. If there is a problem, I'd suggest going the grease filled tube direction. (info elsewhere on the forum). Mine seemed perfect so oil fill for me (until proven otherwise).
The reason mine had leaked oil was the seals had hardened over time. When removed, they had about half the flexibility of new ones.
Note - I still have a serviceable retaining spring that I prefer to the cable tie that came with the kit. (it sits in the boot grove nicely)

End plat and top hat (love technical terms) cleaned and treated for reassembly.

Filling the tube with 189.42 ml approx. (1/3 imperial pint for those not in the colonies) of the finest 20-60 mineral oil money can buy. This takes a bit of time as the gap between the inner and outer tubes is about 2 mm, the oil is thick and the air is trying to come out as the oil goes in.

This is the interesting bit. This is the exact angel the tube sits when mounted on the car. The oil is right up to the filler hole, just like in a gearbox and a diff. So there proves a point that has been discussed many times before. The filler hole is at this angle for a reason...

The tube now contains oil so care must be taken not to pull it apart although the retaining clip should stop it from doing so.
My choice is to seal the gaskets with a non hardening sealant to keep moisture from creeping in.

Before putting the tube completely together, I loosely reinstalled 2 studs on each elbow. This made realignment of the bolt holes very easy. After a couple of the bolts were installed, the studs were removed and stored for a later day (but where did I put them I will be asking myself). As well as the lock washers, I put a drop of loctite on each bolt. (overkill, I know).
The tubes have a spacing pattern for the bolt holes that allows it to be mated to the elbows one way only. This way the oil fill hole will be at the correct angle and facing upward toward the rear of the car. I didn't try it, but if the tube were to be mounted with the boot on the left (looking forward), the oil filler hole would be facing down towards the rear of the car. (and the air hole for the boot would be wrong too but that shouldn't be a big problem).
These last findings are for MY car. I haven't seen or worked on any other P6's and as many have stated, their boots are on the left. (Maybe grease filled with no filler hole, maybe different hole patterns, I don't know(possible survey topic))

All done and pretty. No more squeak, no more leak???? will let you know over time. If it does leak again, I'll head the grease filled direction.

Have reached the maximum photo's for a post and have culled a few of the lesser images to make this fit. Hope this will be of use to someone one day.
I am happy to be corrected on any of my findings, This was how I tackled it first time round. It all went smoothly and, touch wood, stays fixed.
Cheers all,
Peter
My one was leaking (oil in the rubber boot) and creaking. Ordered the kit, waited a month or so and made a plan. As mentioned various times in this forum, photo's are good. Actually they're great, you know, picture=thousand words stuff. And that is what I found lacking for a De Dion novice like me.
Sooooo, had my camera handy and started my little adventure.
Now, this is my first post here so still finding my way around and if it turns out a little odd, please forgive me. Also, the way I did the overhaul isn't gospel by any means. There are many here that can do this job in their sleep. I'm just sticking my photo's up for anyone else tackling this job for the first time to have something to work with.
My car is a 73 New Zealand assembled P6B that started life as an auto. (just in case that makes a difference or not
)Here I have raised the car on the rear jacking point (solid rust less car) to allow the wheels to swing together compressing the tube to its shortest.
Also have removed the large hose clamp and drained the oil from behind the boot.
Have removed the bolts and the nuts from the studs. For some reason, or not, there were 3 studs on one side and one on the other.
Now I have lowered the car back onto it's wheels, thereby pulling the suspension apart again releasing the tube. (too easy, where's the catch....?)
This is where I cleaned out the tube elbows of years of built up road dust, Wire brushed them out and treated them with my favourite rust penetrator-preventer-sealer stuff. (technical term). No problems with these, just thin surface rust.
Rover special tool #1
Rover special tool #2
This is where the fun begins. Cleaning and seeing what I've got to work with as far as a 47 year old De Dion tube goes.
Little bit of scuffing/wear here (other end of the tube was the same). If you were to to jack the car up by the De Dion tube
, this is where the weight if the car will bear upon. I suspect the yellow bush is a plastic but I'm probably wrong. (again)And spotless this side.
Cleaned out the air hole. This is to allow air to enter and leave the inside of the rubber gaiter/boot when the suspension is working.
All cleaned up ready to assemble. Replaced all the bolts and studs with new high tensile bolts and lock washers. (don't throw your studs away though)
This is the position where the seal sits on the inner tube at normal road height when on the car. It squishes (another technical term) in and out when driving so the shiny part of the inner tube must be free from any defects otherwise the new seals will just leak again. Same again with the other end of the tube. If there is a problem, I'd suggest going the grease filled tube direction. (info elsewhere on the forum). Mine seemed perfect so oil fill for me (until proven otherwise).
The reason mine had leaked oil was the seals had hardened over time. When removed, they had about half the flexibility of new ones.
Note - I still have a serviceable retaining spring that I prefer to the cable tie that came with the kit. (it sits in the boot grove nicely
)End plat and top hat (love technical terms) cleaned and treated for reassembly.
Filling the tube with 189.42 ml approx. (1/3 imperial pint for those not in the colonies) of the finest 20-60 mineral oil money can buy. This takes a bit of time as the gap between the inner and outer tubes is about 2 mm, the oil is thick and the air is trying to come out as the oil goes in.
This is the interesting bit. This is the exact angel the tube sits when mounted on the car. The oil is right up to the filler hole, just like in a gearbox and a diff. So there proves a point that has been discussed many times before. The filler hole is at this angle for a reason...
The tube now contains oil so care must be taken not to pull it apart although the retaining clip should stop it from doing so.
My choice is to seal the gaskets with a non hardening sealant to keep moisture from creeping in.
Before putting the tube completely together, I loosely reinstalled 2 studs on each elbow. This made realignment of the bolt holes very easy. After a couple of the bolts were installed, the studs were removed and stored for a later day (but where did I put them I will be asking myself). As well as the lock washers, I put a drop of loctite on each bolt. (overkill, I know).
The tubes have a spacing pattern for the bolt holes that allows it to be mated to the elbows one way only. This way the oil fill hole will be at the correct angle and facing upward toward the rear of the car. I didn't try it, but if the tube were to be mounted with the boot on the left (looking forward), the oil filler hole would be facing down towards the rear of the car. (and the air hole for the boot would be wrong too but that shouldn't be a big problem).
These last findings are for MY car. I haven't seen or worked on any other P6's and as many have stated, their boots are on the left. (Maybe grease filled with no filler hole, maybe different hole patterns, I don't know
(possible survey topic))All done and pretty. No more squeak, no more leak???? will let you know over time. If it does leak again, I'll head the grease filled direction.
Have reached the maximum photo's for a post and have culled a few of the lesser images to make this fit. Hope this will be of use to someone one day.
I am happy to be corrected on any of my findings, This was how I tackled it first time round. It all went smoothly and, touch wood, stays fixed.
Cheers all,
Peter
Last edited: