

You are using an out of date browser. It may not display this or other websites correctly.
You should upgrade or use an alternative browser.
You should upgrade or use an alternative browser.
Getting back on the road
- Thread starter sdibbers
- Start date
sdibbers
Well-Known Member
This was silvering from the filament inside the bulb. No big deal to just replace with fresh bulbs. Fortunately the strip speedo is easier to pull out than the later style.Mostly the bulbs get a black coating on the outside. Usually they can just be cleaned and put back. There is easily enough light.
sdibbers
Well-Known Member
The revised front end has been great, however, I’d noticed if not feeling quite as tight after a while. Some investigation revealed the right hand camber angle was almost 0° while like left remained at -1.5°. Also the toe was now 5mm out (about 0.5° toe out). A bit of diving in showed the out bushes were eccentric already. With the outer bushes allowing the pivot to be a good 3mm closer to the bulkhead. On top of that the nut on that end of the arm was loose! I think that was my fault, if left it loose until weight was on the suspension, I wonder now if I’d not tightened it up when I’d fitted it.
I’ve fitted my last NOS rubber bush as the one in that had taken a set. But have ordered poly bushes for the future. I notice they now have some rexture inside to hold onto the silicon grease (plus possibly reduce ‘sticktion’) as caused of creaking on the first poly bushes. If the rubber does show signs of collapsing in the future I’ll try the polys.
Failing that I’ll try making up nylon solids bushes as per @cobraboy, although he does say they transmit more noise into the cockpit. We shall see…
Since replacing the failed bushes the car feels tight again, camber and toe are reset and Beryl feels pretty accurate again.
DavidWalker
Member
Coincidentally, in a recent comparison drive between the Ford Zephyr, Vauxhall Cresta, and Austin Westminster A110 i Classic And Sportscar Magazine, the instrument panel of the Austin looked very familiar. Even pre-BL it appears BMC shared more than a few parts.Little jobs are sometimes the most satisfying.
The instrument lights were very dim on Beryl. Also, the ribbon would bounce around when you lift off the accelerator pedal at speed.
So this morning I pulled the dash top rail and the instrument panel. Both of the original bulbs were almost a solid silver from age. I replaced them with new incandescent bulbs (I just don’t like the look of the LED bulbs).
On the speedo cable, I removed the angle drive from the speedo head and partially dismantled it so I could spray it with penetrating oil. That seemed to free it up quite a bit. It’s pouring with rain today so I’ll take the car out tomorrow to evaluate how the speedo performs. If it’s still playing up I guess I’ll have to pull the whole cable and try and lubricate it fully.
A photo below of the warm glow of success (and my very untidy garage!).
View attachment 24092
sdibbers
Well-Known Member
That’s very odd the Austin cluster was made by Smiths, the Rover by Jaeger. Two rival manufacturers, maybe more of a coincidence in design similarities?the instrument panel of the Austin looked very familiar. Even pre-BL it appears BMC shared more than a few parts.
Demetris
Well-Known Member
Not quite...That’s very odd the Austin cluster was made by Smiths, the Rover by Jaeger. Two rival manufacturers, maybe more of a coincidence in design similarities?
In 1927 Smiths Industries purchased Jaeger, so they are in fact the same company at the period we are looking at.
sdibbers
Well-Known Member
Haven't been doing much with Beryl recently due to snow ans salt everywhere. But one thing was the driver's set back was getting a little loose. Time to adjust the locking mechanism. Of course you need to remove the seat to gain access to to the adjuster nuts, seat out and one flat turn on the coarse adjuster nut worked out perfectly. Getting the seat back in is always a pain on our cars. The heads of the cross head screws used by Rover were a mess. I decided to invest in some 1.5" 1/4"-28 hex head screws. A quick touch with a grinder and the screw in an electric drill gave me a nice pointed tip to help align with the flat nut in the base unit. Some of them I had to remove and run a tap through as the threads were not in the best condition.
All back together, but putting the seats in are one of the less fun projects on the P6. At some point I think I'll put something a little more sporty in the driver's position. I find that I slide around in the corners now with the suspension upgrades I've performed. So, maybe time to look at a better, more secure solution to fixing the seat.
All back together, but putting the seats in are one of the less fun projects on the P6. At some point I think I'll put something a little more sporty in the driver's position. I find that I slide around in the corners now with the suspension upgrades I've performed. So, maybe time to look at a better, more secure solution to fixing the seat.
cobraboy
Well-Known Member
Us skinny runts don't slide around that much, I wonder if it is the seats fault, or the reason for the slippage is the fact that the driver is not as 'sporty' as he could be ?
Not casting Nasturtiums, just throwing it out there")
PS I personally thought you were cutting a fine figure when I met you at Goodwood.
Not casting Nasturtiums, just throwing it out there
PS I personally thought you were cutting a fine figure when I met you at Goodwood.
sdibbers
Well-Known Member
No comment (but you may have a point…)Us skinny runts don't slide around that much, I wonder if it is the seats fault, or the reason for the slippage is the fact that the driver is not as 'sporty' as he could be ?
Not casting Nasturtiums, just throwing it out there
sdibbers
Well-Known Member
That’s never occurred to me! I’ll try that next time for my own sanity.Indeed, havind to deal with the cross head screws while removing and refiting the seats can be a pain. Usually i prefer to undo the nuts that hold the seats to the runners, take out the seats and leave the runners themselves in place.
jp928
Well-Known Member
When I got my car the front pass seat wobbled on the runners, something not to be tolerated. Took the seat off, and found the philips head screw (holding down the slide) into the captive nut had been cross threaded very badly, and in the end I had to cut the screw with a pad handle. Probably done when the PO had all the carpets replaced, including the seat rail covers. GGGGRRRRR. With front seats I usually just unbolt them from the runners/slides.
sdibbers
Well-Known Member
Sounds very familiar. I had a battle when I did the carpets because of damage to the threads and screw heads. So I’d already purchased 1/4”-28 hex head screws and a tap for that reason.When I got my car the front pass seat wobbled on the runners, something not to be tolerated. Took the seat off, and found the philips head screw (holding down the slide) into the captive nut had been cross threaded very badly, and in the end I had to cut the screw with a pad handle. Probably done when the PO had all the carpets replaced, including the seat rail covers. GGGGRRRRR. With front seats I usually just unbolt them from the runners/slides.
sdibbers
Well-Known Member
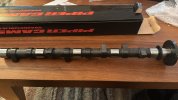
After some family related stuff I have finally got back to the car. The fast road camshaft I had reprofiled by Piper Cams has been sitting in its box for 6 weeks giving me the eye. I was able to get into fitting it this weekend.

First I had to remove the old camshaft. You know the routine if you have a 4 cylinder engine. Disengage the top tensioner, lock camshaft at no.1 cylinder exhaust peak and then painstakingly remove two head bolts, remove bearing cap, fit spacers (in my case bit nuts). Torque and onto the next pair. I have to be frank, its my least favourite job on these engines, its such a faff!
Because the new camshaft has been changed quite a bit I wanted to at least have a ball park stack for the shims. So I started by adding 0.020" to the existing shims, plus the difference in clearance. (New exhaust is 0.012" Intake 0.010" vs 0.014" and 0.009" respectively).
I poured fresh engine oil down the inside of the camshaft to hopefully minimise dry bearings on start up.
I then fitted new bearing shells. and poured new high zinc engine oil and assembly lube over the bearings and tappets.

I then fitted the new camshaft, bearing caps, torqued head bolts and fitted cam sprocket back on cam. Using a dial indicator I then measured how much clearance we had on each valve.

Using my spreadsheet (less chance of me screwing up the calculations!) I then removed everything again and changed the shims. Reassembled the camshaft etc and measured, this time with feeler gauges. I wasn't convinced that the numbers from the indicator were accurate due to the cushion of assembly lube and also the probe could only just touch the surface of the tappets. Sure enough, some were off. So, off with the cam AGAIN! Adjust shims and reassemble. This time all 8 were within spec exactly.
Next was to change the valve timing to Piper's specifications; 106 deg for No. 1 EP. There's a write up on how to do this on the 4 cylinder forum
With that set I could deploy the tensioner, put the back plate on the rearmost bearing cap and double check my work. Then valve cover, reconnect vacuum lines etc.
Piper say you should start the engine at 2500rpm from the get go, they even say make sure the fuel pump is primed and ready as low RPM grinding can damage the new cam surfaces. So I used the priming lever on the mechanical pump to ensure the float chambers were full and ready. Then fingers crossed and turn the key! Car started after one revolution of the crank! I then had to sit on the car and hold the revs at 2500 or higher for 20 full minutes. So, I sat in the garage, with the engine at fast idle and cringed about the noise I was making for the neighbours! Straight away you could feel the difference in the engine. Smoother, readiness to rev, quietness (sounds silly but even at speed the engine was quieter, I wonder if the old cam had some wear I hadn't detected).
So, was it worth it? I drove the car to work today. This involves motorways and fast side roads. Power is certainly up a bit. But the biggest change is torque through the range. Its ability to accelerate in the 60-80mph range is very impressive now, certainly enough to catch me out a couple of times. Any incline at motorway speeds are not even noticed now. I instinctively squeezed the throttle for a hill this morning and found myself passing everyone! Its made for a more relaxed and powerful drive. I'm very much looking forward to seeing how Beryl does on the track in two week's time, time to go Alfa hunting!
First I had to remove the old camshaft. You know the routine if you have a 4 cylinder engine. Disengage the top tensioner, lock camshaft at no.1 cylinder exhaust peak and then painstakingly remove two head bolts, remove bearing cap, fit spacers (in my case bit nuts). Torque and onto the next pair. I have to be frank, its my least favourite job on these engines, its such a faff!
Because the new camshaft has been changed quite a bit I wanted to at least have a ball park stack for the shims. So I started by adding 0.020" to the existing shims, plus the difference in clearance. (New exhaust is 0.012" Intake 0.010" vs 0.014" and 0.009" respectively).
I poured fresh engine oil down the inside of the camshaft to hopefully minimise dry bearings on start up.
I then fitted new bearing shells. and poured new high zinc engine oil and assembly lube over the bearings and tappets.
I then fitted the new camshaft, bearing caps, torqued head bolts and fitted cam sprocket back on cam. Using a dial indicator I then measured how much clearance we had on each valve.
Using my spreadsheet (less chance of me screwing up the calculations!) I then removed everything again and changed the shims. Reassembled the camshaft etc and measured, this time with feeler gauges. I wasn't convinced that the numbers from the indicator were accurate due to the cushion of assembly lube and also the probe could only just touch the surface of the tappets. Sure enough, some were off. So, off with the cam AGAIN! Adjust shims and reassemble. This time all 8 were within spec exactly.
Next was to change the valve timing to Piper's specifications; 106 deg for No. 1 EP. There's a write up on how to do this on the 4 cylinder forum
With that set I could deploy the tensioner, put the back plate on the rearmost bearing cap and double check my work. Then valve cover, reconnect vacuum lines etc.
Piper say you should start the engine at 2500rpm from the get go, they even say make sure the fuel pump is primed and ready as low RPM grinding can damage the new cam surfaces. So I used the priming lever on the mechanical pump to ensure the float chambers were full and ready. Then fingers crossed and turn the key! Car started after one revolution of the crank! I then had to sit on the car and hold the revs at 2500 or higher for 20 full minutes. So, I sat in the garage, with the engine at fast idle and cringed about the noise I was making for the neighbours! Straight away you could feel the difference in the engine. Smoother, readiness to rev, quietness (sounds silly but even at speed the engine was quieter, I wonder if the old cam had some wear I hadn't detected).
So, was it worth it? I drove the car to work today. This involves motorways and fast side roads. Power is certainly up a bit. But the biggest change is torque through the range. Its ability to accelerate in the 60-80mph range is very impressive now, certainly enough to catch me out a couple of times. Any incline at motorway speeds are not even noticed now. I instinctively squeezed the throttle for a hill this morning and found myself passing everyone! Its made for a more relaxed and powerful drive. I'm very much looking forward to seeing how Beryl does on the track in two week's time, time to go Alfa hunting!
sdibbers
Well-Known Member
All good advice, obviously I always run with nothing in the boot/cabin on the track for safety reasons. The spare was replaced with a fix a flat can a few years back for the weight savings (although on the drive to the track it’s full of spares and tools!). The driver, however, has not been lightened at all!Another thing to consider is shedding excess weight. I once weighed everything I took out of the boot for daily use. The spare wheel, jack, tools, cuddly toy etc weighed over 30 kg !
Only put in enough fuel for the laps you are doing, but don't run out !!!!!
cobraboy
Well-Known Member
All good advice, obviously I always run with nothing in the boot/cabin on the track for safety reasons. The spare was replaced with a fix a flat can a few years back for the weight savings (although on the drive to the track it’s full of spares and tools!). The driver, however, has not been lightened at all!
The driver, however, has not been lightened at all!