My Rover 3500s Rebuild Project

John.youens

New Member
Hi Guys,
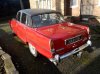
I thought I would post some information about my NEW Project car.

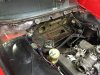
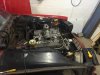
Bought the car early this year with MOT and running on the road, I however knew it required some work in the close future. The car had a newer engine fitted and a LT77 5 Speed box.
The gear box had major whine on all gears apart from 4th and the engine wasn't running on all cylinders most of the time.
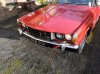
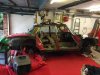
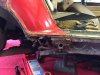
The car itself looked pretty solid on all accounts but as you will see from the project photos to follow this was not all as it seems.

Tasks to do;
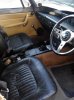
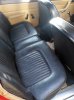
Remove series 1 interior and fit a series 1.5 which is fitting for the 1972 year with front and rear headrests.
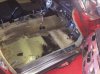
Remove & Replace Carpets as they all smell and are thread bare, whilst doing this will fit modern insulation to reduce noise.
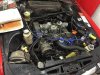
Remove engine and gearbox for complete overhaul replacing bearings, seals, mounting rubbers as required.
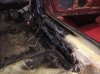
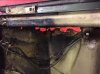
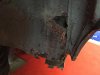
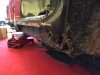
Repair any rust found in the base unit and panels.
Replace drivers door as it is completely rotten on the outer skin and has already has a replacement fitted.
Repaint Engine Bay
Re-spray all panels
Refurbish wheels.

Once this is all done and the car is back on the road the finishing touches will be looked at like chrome work, exhaust, lights etc.

I will post the work so far soon.
 
Okay so this is how I picked up the car, its what I would call a good 10 foot car :wink:

I have loads of books with the car but not a huge amount of history, so if anyone knows anything about its past drop me pm as it would be great to know.
 

Attachments

  • Full Car.jpg
    Full Car.jpg
    466.9 KB · Views: 822
  • Rear Full Car.jpg
    Rear Full Car.jpg
    446.7 KB · Views: 820
  • Front.jpg
    Front.jpg
    583.9 KB · Views: 820
  • Front Interior.jpg
    Front Interior.jpg
    386.5 KB · Views: 822
  • Rear interior.jpg
    Rear interior.jpg
    395.8 KB · Views: 821
Okay so out comes the interior and the thread bare carpets ready for a series 1.5 interior


I then started to find areas which looked a little more suspicious once all seats and carpet were removed, instead of what looked initially like a nice repair turned out quite ugly once picked at so with a dampened heart I started to strip down the exterior of the car.


Below the acres of fibre glass I found a piece of metal sandwiched in to make it magnetic, to make matters even worse the inner sill and floor didn't actually meet for around 2 foot and the outer sill was also peppered with holes around both jacking points.

Time now for some new panels I think


This is looking through the big holes in the outer sill to the inside sill.
I wont let this little set back get me down and will get on with getting rid of as much rust as physically possible and rebuilding this.
I'm still loving the P6B
 

Attachments

  • IMG_0644 (Copy).JPG
    IMG_0644 (Copy).JPG
    84.9 KB · Views: 824
  • IMG_0655 (Copy).JPG
    IMG_0655 (Copy).JPG
    104.1 KB · Views: 824
  • IMG_1025 (Copy).JPG
    IMG_1025 (Copy).JPG
    96.1 KB · Views: 825
  • IMG_1028 (Copy).JPG
    IMG_1028 (Copy).JPG
    62.8 KB · Views: 824
KO ON MELBORP! :LOL:
Hi John.
Welcome to the forum.
Nice to see a new project to follow.
Where are you located?
If you have any questions,need help dont forget to ask in the right section.
Also use the Rover P6 facebook pages for help.
You should only need flat pleat front seats to make it 1.5. unless you are going for 3500S boxpleat?
 
Okay, while I wait for the metal work to arrive its time to crack on with the engine bay, engine and gearbox.
The engine was giving a slight knock on the bottom end it seemed once I had the carbs balanced properly, so its out with that and have a good inspection of all the bearings, pistons, heads etc.
Also need to rebuild the gearbox to get rid of the whine in all but 4th gear, I will get that luxury feel back into the car instead of the London bus sound.


Engine Bay at the start


Heater Box out


Front wing off, wiper motor out, front slam plate off for repair

Still lots to do, wish me luck!
 

Attachments

  • IMG_0595 (Copy).JPG
    IMG_0595 (Copy).JPG
    115.1 KB · Views: 819
  • IMG_0601 (Copy).JPG
    IMG_0601 (Copy).JPG
    109.3 KB · Views: 818
  • IMG_1018 (Copy).JPG
    IMG_1018 (Copy).JPG
    85 KB · Views: 818
Argh! This is like deja-vu for me! :shock:

These fibreglass bodgers should be rounded up and shot. I feel your pain!
 
Hi Pilkie,

I'm located in Grantham, Lincolnshire. I am on the Facebook pages :D literally ask a few days ago on there if anyone has a good drivers door as mine is completely shot.
I would love to have a good boxpleat interior but funds just don't stretch that far yet. I have just got a good condition flat pleat set for it now but will look to change this once she is back on the road in the future.
I will most definitely be using the help from this forum its invaluable!
J
 
Hi Quagmire,

Oh god yes......Please get a firing line for them!!!!!
The worst part about it was that with both inner and outer sills gone there was no structural rigidity left....And to think it had just passed an MOT with NO....yes NO Advisories!!!!!!
 
Just a little update for all, not going quite so fast now due to family reasons but its still going.
All new panel work and steel has been ordered now so its time to start chopping out all this rust!


Now this D Post seriously isn't looking good, a new lower panel has been ordered for this to make the installation a little quicker.


More dreaded fibreglass found in both the above pictures hiding massive holes, I believe I have removed all traces of fibreglass now from this side of the vehicle :D


So Jobs to do on this side, Replace inner and outer sill panel, repair/replace jacking points, renew lower D post and replace splash panels front and rear....
Better crack on really!
 

Attachments

  • IMG_1177 (Copy).JPG
    IMG_1177 (Copy).JPG
    95.3 KB · Views: 756
  • IMG_1178 (Copy).JPG
    IMG_1178 (Copy).JPG
    88 KB · Views: 755
  • IMG_1180 (Copy).JPG
    IMG_1180 (Copy).JPG
    71.9 KB · Views: 756
  • IMG_1179 (Copy).JPG
    IMG_1179 (Copy).JPG
    76.8 KB · Views: 754
  • IMG_1182 (Copy).JPG
    IMG_1182 (Copy).JPG
    80.8 KB · Views: 754
I wish I had a pound for every P6 sill like that.... :wink:

Even just on the cars I've had it would get me a Big Mac meal ("...is that a large meal?", I hear you say :LOL: )
 
John.youens wrote,...
The engine was giving a slight knock on the bottom end

Hello John,

The main bearing caps on the two bolt engines can work loose, so a heavy knock when the engine is idling is not uncommon. If you drop the sump and check the torque on the caps, you may well find some or all are below the minimum torque setting.

Ron.
 
Hi Guys,

It is nice having a double garage to work in, the downside is that it gets full of junk lol, I swear anything the wife doesn't think belongs in the house gets pushed into the garage!!!
Only other snag is I live in an upside down house, so half Garage is under the house and most of the rooms apart from one bedroom are upstairs so I'm never popular when the kids are in bed and I'm angle grinding :LOL:

Thanks for the tip with the bearings, I will definitely have a look at that. The engine is coming out this week so the fun will begin with the overhaul. First off though I have to work out what the heck the spec of the engine is, I know its high compression and has a 3.9 Cam in it (Previous owner told me this), however the engine looks to be a 1980's v8 and possibly has an MOD Block. Goodness knows until I start stripping it down, I know the previous owner changed the engine but is very vague on what it is! From the looks of the engine though it is a MOD Block, with standard crank, 3.9 Cam & SD1 Heads with twin HIF6 SU's. My head is going to hurt I think when I start taking this apart!!!! aghhhhh

For the time being though I have been focusing on the Base Unit and have now got to replace most of the floor pan on the drivers side front due to the rust bug :( hopefully though once all the new metal is in it will last a good few years.

More pics to follow soon

J
 
Hi John,

Try checking your engine number against the list here, it should help you pinpoint what it started out as:

http://www.v8forum.co.uk/engineno2.htm

I had been doing the opposite to you, and been storing my front wings, bumper and front passenger seat in the back room at home whilst working on the front end- I was not popular at all! :shock:
 
Wow, you're not messing around are you?

There are lots of photos of the sill area and jacking points in the members projects section, but obviously anything you make will be better than what's there now.
 
Back
Top