Rear Caliper Removal

codekiddie

Active Member
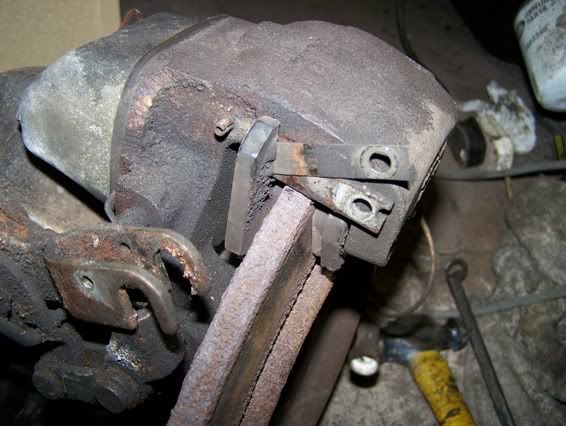
OK, so it's my turn to visit the rear calipers after noticing a nasty leak on the offside one. Been through the WM procedure to remove them, and am stuck at the last hurdle of removing the pivot nut. The nut is surrounded by some form of spring which doesn't seem to want to budge, so not sure what I am meant to do next :oops:

pivotnut.jpg


None of my sockets will close the spring sufficiently to allow the nut to be turned and it just turns the spring part instead. If I am simply meant to use a socket over the spring part, which size should it be please. Any other pointers gratefully received :D
 
Remove the driveshaft and disc, disconnect the brake hosee, then rotate the caliper until hits the diff output shaft, then using a good quality 15/16" AF OE spanner, remove the pivot nut. The cover doesn't come off. If you remove the handbrake quadrant you'll get a socket on it, but if you want the best result on refitting you'll have to remove the disc anyway.
 
harveyp6 said:
Remove the driveshaft and disc, disconnect the brake hosee, then rotate the caliper until hits the diff output shaft, then using a good quality 15/16" AF OE spanner, remove the pivot nut. The cover doesn't come off. If you remove the handbrake quadrant you'll get a socket on it, but if you want the best result on refitting you'll have to remove the disc anyway.
Thanks Harvey, I'll give that a go since it is only a few more bolts. Space doesn't seem to be a problem in terms of getting a socket on, but although I can get a 1" socket on it OK, I can't get the 15/16" to fit. I will have to get hold of a 15/16" OE spanner now as well:- the toolbox grows again :shock:
 
harveyp6 said:
Remove the driveshaft and disc, disconnect the brake hosee, then rotate the caliper until hits the diff output shaft, then using a good quality 15/16" AF OE spanner, remove the pivot nut. The cover doesn't come off. If you remove the handbrake quadrant you'll get a socket on it, but if you want the best result on refitting you'll have to remove the disc anyway.
Done the easy bit.....

pivotnut2.jpg


.....now have to wait until tomorrow after I get a new spanner :D Thanks again Harvey.
 
If you have a 15/16" AF socket, get that on there. Because youve had the cover turning you'll need to hammer the socket on, but it will fit, and it will remove it. The only reason for using a spanner is to avoid removing the quadrant stop bolt, and you've done that already.

PS. That pad slipper is fitted upside down.
 
harveyp6 said:
If you have a 15/16" AF socket, get that on there. Because youve had the cover turning you'll need to hammer the socket on, but it will fit, and it will remove it. The only reason for using a spanner is to avoid removing the quadrant stop bolt, and you've done that already.

PS. That pad slipper is fitted upside down.
OK Harvey, I'll try hammering it on :shock: . I had noticed the pad slipper when I was looking earlier, and was going to ask in case the WM was wrong, (didn't think it would be though). Should the rear ones be the same way up as they were fitted the same as the front?
 
codekiddie said:
OK Harvey, I'll try hammering it on :shock: .

If that offends your sensibilities, substitute "hammer" with "persuade".


codekiddie said:
I had noticed the pad slipper when I was looking earlier, and was going to ask in case the WM was wrong, (didn't think it would be though). Should the rear ones be the same way up as they were fitted the same as the front?

The rear is the same orientation as the front, but the book is wrong as far as the shim and spring are concerned. The shim goes on the front, the spring on the rear, despite what the book says.
 
Harvey, do you know the reasoning for the cap with the spring arrangement? That was changed fairly early on to a solid cap, I can't recall seeing the spring cap arrangement on the 68 NADA cars, and very few on the 67s.

Yours
Vern
 
Vern Klukas said:
Harvey, do you know the reasoning for the cap with the spring arrangement?

I can't say I do, all I can say is it came about at the same time the quadrant changed, and the old cap won't fit under the new one.
 
harveyp6 said:
If that offends your sensibilities, substitute "hammer" with "persuade".
No amount of 'persuasion' would get the socket on, but since I had the room now I just used a pair of Mole Grips :) ....

removed.jpg


....and a little while later....

stripped.jpg


I will still need to find a socket that fits, in order to torque it back up correctly on refit though :?
 
codekiddie said:
I will still need to find a socket that fits, in order to torque it back up correctly on refit though :?

You won't need to torque it, and you won't get a socket on it because the quadrant will be fitted, and that will prevent access for a socket, which is why you need the spanner.
 
You had me puzzled there Harvey as I just removed a pair using a socket and am sure I replaced the last ones using one too.
The answer appears to be a socket with a narrower top, like this except mine is a Draper 15/16" 1/2" drive:
king_dick_3.4drive.jpg

I find there's just enough room to get this type of socket on once the quadrant has been turned back.
 
harveyp6 said:
codekiddie said:
I will still need to find a socket that fits, in order to torque it back up correctly on refit though :?

You won't need to torque it, and you won't get a socket on it because the quadrant will be fitted, and that will prevent access for a socket, which is why you need the spanner.
So I still get to buy new tools :D

Do you happen to know if new pads come with the anti-rattle springs, as I seem to be missing one from the N/S caliper, and can't find it mentioned on any of the normal suppliers web pages :(

parts.jpg


Also, regarding your earlier comment of....

harveyp6 said:
the book is wrong as far as the shim and spring are concerned. The shim goes on the front, the spring on the rear, despite what the book says.
Which shim and spring are you referring to?

Willy Eckerslyke said:
I find there's just enough room to get this type of socket on once the quadrant has been turned back.
That's as far as I got, but then I couldn't get the socket on, which is why I followed Harvey's advice to remove the disc for better access and use a spanner. If my socket had fitted, the caliper would have come off easily. Just about to pull the other caliper now so maybe I will get lucky and get away with a (persuaded) socket :shock:
 
codekiddie said:
parts.jpg


Also, regarding your earlier comment of....

harveyp6 said:
the book is wrong as far as the shim and spring are concerned. The shim goes on the front, the spring on the rear, despite what the book says.
Which shim and spring are you referring to?

The one you've highlighted in your illustration, and the one that goes on the front and is the same shape as the slipper. They used to come as a kit with Girling pads, but they don't come with the aftermarket pad sets. The positioning of that drop spring is also correct in your illustration, as it is in the parts book IIRC, it's the WM that's wrong, showing that on the front when it should be on the rear.
 
Well, that was a bit easy :shock: :shock: :shock:

socketon.jpg


boltout.jpg


caliper2.jpg


I would say that I am finding the rear brakes not anywhere near as tricky as I had thought they might be, but that would just be tempting fate :? :? :?
 
harveyp6 said:
The one you've highlighted in your illustration, and the one that goes on the front and is the same shape as the slipper. They used to come as a kit with Girling pads, but they don't come with the aftermarket pad sets. The positioning of that drop spring is also correct in your illustration, as it is in the parts book IIRC, it's the WM that's wrong, showing that on the front when it should be on the rear.
Picture was from the parts book. I don't remember seeing any shims which is why I asked the question. I will check again :shock:

I also came across a part NOT in the parts book or WM when stripping down the caliper:-

extra.jpg


It was under the beam. I assume it is an upgrade of some sort from an earlier caliper???

I also didn't have the sleeves over the studs as per the WM.
 
codekiddie said:
I also came across a part NOT in the parts book or WM when stripping down the caliper:-

extra.jpg


It was under the beam. I assume it is an upgrade of some sort from an earlier caliper???

I also didn't have the sleeves over the studs as per the WM.


The sleeves disappeared, the studs changed, as did the beam, and the item pictured was added. Yours are later calipers as witnessed by the pivot nut you've had so much trouble with, and the quadrants with a stop at both ends.
 
harveyp6 said:
codekiddie said:
I don't remember seeing any shims which is why I asked the question. I will check again :shock:

FYI.

a101_0287.jpg


Pic_1208_068.jpg~320x480
That will be me short of two shims and a spring then :( :( :(

Before you know it there's two of the blighters on the bench.

twocal.jpg


Now off to order the rebuild parts :D
 
Back
Top