Rover NADA 3500S Auto

keynsham1

Active Member
For the last two years I have been 'Refurbishing' a 1970 Rover NADA 3500S Auto which I bought from Ian Wilson at Rover Classics. My original plan was to get it on the road and do a rolling restoration. I didn't do that, but I have ended up rebuilding virtually everything. The car was completely standard down to the original dealer fit radio and aerial. It still has it's original engine and internally it is in excellent condition. All the emmissions equipment for California was also present. I am well on the way to completeing this project now and hopefully will have it on the road sometime this summer. I have attached a few pictures for interest. I will add to this topic and add more info and pictures over the few next months.

Richard.
 

Attachments

  • 4_1_jpg.jpg
    4_1_jpg.jpg
    48.7 KB · Views: 2,514
  • 3_jpg.jpg
    3_jpg.jpg
    80.8 KB · Views: 2,514
  • Dscf0084.jpg
    Dscf0084.jpg
    73.8 KB · Views: 2,514
  • Dscf0073.jpg
    Dscf0073.jpg
    42.2 KB · Views: 2,514
The air con was working, but leaking before it came apart. Assuming it was a joint, hopefully this will now be cured. It isn't charged up at the moment so I don't know if it will work or not. Just spent the afternoon removing the front near side suspension spring and all. Always a challenge! Nice thing about a California car is there is absolutely no rust!
 

Attachments

  • Dscf0194.jpg
    Dscf0194.jpg
    68.2 KB · Views: 2,495
More work done today but as usual, nowhere near as much as I had hoped. First job was to underseal the front valance before fitment. Easy. Next to fit new splash seals and wing to body rubbers in preparation of front wing fitting. Easy. Lastly to bleed the entire brake system....Erm.

The Nada V8 as you may or may not know has a dual line braking system. It is weird because the front and rear circuits are completely separate, but the front circuit is pressurised by the rear circuit via a floating piston in a common bore in the servo. If you loose fluid pressure to the rear, you also loose it to the front regardless of the condition of the front system. The way the system recovers is for the servo to mechanically push on the floating piston and operate the front brakes. If the front fails, the rear system will operate normally however. I have reconditioned both master cylinder, servo and brake calipers and replaced all brake pipes with copper so there was no fluid in the system when I started. Bleeding the system is done rear first and then each front individually. If you don't bleed the rear first, there is no fluid to push on the floating piston, and nothing happens at the front. It also has to be done very slowly as the floating piston normally moves a very small amount, just taking up pad movement but when bleeding it moves all the way to the end of the servo bore and is returned via a spring. As the seals are all new, the return is slow and so if you try to bleed the system at the usual speed, you end up with the floating piston at full travel and the brake pedal locks
ing up, without any braking or fluid movement.

That is probably enough tech stuff, but needeless to say I am now an expert in the NADA 3500S dual braking system so if anyone wants to know more, let me know!


I have added a few more pictures for your interest! Second shows how rust free California cars are. My PAS box had been leaking and the underseal had come away in the wheelarch. When the area was cleaned up, all you see is the original finish underneath and no rust! First picture is after front suspension reassembly. I hate that spring but it is in nice and safe now.

Lastly, does anyone know how to order photos on these pages? It always puts the first picture uploaded last!
 

Attachments

  • Dscf0208.jpg
    Dscf0208.jpg
    77.8 KB · Views: 2,420
  • Dscf0228.jpg
    Dscf0228.jpg
    75.4 KB · Views: 2,420
Lastly, does anyone know how to order photos on these pages? It always puts the first picture uploaded last!

Once you have uploaded the pics, you should see them listed at the bottom of the posting screen, with two buttons "Place Inline" and "Delete", fairly obvious what the second one does, but the first one puts the image actually in the post, so you can have pictures in between blocks of text etc. When you click the button it puts a little line of code in the text, you can move this text to the place you want the picture to appear.

Give it a whirl ! :D
 
Thanks for the help on photos. I will hopefully add some pictures in the right order here!

Not wanting to let the heat off, and because my wife and daughter are away for a few days, I have spent another few hours in the garage. I have now fitted the rear valence, grille, and badge.

The more I refit to this car, the more I realise how hand built and 'individual' they are. The valance is not the original as this was beyond repair. It is a second hand replacement and it is roughly the same shape as the one that came off!
Anyway, here are a few more pictures of my evenings endeavours.


Next job...fit the wings!!!
 

Attachments

  • Dscf0236.jpg
    Dscf0236.jpg
    56.7 KB · Views: 2,365
  • Dscf0235.jpg
    Dscf0235.jpg
    65.3 KB · Views: 2,364
  • Dscf0237.jpg
    Dscf0237.jpg
    61.5 KB · Views: 2,364
  • Dscf0240.jpg
    Dscf0240.jpg
    53.6 KB · Views: 2,364
  • Dscf0245.jpg
    Dscf0245.jpg
    54 KB · Views: 2,364
WOW, your car is looking great! You have been extremely thorough in your work it looks like. What colour is it? Looking at the photo of the inner wing, I wonder how you have applied the underseal? Have you used a brush or is it sprayed, and did you remove all the old underseal first?
Good luck with your completion of the car, I really hope I will be able to see it live sometimes!

regards, Barten
 
I second Barten, that is a lovely red and your project is looking great.

I'm curious about how you've bled the dual circuit brakes, as I've never done it rears first and have had soft brake pedals on both my export cars (hoping that is the connection). After my last all-round seals job I bled the four-way splitter by the servo first of all, then the servo outlet port, and then calipers front L + rear, front R + rear or whatever it was the book said. Brakes worked well, MOT man remarked on that, car didn't nod too much but pedal was never hard like on other cars and on single-circuit P6s. And similarly, having recently fitted new seals to the rear calipers only, and bleeding the rear, by your account I have to bleed the rest too..? :|
 
My point is that if you have no fluid in the system at all, as I had, then you cannot bleed the front until you have fluid in the rear system. If the rear system is spongy then it follows that the pedal will feel spongy even if the front system is 'as new' as the system compresses the rear fluid to operate the floating piston which in turn pressurises the front fluid and operates the front brakes. The following diagram might help!


If the system is pretty full and you are just bleeding the brakes normally, I can't see any obvious reason why you can't start anywhere. The manual says rear first, then front farthest from the servo, then the other front. I suppose if the rear is not in a good shape, it could affect the bleeding operation on the front. I am now begining to get into that 'opinion and guessing' area here though as I don't really know why the order is given. I will give it some more thought over the weekend!
 

Attachments

  • Servo.jpg
    Servo.jpg
    58.5 KB · Views: 2,299
Hi richard,
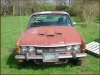
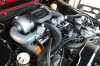
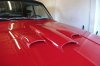
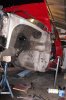
Nice to see the pictures on here. As richard bought the car from me i have asked him to keep me updated on progress and send me pictures which i have thoroughly enjoyed looking at. This was the car i wanted to keep, but richard wanted a red one, did not fancy white, which i had as well, plus the white one did not have air-con. Any way i am on my way with the white one, everything has been replaced underneath with new and i mean everything. I nearly have a full air-con system and shall hopefully soon be getting a good air-con heater box. It will then keep me busy ( while my car comes back as it is away having fuel injection fitted ) stripping it all down, cleaning and re-commisioning. I am hopefully going to beamish in it, it is white with sandalwood ambla interior. i am going to enjoy driving it this year as i have spent too much on it allready. next year all being well it will have a respray in white, a new leather interior which will be red as that is one of my favourite combinations. All NADA'S left the factory well specked for the american market. As standard wraparound bumpers, square front and rear no plate plinths, icelert, blacked out front aluminium grille, embossed 3500'S badges, three functional scoops on the bonnet ( they were not just for show ) front and rear side markers and indicators on the wings. boot mount kit, PAS, sundym glass, leather covered centre console, front door pockets under the armrests, four times electric windows, front teardrop headrests. Also a coachline stripe above the metal strip down the side of the car and polished 'S' trims. the two options were leather, most had ambla as it lasted longer than leather with the sun and air-con, which hopefully will one day get fitted to mine. :roll:
 
This is one of the most beautiful P6 cars I have even seen, the work is a real tribute to you.

Good luck with the rest of the work and I hope to see it in the flesh one day.

Colin
 
What a lovely job you're making of this car Richard, I hope to see it in the metal this summer.

Congratulations!
 
Thanks Richard for the diagramme and details. It'll help me when replacing the fluid soon! Good luck putting your car back together, which must be the most gratifying job I can think of :D
 
Just finished refitting my front wing. I have now got the wing to door gap better, but not perfect. Are there any perfect gaps on P6's??? I spent all yesterday doing small jobs. Everything takes three times longer that expected. When I tried to refit the wiring for the front light, the bullet connectors disintegrated. The 4 way joints can be bought at Halfords by the way, so it was a trip out for me! I also fitted a rechromed petrol filler cap, dyed a second hand leather covered steering wheel with black shoe dye (Came up rather well!) fitted another seal or two, fitted a few door handles etc.etc. There seem to be a million tasks to do. Maybe my May deadline for completion was a bit optimistic!

Looking good in the sun!
 

Attachments

  • Dscf0329.jpg
    Dscf0329.jpg
    52.4 KB · Views: 644
  • Dscf0327.jpg
    Dscf0327.jpg
    43.8 KB · Views: 644
Back
Top