Rust on my rover not so bad.

kees57

New Member
The rover i did buy past 3 weeks do not have really heavy rust, it is already be renovated in 1983, so bodyshultz anti rust is applyed.

Here some pictures of the rust work, a part of the bottom is very thin and needs weldling, because the bottom parts are not for
sale I do need to maken them myself, how thick is the metal normally of a rover? I did see it is not really very thick, also the heavy
stressed panels are not thick, is this normal? because of the vorm of that metal is makes it very strong.

The rust I do see on the part of the bottom on drivers side is rust, but not thin, just lineseed and bodyshultz and ready.


this the same, just some rust, still very strong but needs treatment afcourse.


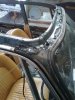
Here it is thin around the stop, needs welding and also part of inner sill, (weld on bottom part is bad).


same bottom part on sill.


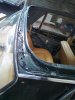
wings side, not rot, just rust, treated with lineseed oil.


it looks very good, so I have work to do.

regards

kees
 
Well that looks like whoever did that 30 years ago did a fine job. What most people forget is that this type of protection still needs annual inspection and maintenance. It ain't a one-off job. I

You'll need to remove it completely around the areas of corrosion anyway and that does look like a hole near the plug. I'd say whatever work you have there is an easy fix for any good welder.

Longer term I would remove that thick protection all over for a more thorough inspection. Not a fun job.

The problem with this type of protection was always that water could get under it unseen. That's why epoxy is popular at the moment. It's more durable, rust doesn't tend to spread under it and because it's not a thick coating it's easy to see any new rust forming and deal with it.

That's my plan anyway, like you I have old skool underseal. Phosphating, epoxy and dinotrol will eventually take it's place.
 
The rust on the plug is bad, but the rust is in the car, this plate is very thin because water get in the car when rain,
not much but it get moisure.

I do remove al stuff and do anti rust and welding, a part of the inner sill has also be repaired, I did see it is still for sale
new.

Al the rust who start is by the people not control it on time, special the stuff inside the car like the damping (hennep rope?)

regards

kees
 
Hi All

Do now somebody of there is differents in the heater in the rovers? I need a new one because mine is complete
rotten underneath of it, difficult to see, but did see the radiator in it, I do not now it is repairable but als e
new heater is all the same for the 2200TC or the V8 or the 200TC SC then it is easy replace.

DO somebody now what can be wrong if the starter sometimes do not grip when starting the engine, then I hear teeth
sound like if you do mis a gear (teeth brush :D ). remove the starter is not so easy, upper bold are little bad place,
maybe tip, rover is not always easy to remove things, not much room.

this is the reason afcourse water come in the car .

I can buy one here in holland, parts enough.

regards

kees
 
Hi All

I am started to repair the rust problems, it needs welding and so I have dismantle it now
also it leaks water and this looks like the roof does that, or the front window, for al rover
lovers here look very carefull for leaks because this water go in everywere also in hollow
parts of the frame inside where it cause rust hidden from the eye, I have spoken a specialist
about this problem, the man do have done rovers for years. Last photo is where rust look
bad but it is not, only a small hole rest is just fine and has a lot metal left, photo,s make
it sometimes more worse but that is only my thought.

I just go remove all and search for fish swimming somewhere in the chassis.

I do put pictures of it here, the first now.

DSCN1744_zps494e019e.jpg


DSCN1747_zpsedc2b084.jpg


DSCN1752_zpsac11d194.jpg


DSCN1746_zpsca58fc61.jpg


DSCN1745_zps76760df6.jpg


DSCN1751_zpse3e9d2ac.jpg


DSCN1750_zpsb521ca95.jpg
 
I ams tripping the roof, I do see water is/ was present because of rust on the style
beside the front window.

I need so remove the roof for repairing the seal there, if there is one.

DSCN1753_zps2cad4f18.jpg
 
Hello Kees.
Do you want to just remove the headlining or the whole roof panel?
Where is the water coming in?
It could be your gutter rails that are rotten,so leaking water in via the top of the doors!
It is extreemly rare for water to get in via the roof seams and the headlining unless there is some rot in the main roof frame,gutters!!


You will need to remove the front internal black pillar trims,the seatbelts and seatbelt pillar trims,the rear seat backs,the rear internal 1/4 panels,the 2 side trim strips above both doors,which need EXTREEMLY careful removal as they stick to the headlining and can easily tear,so go slow and tease it apart.
Also remove both the rear external 1/4 panels held on with cross head screws in the door shuts and behind the inner 1/4 panel!
They will need to be jiggled out,as they locate in the rear screen seal,and the top bit in the door shut may need to be slightly bent to get it out!
Both the sun visors and the rear view mirror,then ease the panel that goes across the top of the screen, back and off.
While there undo the roof aerial if you have one!
All of these panels have obvious and/or hidden cross headed fixings that need to come out.
That should leave you with just the headlining in place,which is retained by cross head screws,and the ones on the center pillar are quite high up and not easily seen.
You should then be able to tilt the headlining down at the front and out of the passengers door.
You will need to disconnect the interior light wiring at this point!
Its easier to get it out with 2 people!
You will then need to drill out the rivets securing the front pillar stainless trims and top caps,that are located behind the rubber seal in the door shut.
Remove these carefully and also the trim across the top of the screen.
The stainless trims on the side gutters should stay in place!
Only remove them if your gutter is rotten and needs weld repairs!
The roof is held in with 26, I think it was,cross head screws all round the frame.
The front and rear ones are got at from inside the car,and the side ones from the top of the door shuts,and behind the 1/4 panel.
Carefully check you have removed them all.
Once you are SURE they are ALL out,then carefully,from the front corners,lever the roof panel up a bit at each side,till you can feel it loosen from the mastik type sealant.
With a person either side lift it up from the front gradually about 30cm,then slide it forwards out of the rear screen seal.
Dont think I have missed anything?
Dont hesitate to ask if you need any other help!
 

Attachments

  • Photo1210 (375x500).jpg
    Photo1210 (375x500).jpg
    156.9 KB · Views: 1,314
  • Photo1209 (375x500).jpg
    Photo1209 (375x500).jpg
    141.5 KB · Views: 1,313
Hi Pilki

Thanks for the extensed explaining, I have/had in the meantime things done by stripping the whole car down, Only the lower bold of the rear wing
do,n coming out, rust and slips.

I have abgain do some pictures, I have seen that the side gutter is oke, some rust but nothing leaking just some paint is of, inside top is out, roof is stil
bolted, I see your picture and think thar water indeed can not come easely in this because of the upstanding form of it, I did see a welding repair on one of the
front window style who is under the crome covering plate, this weld I can see in the inside and is again rusty, this is because it is not treated and that is needed
because it do leak always some bit, therefore I do solder things where strength is not a issiue, then it is always water proof.

I put some pictures, I have seen a rotten place where water can come in, the heater housing is rotten on the bodem of it, but give not water in, the rubbers of the
wipers are gone, so water can go in there and this is not the way to do afcourse.

I did see het stripping is not a difficult thing to do, it looks very similar to a citroen DS.

Roof looks good.

DSCN1768_zps872066a2.jpg


DSCN1767_zps9097a704.jpg


under hocky stick.

DSCN1764_zps15d9616d.jpg


this one leaks water in (when driving)

DSCN1756_zpsf2c488d4.jpg


some more rust, nothing bad.

DSCN1755_zps264e2f6a.jpg


Here is the repair from a restaurater in 1981, grinted but not treated afterwards, not professional
the inside (not on photo) is here on top of this style welded but also not treated agains leaks..

DSCN1753_zps2cad4f18.jpg


This one is rotten down in the corner, also in the boot there is rust in that same corner, bold do not get out
do turn but rotten there, other side is oke.

DSCN1771_zps70f5cfaa.jpg


regards

kees
 
@Pilkie

That's useful as my roof will need to come off ideally for a respray - good to know I will probably not need to remove the side stainless rails. (you should compile your pictures into a "how to dimantle and reassemble a P6" book) Any hint/tips as to where and how much sealant to reapply? I can't believe looking at pictures of the remaining gunk that it was particularly carefully applied at the factory.

Unlike the rear arch/d-panel rot, the rot at the front seems to affect some cars and not others. I'm guessing this is a function of how well the factory did this particular job at the the time or even which individual did the job.

Also the interior side trim. This clips, right? Which direction to pull? down towards the floor outwards towards the opposite door.
 
I took a load if pictures when removing and replacing my roof panel - it's here

viewtopic.php?f=21&t=6548&start=390#p97178

As far as the sealant goes, use a non setting butyl, (e.g. soudal butyrub) and run an unbroken bead of around 6- 8mm, outside of the fixing holes around the whole roof.

I would remove the stainless trim though, as you can get rust under it.

Richard
 
quattro said:
I took a load if pictures when removing and replacing my roof panel - it's here

viewtopic.php?f=21&t=6548&start=390#p97178

As far as the sealant goes, use a non setting butyl, (e.g. soudal butyrub) and run an unbroken bead of around 6- 8mm, outside of the fixing holes around the whole roof.

I would remove the stainless trim though, as you can get rust under it.

Richard

Hi Richard

Nice car you have there!! I see you did much work on it, have you refit the chairs yourself? anyway i have a lot of usefull information found there thanks.

I have more work then you, I think that even the bearings of the engine are worn, there is a thick slack in the sump with metal powder like stuff who stick
on a magnet, even I did see s metal splinter but it was very little, maybe because of there is something fallen in the sump it has scratch some metal.

it do run, and has 50 psi oil pressure when driving 50 km hour, and cold idle but when idle warm it is 30 a 35 psi rising when give more rpm.s
gearbox makes some sound in its lower gears, not in the fourth, but I have a open hole under the stick let also sound in.

I go remove the sump and see, I have leak from the front krank seal also, it can be bearings afcourse, I will check that later.

I have not yet removed the roof, and I do use your tip for sealant, I use alsways the stuff used for mobile home windows, that is the same who do not glue
but only seal.

I have need welding the car floor but a part is that mountain part who is not easy to form, maybe grint a piece from a old P6 to repair that because
there are no floor parts anymore.

regards
 
I have remove the strips, this was not hard really.

But the roof is stuck, the old restaurator Bart Holland has weld onderneath it and use sealant who glu also,

it is not movable ad all, maybe there are more bolds then the back and the front?

DSCN1773_zps104f3f21.jpg


DSCN1772_zps952d4780.jpg


styles looks really good, there was debris in one of them making water coming in.

regards
 
There are 28 screws, all around the roof panel, so yes there are screws back and front.

If you have 28 of them, it should come up with a gentle lever under the lip in your picture.

Took me a few seconds to work out what the picture was? :)

Richard
 
quattro said:
Took me a few seconds to work out what the picture was? :)

Richard

The car was just taking off.

I have not remove 28 screws, but 10 I think alone back and front, where are the other ones?

I dis see small holes on sides but, are she hidden there?

Never mind, found them .

regards

kees
 
I did some more research baout our rust devil, as for I see everything bottom'net has rust
these cars rust on to vertical metal parts because of water coming in, and get bad.

I have some quenstions is there a schematic about metal work of this car? special where
spotwelds are.

The most damage is on front, behind the lights I can not reach for repair very well, so any tips are welcome.

bottom plate and such is not so difficult, I need to now how to start the best, here are professionals who
have for shure experience.

Tip for people, there is a welding wire for mig who is called SG titan wire, this weld perfectly over rust and dirt,
it is special for car repairs.

see pictures of damage, you now pictures give always dramatic idea,s but is is less dramatic in real.

DSCN1825_zps795bd0b2.jpg
[/URL]

DSCN1824_zps296a01ff.jpg
[/URL]

DSCN1823_zps8d7f740d.jpg
[/URL]

DSCN1822_zps57f361b0.jpg
[/URL]

DSCN1821_zps4d2318be.jpg
[/URL]

This one is ready, rust treated and welded.

DSCN1816_zpsf0ea65a3.jpg
[/URL]

regards

kees
 
Back
Top