Sparky's winter/spring/summer/autumn work

I've been terrified of gearboxes ever since, as a callow youth, we attempted to rebuild the gearbox on a 997 Cooper on the afternoon before we were due to use the car on an overnight 12 car rally. A loud ping and balls, springs etc etc went all over the garage. We used a mate's mini traveller for the rally!

So I shall be holding everything crossed for you when you get to putting it back together!

Chris
 
The damage to the pump is from sucking the fuzz in and trying to eat it with fiber gears and an alloy housing.... :shock:
Yours looks good compared to mine...mind you I had visible play on the input bearing. :cry:
 
chrisyork said:
I've been terrified of gearboxes ever since, as a callow youth, we attempted to rebuild the gearbox on a 997 Cooper on the afternoon before we were due to use the car on an overnight 12 car rally. A loud ping and balls, springs etc etc went all over the garage. We used a mate's mini traveller for the rally!

So I shall be holding everything crossed for you when you get to putting it back together!

Chris

Me too Chris, with my first ever attempt at a gearbox, a 4 speed TC unit. It's when you hear that, 'tink tink' on the other side of the garage that your heart sinks.

I was extra careful with this one, but still managed to lose the spring and one of the slipper pads :evil:

unstable load said:
The damage to the pump is from sucking the fuzz in and trying to eat it with fiber gears and an alloy housing.... :shock:
Yours looks good compared to mine...mind you I had visible play on the input bearing. :cry:

You could catch hold of the input shaft and wiggle it from one side to the other, but not much.

I am still not sure where the swarf came from as it appears to be more than the damage on the layshaft :?:

I do know though, that I will be happier now it's gone and have an oil pump working to full capacity.

Richard
 
Hi Richard,

Did the damage to your gearbox result from it not being sufficiently strong enough to cope with the torque that your engine delivers or was it likely something else? How many miles had the box seen and what would be considered the normal life expectency in terms of miles of such a gearbox?

Ron.
 
SydneyRoverP6B said:
Hi Richard,

Did the damage to your gearbox result from it not being sufficiently strong enough to cope with the torque that your engine delivers or was it likely something else? How many miles had the box seen and what would be considered the normal life expectency in terms of miles of such a gearbox?

Ron.

I wouldn't have thought so Ron.

The only damage I have found is the reverse gear where it has been crashed in, (I assume) and the resultant oil pump damage from the swarf.

The gearbox has done around 6,000 miles since a rebuild, or so I am told. When I first bought the car, it was very difficult to change gear so I drained the box of the EP grease (It was thick stuff) and washed it out with white spirit and refilled it with MTL. I got a lot of swarf out then, and afterwards it changed gear very well, a real slick shifter in fact. I am thinking that the damge was done with the thick goo in it as it was difficult to change gear, and now it is all cleaned out it will not suffer any more - I may be hoping more than thinking 8)

The box is a 19A prefix which means it was originally for a V8 or VDP, and with a B suffix which means it is quite an early one. The 28A is better as it is strengthened for the Vitesse engine and the D suffix had larger bearings so is the best one to have.

Richard
 
Hi Ron

Given that there is no such thing as an infinite life gearbox - or any other piece of engineered mechanism - all gearboxes suffer terminal damage eventually. The LT77 certainly wouldn't be anyone's choice for delaying that point as long as possible. The bearing problems are well known, although these are almost certainly really a symptom of lack of stiffness in either the shafts or casings, or both. BL weren't impressed either, and a series of upgrades took place until the box was replaced completely by the R380. None of the upgrades solved the basic problems.

It's used as the default option in the UK for upgrading from the (much worse) Rover 4 speed box solely because of the plentiful supply of boxes ready fitted with the correct bellhousing, clutch etc from rusted out SD1's. It's notable that in Australia, where the SD1 was not in such plentiful supply, the standard upgrade seems to be a Toyota box.

Consensus seems to be that the LT77 performs quie well, provided that you are prepared to act quickly to replace mainshaft bearings as required. If left after problems are evident, then the box becomes scrap fairly rapidly. Change quality is often criticised, and it is never going to be a standard setter, but using the correct - ie not what Rover recommended - Castrol SMX equivalent fluid improves things to a completely acceptable level.

Richard

I agree tht you haven't found nearly enough damage to account for the quntities of swarf in your box. Perhaps the swarf in your box is therefore a hang over from it's previous failure? :evil:

Chris
 
You never know what was involved in the previous "rebuild", could have been no more than some new seals and a coat of silver paint....
 
Don't be disappointed if you find swarf on your plug after your rebuild, either.
It is perfectly normal for running in with new bits and tolerances after the work done.
 
Hi Richard, impressive work so far - well done. Just wondered where you got the big gear puller? It looks like quite a nice useful bit of kit.
 
I haven’t done a step by step guide to rebuilding this thing, as I got a bit engrossed in actually doing it. I must say that it is a bit more involved than I first thought, but still within the capabilities of anyone who is methodical in their approach and has some patience and a few tools.

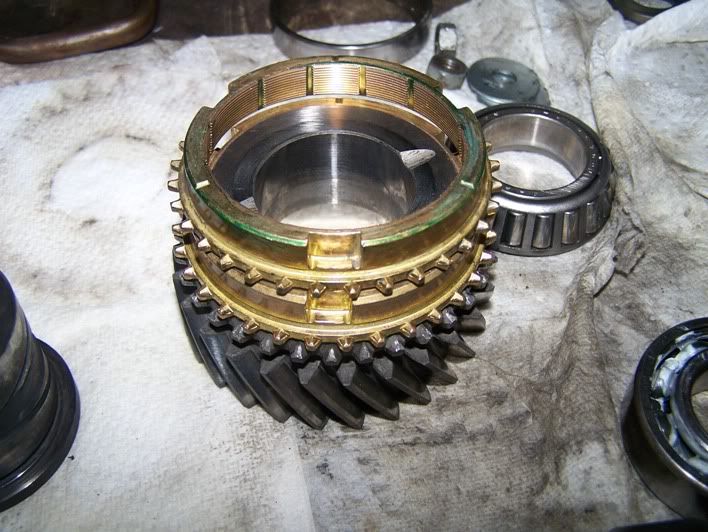
First thing to do is to have a good look around the internet and read up on the internals of the 2WD version of the LT77. I used a manual for a car which had the LT77 fitted, but to be honest it wasn’t much good. If I hadn’t have had the internet, I would have been in trouble. Mainly because, although I was very careful taking things apart and took a load of photos, I still managed to get confused with things like, why are there four synchro rings of one type, and one of another? The one in the pic with the wider lugs is second btw. I don’t know why it has wider lugs?
f100_1638.jpg

This synchro hub is not symmetrical and it‘s not in any way obvious which way it goes back on. Of course it’s covered when it’s on the mainshaft so I haven’t got a photo of it in place.
d100_1634.jpg


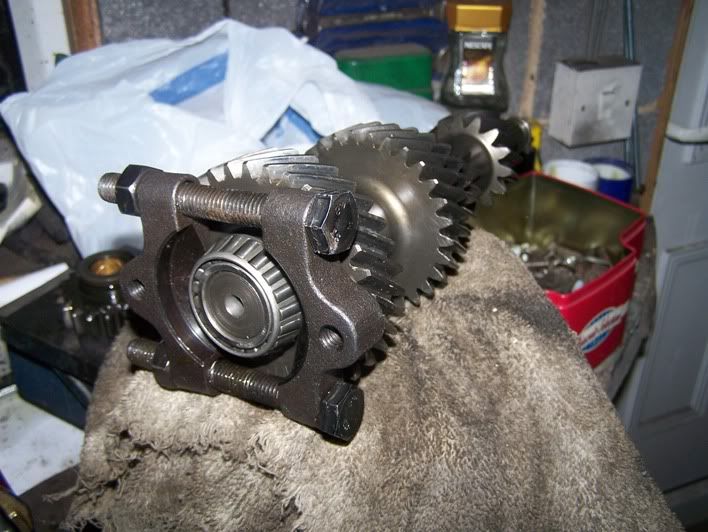
You will need a bearing separator and a selection of pullers to get the old bearings/gears off.
c100_1649.jpg

And I still haven’t worked out how to get this pressed in race out of the input shaft, so I had to get violent with it. Manual says, ‘replace bearings if required,’ or words to that effect.
g100_1677.jpg

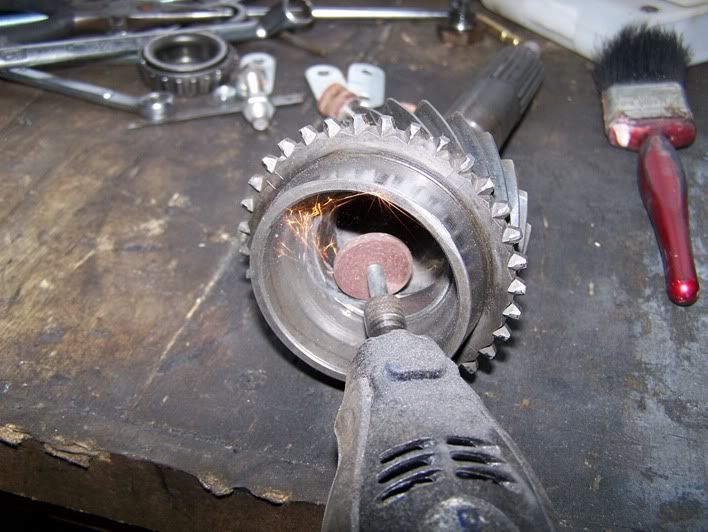
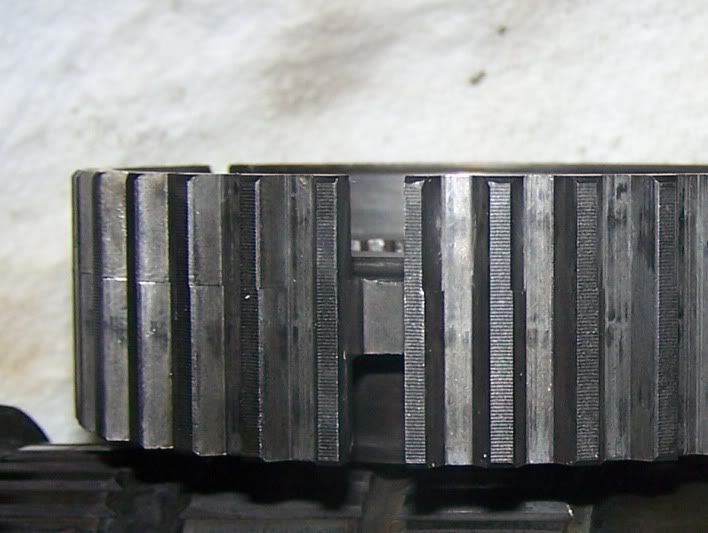
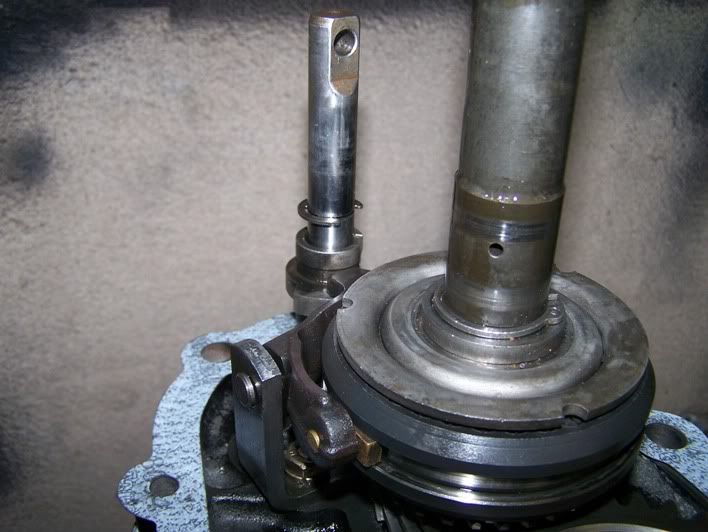
The wear on the top of this synchro hub isn’t actually wear at all, the flats are machined into the hub to stop it from jumping out of third gear, and must face third when reassembling.
e100_1636.jpg

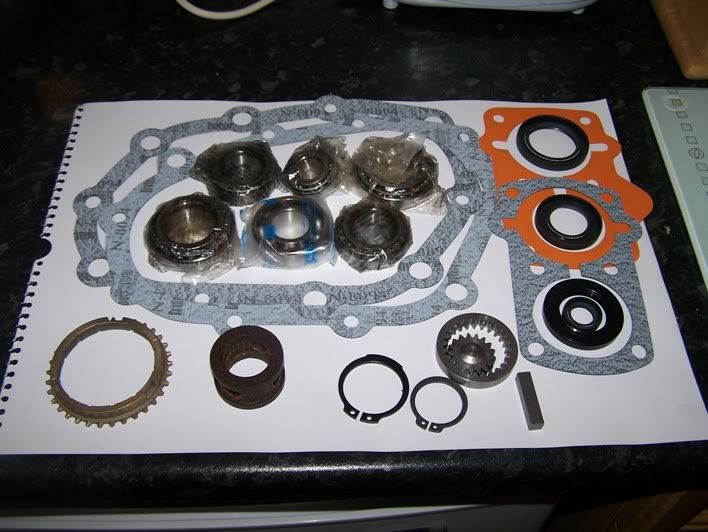
You can buy all of the bits separtately, but I opted for a rebuild kit with Timekin bearings and some extras, which included oil ring, circlip set (the large one doesn’t fit anywhere?, steel oil pump gears, and fourth synchro ring. All that lot came to around £140.00. I could have got away without the bearings as they seemed fine, but thought better of it.
b100_1652.jpg

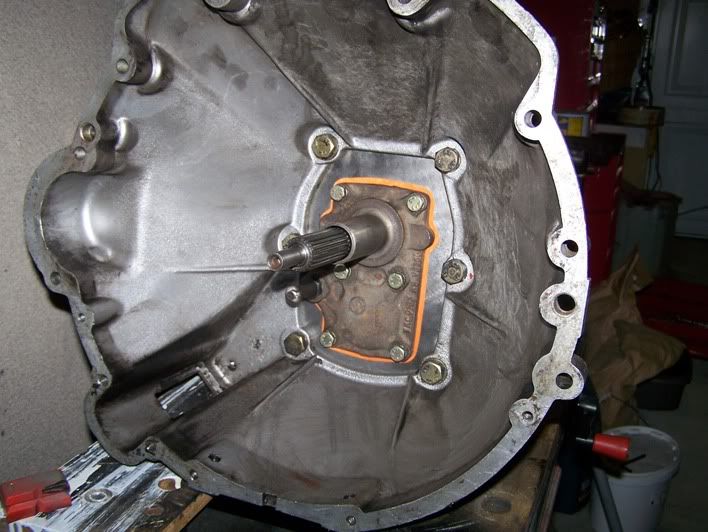
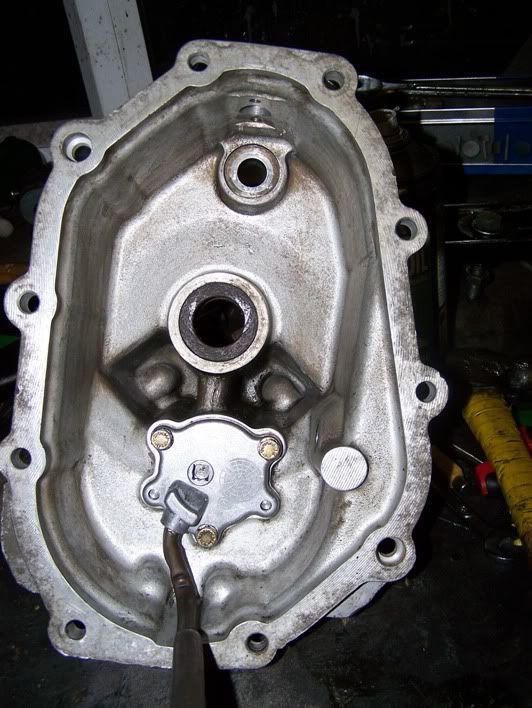
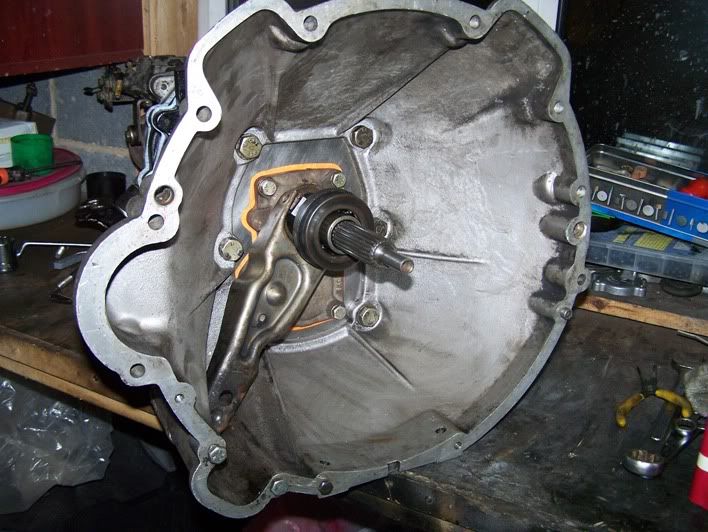
So the front casing is now on and torqued up to enable me to check the end floats of the main and lay shafts. Again, the manual doesn’t mention the actual torque figure so I had to find it on the net. Both the front cover and the bolts holding the front to rear cover (and clamping the centre plate) are 21 lb/ft.
h100_1680.jpg

i100_1681.jpg

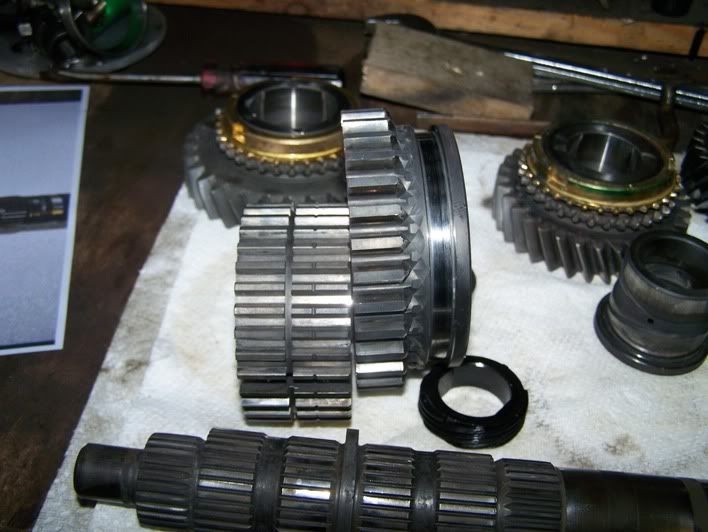
The manual states to remove the third gear first, then first and second. This makes it difficult to remove third as second is in the way. It is a lot easier to remove second/first assembly first i.e. strip the rear of the mainshaft first, as second is bigger than third and can be pulled off without fouling second. I wonder if that makes sense?
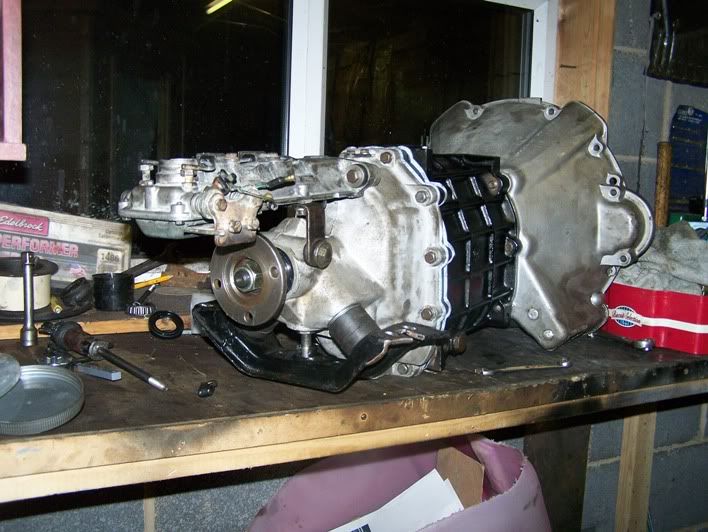
The manual also says that after sorting end floats, to remove the slave bolts before reinstalling five gear. I am not sure why it says this as you are going to be trying to press the fifth gear assembly onto the mainshaft with a floppy centre plate, so I will be ignoring that bit, bolting the bellhousing on and having a stable platform to refit the rear end.
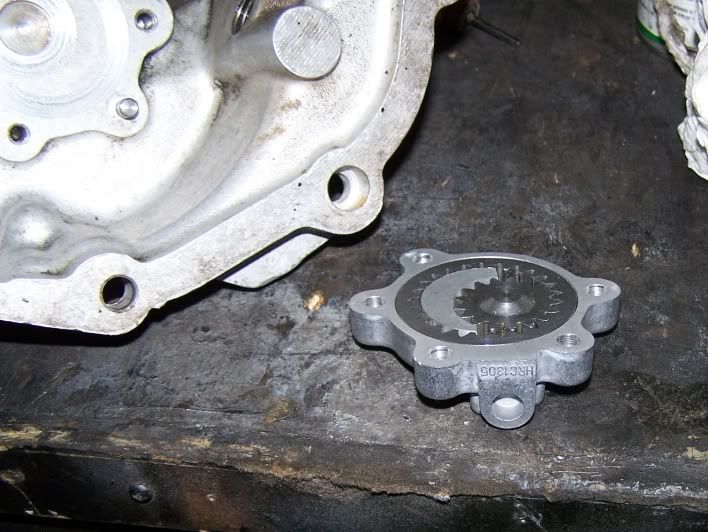
We’ll see how that goes. I am still waiting for the new oil pump cover to arrive, then it’s back together and pop it back in.
 
JVY said:
Hi Richard, impressive work so far - well done. Just wondered where you got the big gear puller? It looks like quite a nice useful bit of kit.

I got it from ebay for about £80.00 a while ago now.

I did think that it was a lot smaller than it was, it's enormous :shock:

There is one on ebay at the moment, bit pricey though http://www.ebay.co.uk/itm/Trident-Hydra ... 682wt_1139

Very useful, I managed to pull off the top link bushes and with a bit of creative thinking, managed to put them back on with it as well.

Richard
 
You'll get enormous satisfaction when it's all back together and you're changing gear and can visualise what's doing what inside the box
I'm envious
 
If you are still struggling to get that inner race out, run a bead of arc or mig weld around the centre of the shell and as it cools it will shrink slightly and you can often remove it by hand.

DON'T weld it to the gear, though....... :mrgreen:
 
Right, I’ve always fancied a dial gauge but never had one, so with the help of ebay and my paypal account, one turned up a few days later. I tested the input shaft, which is dead centre between the two variants, and the layshaft which is right at the limit of being tight, so should be all good.

On with the bellhousing and torque it up so I can upend it on the workmate. The input shaft is actually slightly proud of the bellhousing, so you can't put in on a bench.

j101_1682.jpg

The new oil pump cover arrived and was a nice snug fit with the gears, but didn’t have the hole for oil inlet? I take it that there are different inlet passages for different models, so I had to drill it out to fit. Good job I noticed that :shock:

j101_1687.jpg


Rear cover all back together with its new oil pump, pick up and oil ring.

j101_1688.jpg


After fitting reverse gear and all of its bits to the centre plate, except for the circlip on the selector shaft, I tried and tried to refit the rear cover. The problem is that the new oil ring is very tight and needs to be gently persuaded to fit, BUT you can’t force it on as you have to make sure that the square oil pump drive has engaged in the layshaft and the oil pump. You can always get fed up with trying to align it, and put a couple of bolts in and carefully ease it down into position. Then when it doesn’t drop in, remove it and file off the burr that the oil gear has on it when the drive didn’t connect properly. You can actually see the oil pump drive through the oil level hole but only just.

After what seemed like a few hours of cussing and swearing, I finally managed to get it to fit, by tapping it down with a soft mallet (Fist) and put the bolts in. Then I removed it all again to fit the F&^%*g circlip onto the selector shaft :twisted: . Not my finest hour :oops:

j101_1694.jpg


In with the selector locators or whatever they’re called and it’s ready. The speedo drive was a very tight fit and didn't want to play, so being plastic, I dropped it into a cup of very hot water. After a few seconds it lifted up slightly and almost floated, so I assumed it had expanded to make it lighter. I dropped in on again and it dropped into place easily with a carefully aimed screwdriver. Then on with the spacer, bearing and oil seal, followed by the outlet bit of the speedo drive, and the rear flange. Tightened it to 150lb ft, and now my back hurts :shock:

j101_1699.jpg


I did strip down the gear lever extension, clean it all up and regrease it. All of the tolerances seemed fine so just slapped it back together and onto the box.

j101_1708.jpg


Clutch release gear on and ready to go back into the car.

j101_1707.jpg
 
harveyp6 said:
I trust the pushrod is connected to the release arm? Only I can't see it in the last pic.

Nope it's still in the box of bits :)

I have been looking at this though. There is a clip on Rimmers Bros site to hold it in place but there wasn't one fitted when I took it apart.

Also, the slave cylinder seems a little short so I will be looking at that too.

I haven't actually finished the story here either as the box is back in place, just need connecting up and bolts fitted.

:D

Richard
 
Right the slave cylinder was leaking so I ordered a seal kit for it and took it apart.

The cylinder does look like it is almost at the end of its travel when the clutch is pushed in but it still shouldn't leak.

Stripped down with the original seal next to the piston, and the new one next to that.

101_1718.jpg


Hmmm.. :?:

I have emailed Rimmer Bros to ask if there is more than one slave cylinder for the SD1 V8 and I have the wrong one, or if I have a slave cylinder from a different car, or if they have sent me the wrong rebuild kit, or whatever?

Anyone know if this is the SD1 cylinder?

Richard
 
quattro said:
Anyone know if this is the SD1 cylinder?

Richard

Yes...something looks amiss, doesn't it?

Can't really help with the question, but this is where I was when I did the conversion on Occie...
100_3057.jpg


May not be significant, but the cast-in number on mine is S 05 whereas yours appears to be S 08.
 
Back
Top