Step 3. Remove the clevis pin...

So Cal V8

Active Member
Okay, so this post is born of a little frustration I am having with the rear calipers at the moment.

I am relying on those of you with more experience/common sense than me to help me out here...

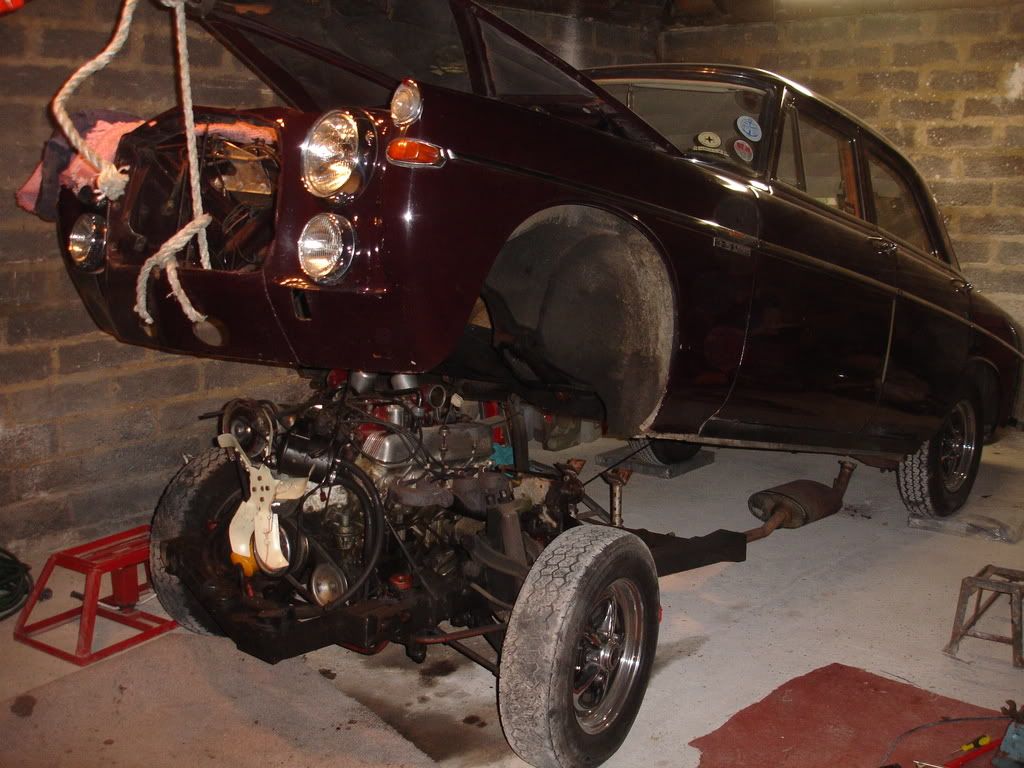
I am trying to remove the rear calipers from my 1970 NADA 3500S - I am following the steps in the official Rover manual - at least I think I am.

In order to remove the caliper I must first remove the pads - so step 3 of the procedure for removing the pads says the following:

"Remove the clevis pin securing the hand brake link lever to the R.H. caliper."

That's it, that's step 3... What step 3 fails to do, is tell you how. The diagram is straightforward enough, and seems to make sense, but practically speaking the clevis pin is virtually inaccesible :cry: . It's covered in 40 years of road crap and in the most akward position possible.

You may have guessed that this is my first time tackling the rear calipers on the P6 - you would be correct.

Please share the collective knowledge of years of disassembling these things with me - is there a technique, or a tool or a method that makes it slightly less difficult?? A large scale drawing in crayon may help me, please don't use words with more than two syllables - the more you can dumb it down for me the better :?

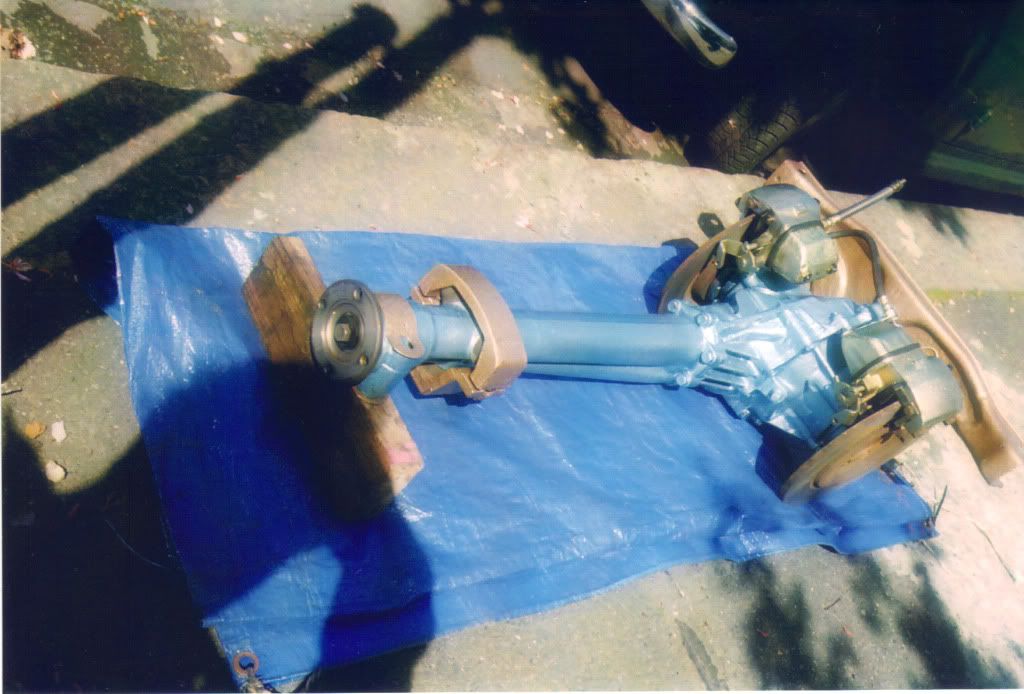
I did not think many kind or charitable thoughts about those clever Rover engineering chappies who managed to reduce the unsprung weight with their awfully clever inboard disc brakes - help...

Thanks in advance.
 
Hello So Cal,

The clevis pins are a bit like a golf tees, except with flat heads. When you look at the handbrake linkage at the point where it meets with the r/h caliper, you will see the pin which is secured with a split pin. Remove the split pin and withdraw the clevis pin. A pair of pliers can be handy for taking out the split pin, but the clevis pin can be removed by hand. Note any washers that may drop as you remove it, there are two.

As for seeing what you are doing, giving the whole assembly a good clean with some rags and turps or similar is your best bet. You have hours and hours of fun ahead, and this is the easy part.

Hope it goes well,
Ron.
 
SydneyRoverP6B said:
You have hours and hours of fun ahead, and this is the easy part.

Ron,

That is precisely what I was afraid of...

I guess the initial problem I am having is getting access to the split pin - it seems very well protected, perhaps too well protected...
 
It doesn't present any particular problems that I've come across. The car raised at a good height & solidly supported is the key to getting to the rear brakes. In fact I would imagine that your best option once you've removed the handbrake mechanism is to drop the diff assembly complete with the calipers affixed.....assuming this wasn't already your plan.
It's how I did our 2200, though I did Bruisers with the diff in situ:

aaDiffunit-2.jpg
 
Have you got the disc off and out of the way? If not remove them both discs and that will give you far better access to the clevis pin. Forget what the book says, which IIRC makes no mention of taking the discs off, only about using the useless Girling "Special Tool". Once you get at the pin you may find the split pin is so corroded in there that you will have to break off the head and legs of the split pin as close as you can to get the clevis out and on to the bench and drill out the rusted remains of the splitpin.

[edit] Just noticed you want to remove the calipers, not just rplace the pads, so the discs should be out of the way already, and you can remove whichever of the 4 clevis pins are the easiest to get at, it doesn't have to be the ones on the caliper, then you can sort it all when they are on the bench.
 
I know that quattro has done a guide to refurbishing the rear calipers but the subject of how to remove calipers and change pads comes up quite a bit. The procedure in the ROM appears to be overcomplicated and many people have their own views on how best to both change rear pads and/or remove rear calipers.

Would some kind soul like to do a definitive "How To" guide to replacing rear pads and/or removing rear calipers, preferably with accompanying pictures.

Purely selfish on my part as my rear pads are going to need replacing very soon :D

Apologies for attempted thread hijack.......back to "Step 3. Remove the clevis pin........."

Dave
 
To change the pads, jack up & support the rear end & get something comfortable to lie on & support your head. Unbolt the halfshafts, let them hang from the wheels (you'll have to raise the back of the car to get the ends out of the discs), then drop the discs & you have splendid access to get to the pads. That's it really apart from removing the handbrake mechanism & holding it out of the way.
Refer to Harvey for adjusting the pads/calipers so you get a good self-adjusting handbrake that doesn't leave the lever pointing to the roof-lining when it's applied.
 
Dave3066 said:
Apologies for attempted thread hijack.......back to "Step 3. Remove the clevis pin........."

Dave

Hijack away Dave - it is a good question and one that will serve me well and help anyone else doing this for the first time.

Alan
 
hi harvey,
all the californian cars i have fetched over and worked on don't have rusted on / in split pins :LOL: , in fact if you were tight fisted, they could have been used again as they dropped out easily when straightened. alan's concern was more in getting to them than getting them out.

ian
 
I hadn't even thought about where this particular car was TBH, they do get rusty over here, but as you say, not over there. He really hasn't got any excuses then. :LOL:
Probably not worth my while importing cars just to get a supply of rust free split pins......
 
Ian,

You have hit the nail (or split pin) on the head - getting to the bugger is the problem.

Harvey, although I had planned on reusing the split pin (due to its rust free nature and being slightly tight-fisted) in the event that I manage to get the b*st**d out I will forward you a genuine California split pin...

Alan
 
hi alan and harvey,
it's a great forum, made more worthwhile when you can have a good laugh with one another at different things.

alan, i know it's a long way for you, but your not going to RA11 are you as it would be great to see you. also when you do get the b-----s off remove both covers, but only strip one down at once, so you know where everything goes when you put it back together as the first time is the most daunting when you remove that cover. harvey, myself and probably a few others after a few hundred or so, you can do them in your sleep :idea: mind you if i don't see another one it will be to soon. oh damn got one coming from a customer to re-build for him. roll on the 28th holidays :LOL:
 
josephp6man wrote,...
hi harvey,
all the californian cars i have fetched over and worked on don't have rusted on / in split pins , in fact if you were tight fisted, they could have been used again as they dropped out easily when straightened. alan's concern was more in getting to them than getting them out.

ian

When I read Harvey's first post which mentioned all the rust and corrosion,...I thought...what rust!

It is the same here Ian, no corrosion to speak of. Must make working on Rovers in the UK a nightmare.

Ron.
 
SydneyRoverP6B said:
josephp6man wrote,...
hi harvey,
all the californian cars i have fetched over and worked on don't have rusted on / in split pins , in fact if you were tight fisted, they could have been used again as they dropped out easily when straightened. alan's concern was more in getting to them than getting them out.

ian

When I read Harvey's first post which mentioned all the rust and corrosion,...I thought...what rust!

It is the same here Ian, no corrosion to speak of. Must make working on Rovers in the UK a nightmare.

Ron.

No Ron, honestly it's a real joy :roll: :wink:

We must find you a good UK car to work on some time. In engineering you're always taught on the hardest jobs first so you come to appreciate the easy ones later :wink: Clearly you guys in dry states lack that sort of appreciation so we'll have to make an effort to rectify that :LOL:

Dave
 
My prefered method of brake pad changing is to remove the outer pads, removed the slider?? for the inner pad and swing inner pad out. Because you have the outer pad off you can push the caliper up.

With a screw driver or pokey item of your choice wind but the adjusted. If you have the orginal tool give it a go.

With the adjuster wound back and in the correct position refit the pads making sure the inner slides freely along the reatining pin if that is the correct name.

I may have remove the handbrake at the caliper/clevis pin. once or twice when doing the pads and pull it with the cable out of the way. It you cannot get the pin out you can nip it and file it down so you can pull the clevis pin out and remove the remnants in a vice.

Everone has a different way of doing it. but i normally reverse the back end of the car on to little ramps. It can be hard on the old arms as they are out streched for a bit of time.

I don't take the discs off to do the pads. if you do you struggle a little to pull the half shaft back in.

Removing calipers you can either remove the discs or leave them. I have done both ways more than once. When removing them with discs fitted. Again back the car on to ramps or axle stands, I then take the weight of the car off the springs by jacking the body up. With this method I remove the handbrake linkage and pads. remove the bolts which hinge the calipers and disconnect the hydraulic pipes. I then pass one caliper over the diff and hey presto they are off. When putting them back I connect all the hoses and then sling them accross the diff and bolt them back up.

Pig of a job either way but once you have done them once or twice you get the hang of it.

Colin

Colin
 
arthuy said:
I don't take the discs off to do the pads. if you do you struggle a little to pull the half shaft back in.

A ratchet strap attached to the elbow & the other side of the car does the job of pulling it up to the halfshaft admirably.

So Cal, considering the work that you have to carry out on your car anyway, I personally don't think it's worth faffing about lying under the thing fiddling with the calipers in-situ. It doesn't take long to drop the diff-unit complete & you will soon realise & appreciate how much easier it makes the job (for the in-experienced P6 owner :wink: ) when you've got the thing lying on the bench in front of you. You can give it a nice clean up & paint job too.
I removed & replaced ours at the side of the road outside the house.
 
The Rovering Member wrote,...
I removed & replaced ours at the side of the road outside the house.

Hello TRM,

Did you have any assistance with that in terms removal and especially refit? I am thinking of the diff mounting bolts, and how they could be held from beneath while their nyloc nuts are tightened from within the boot.

On the other hand, doing the rear pads with the calipers in situ can all be done without any additional assistance.

Ron.
 
SydneyRoverP6B said:
The Rovering Member wrote,...
I removed & replaced ours at the side of the road outside the house.

Hello TRM,

Did you have any assistance with that in terms removal and especially refit? I am thinking of the diff mounting bolts, and how they could be held from beneath while their nyloc nuts are tightened from within the boot.

On the other hand, doing the rear pads with the calipers in situ can all be done without any additional assistance.

Ron.

Leave the diff hanger in place, and just drop the diff from it. I put Sparky's diff in on my own that way.

Richard
 
quattro wrote,...
Leave the diff hanger in place, and just drop the diff from it. I put Sparky's diff in on my own that way.

Hello Richard,

Yes,..that will do it! I have not taken my diff out that way, hence I didn't think of it, and that was only once, over 20 years ago. I have helped with others, but the hanger was always detached from the body.

All the best,
Ron.
 
No, I did it without assistance though the missus helped with bleeding the brake system. Judicious placing of a trolley jack aided proceedings, although I possibly got her to hold the spanner on the mounting bolts while I tightened the nuts (it would not be essential though as there is always a way to hold a recalcitrent spanner in position). The diff hanger came off too.
But I also did a subframe swap on our P5B without another human hand rendering assistance, so anything is possible:

subframe5.jpg
 
Back
Top