Where do the horns go?

sico24

Member
Hi

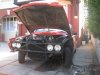
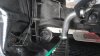
MY 1967 TC has two horns fitted. One doesn't work at all (contacts broken) and the other is a cheap nasty one attached to the brake servo mounting. My question is that if I get Hi-Lo replacement horns, where should they be mounted? I note in the manual it says something about under the battery tray (in the engine compartment) - is this right? Or should they be mounted behind the grille?

Thanks

Simon
 
Simon,

If you're still looking for an answer to this question, the horns in a 4 cyl are mounted on brackets which attach to the front crossmember below the inner bumper brackets. One is fitted on each side of the engine, and both are angled inwards and forwards (towards the centre of the lower grille, behind the reg plate). You can just see them in this photo taken during 'opeartion undershield'. I'll get a proper under-bonnet view of the brackets for you later.

Michael
 

Attachments

  • photo.jpg
    photo.jpg
    222.1 KB · Views: 600
Correct.
There is one exception though. When there is an oil cooler fitted, both horns go on the left side.
 
Hi

Thanks - my TC DOES have an oil cooler. Demetris - The left hand side- do you mean the passenger side on a RHD drive car? Is one horn mounted at the top and one mounted low where it is shown on Michael's photo?

Hi Michael - Simon here who bought your Sandalwood interior back in March. I spent £75 and lots of time on recolouring (original colour) and renovating it and it now looks great in the car! I'll post a photo soon. Thanks

Regards

Simon
 
sico24 said:
Hi

Thanks - my TC DOES have an oil cooler. Demetris - The left hand side- do you mean the passenger side on a RHD drive car? Is one horn mounted at the top and one mounted low where it is shown on Michael's photo?

Hi Simon, you are correct, it is the passenger side or nearside to you, or the opposite side of the oil cooler. This happened because obviously, with the oil cooler in place, there is no space for the horn.
When i bought my car it came with air horns in the engine bay, so i cannot be sure about where exactly the original horns were fitted. However, judging from the brackets and the available space, both should be fitted low, side by side. At least this is how i retrofitted an original pair into my TC.
 
sico24 said:
Hi Michael - Simon here who bought your Sandalwood interior back in March. I spent £75 and lots of time on recolouring (original colour) and renovating it and it now looks great in the car! I'll post a photo soon. Thanks
Regards
Simon

Hi Simon,
Oo, yes, I'd love to see that! They were very comfortable seats that ferried me round for quite some time! Let me know when you post pics so I don't miss the thread. Glad you're happy with them. I still need to get round to recolouring my 'new' buckskin interior so maybe some pics of my old ones looking like new will spur me on!

Michael
 
...and just in case you still need it, here is a pic of the horn mounting as promised. I have deliberately left the pic as over-size so you can see easily where it is in relation to everything else.

I am assuming that when the two horns go on top of each other, the lower one is upside down so the mounted plate goes flush against the other with two bolts through both of them into the crossmember :?: :?:
 

Attachments

  • phpdNwgmpAM.jpg
    phpdNwgmpAM.jpg
    1.1 MB · Views: 496
Michael and Demetris

Thanks - very useful and I will be able to mount my new horns when I get them.

Michael see the pictures. The seats have come out nicely although I would recommend using a spray gun if at all possible. I used a foam pad for the first 2 coats and then a modellers airbrush to do the last one. I probably put the first two coats on rather too thickly. I used the kit from Liquid Leather (Gliptone) - the Scuffmaster 1 litre kit at £77 was plenty for 3 coats on all seats. The Sandalwood colour looks quite bright now but will probably fade a bit to match the doorcards and knee bins etc. They were very helpful with advice at Liquid leather


Regards

Simon
 

Attachments

  • IMAGE_286.jpg
    IMAGE_286.jpg
    113.7 KB · Views: 483
  • IMAGE_285.jpg
    IMAGE_285.jpg
    104.6 KB · Views: 483
Wow! They look fantastic! It's a bit strange to see them in that condition. I am so familiar with the pattern of creases on the drivers seat base, but to see them looking so clean and fresh is amazing.
I really must get a kit ordered for mine. Like yours, the doorcards and rest of the interior is pretty clean and presentable, but the four dull, cracked lumps in the middle let the whole experience down! That is a must-do job at the end of the Summer.

Thanks for posting the pics - it's nice to see that they've moved on to new (and better) things!!

Michael
 
Back
Top