Yet another Rover.......

Guy Engelsman

New Member
G'Day all
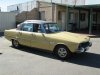
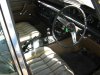
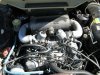
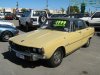
It's been a while but I am back from O/S and still in one piece. To celebrate my triumphant return I have purchased....another Rover. This one is a V8 S and I have (perhaps foolishly) purchased it over the miracle of the internet. It is in Perth (Western Australia) and I am in Darwin (Hot, Wet, Bug infested, raining Northern Australia). It is costing me 1400 of my hard earned dollars to get it here. That is nearly as much as I paid for it in the first place :roll:
Anyway, it runs and has registration for 6 months, so I will be doing a "Rolling Restoration" as I use the car. I am fortunate that I have so many spares sitting around the shed (spare room, laundry, top self of the main bedroom....) so I can at least crack on with rebuilding bits then installing them at a later date.
As for the Blue Car (II) it is sort of back on its wheels, but otherwise on hold until my new workshop is built. :oops: My wife (bless her understanding nature) took my announcement that I had purchased (another) old wreck in her stride, but I am now honour bound to build her Triumph ASAP :wink:
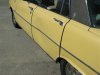
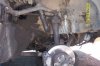
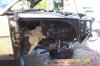
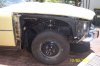
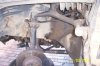
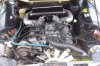
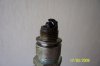
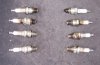
Lots to do when it arrives on the 24th of Feb but until then these are some of the photos that convinced me that it was worth saving.


I hope that the photos work, i will keep you all updated on the progress (when there is some)

Cheers

GUY :D
 

Attachments

  • Rover3500S.jpg
    Rover3500S.jpg
    60.6 KB · Views: 2,575
  • Rover3500S-1.jpg
    Rover3500S-1.jpg
    64 KB · Views: 2,581
  • Rover3500S-2.jpg
    Rover3500S-2.jpg
    82.3 KB · Views: 2,581
So..around 1400 GBP for the car + transport? Spot on what I shelled out for my 3500S.

From what I can see in the pics, it looks money well spent. Nice one, Guy! But it looks like you'll need to grow another pair of hands to keep the wife happy as well!
 
That's what I was wondering
I think it's an aftermarket air con unit - I think you can see the sight glass on the bit under the bonnet
 
Congratulations! You appear to have made a good purchase. I think paying $1400 is better than driving it from Perth to Darwin!
 
That strange contraption is most certainly an air conditioner. VERY important when you live in the tropics with 36 degree temps and 100% humidity. I just hope that the rotten thing works when it arrives! :roll: As for driving it from Perth to Darwin, that would be madness in the middle of the wet season (so called because it rains ALL THE TIME, bit like England really.......) and is filthy hot.
My wife's car is still under wraps, and I am running out of space for old cars, but I will plow on. Only 11 days to go.... :LOL:

Got some more photos, err.... the passenger side has a "Little bit of a ding in it", but at least the chrome is in good condition.
 

Attachments

  • Rover 3500-3.jpg
    Rover 3500-3.jpg
    66.7 KB · Views: 2,479
  • Rover 3500S-4.jpg
    Rover 3500S-4.jpg
    52.5 KB · Views: 2,484
A quick update.
Due to the aformentioned "Wet Season", the truck transporting the new car has been unable to get to Darwin due to the road no longer being drivable (in fact it was washed away and had to be rebuilt!). This means that the car has arrived in Darwin at last (only two weeks late), and I will be able to pick it up tomorrow (monday 8th), and assuming it will start and run, drive it home.
I have been accumulating the spares needed for a service (this is a long and complicated process), and will be able to do a complete safety check prior to the car being allowed back on the road.
I am so excited I don't think I will be able to sleep tonight :roll:
The joys of living in the Northern Territory of Australia, if its not a Ford, Holden or a Toyota 4WD then you have to order the parts in. The abbreviation for Northern territory is NT. This has let to the expression "NT Time", that is "Not Today, Not Tomorrow, Not Tuesdays, Not Thursdays, Next Truck, Next train, NOT THERE" :?

Will post new pictures and update when I have the car home.

Cheers

GUY :D
 
It has arrived.
My first thought on seeing the car for the first time was "looks OK". How foolish I was, it took 20 min to get it started, then it ran out of fuel (someone had drained the tank!) Then the ignition light wont go out, then the steering is via "the force", usually the force of the wind or road surface rather than where I want to go :oops:
I got it home and it only tried to kill me three times. Once stopping at the lights, the second almost failing to go around a sharp bend, and lastly almost driving through the (closed) garage door :shock:
Needless to say there is much work to be done before the car is allowed back on the road. But the good points first.
1. The engine makes no funny noises and pulls really well once you get it started.
2. The engine has electronic ignition and an electric fuel pump already fitted.
3. The back tyres are new.
Thats about it for the good points
The really depressing and dangerous bits (this is a much condensed list)
1. It won't go around corners without trying to roll onto its roof
2. The gearbox sounds like it is full of nails (5 speed Supra conversion on the way)
3. The interior looks and smells like it has recently been inhabited by a pack of incontinent cats
4. ALL the suspension bushes appear to be made of marshmallow (and oil) and ball joints pop off in your hand
5. The last owner seems to have serviced the car using a hammer and pliers. Every nut is rounded off, and the alignment of panels has been performed by a poorly trained monkey, then hit with something hard :evil:
6. There is not a straight panel on the whole car. This is not a huge issue. Shiney cars in Darwin are usually vandalised within days of arriving, especially if it is imported, but will require MORE effort to sort out.
7. The compressor for the A/C is MISSING! So thats why the A/C wont work........ :?
The only saving grace is that I have a fair old stock of spares in the garage, and all the rebuilt parts for the new Blue Car. So the job list looks a bit like this:
1. Strip and replace all the FRONT suspension and brakes
2. Strip and replace all the REAR suspension and brakes.
3. Steam clean the engine bay and put in the new Brake master, Clutch Master, and the new clutch Slave cylinders, oh....and the new servo......and brake lines......and fuel lines.....sorting out the apalling wiring...find out why the battery won't charge....replace the radiator.....new fan belts.... :roll:
4. Replace the gearbox with the 5 speed conversion

I am finding it hard, not to start but to STOP. How far do you go with the repairs? While the suspension is off should I clean and spray the underside? Since the wings will have to come off should I strip and reapaint them? While the engine bay is being cleaned why not take the whole engine out to make it easier? Can anyone else see the danger here, I can very rapidly end up with a bare shell and be facing ANOTHER total rebuld.
I am being very strong, and only making the car safe for the road. I will go mad with it at a later date.

So in summary. I have purchased a total DOG, that with a lot of love (and cash) will end up being one of the few S models that actually runs here in Australia. The temprature has dropped (down from 38 degrees C in the heat of the day) to a more respectable 32 so back to the shed to keep pluging away at the job list. When my wife returns with the camera i will attempt to get a few photos here so that you can all see (and laugh at) my new project.

Cheers

GUY :|
 
Soon after I brought my P6 the big ends and the brakes all failed. Once stripped down I found a lot of mechanical faults that I had to put right, like warn UJ's broken flex plate a shot master cylinder and servo. The engine needed at least a 20 thou rebore there ware was that bad (even though it had a genuine 65k on the clock). Turned out the block was scrap anyway as it also needed a line bore, the engine shop thought it had been in it's life ran so hot it would have seized.. So you could say I also paid a grand for a dog. But you know, I loved every part of putting her back on the road. Took 6 months but I did it and now there is very little mechanical work needed, as I've done most of it. I now need to start work on the body as the rust is starting to bubble throw in a few places but I know the base unit is solid as a rock. After this the interior needs redoing so I've got I think at least another two years before she's ready for showing. And having seen Jon's two P6's (the only other two I know of on the Isle of Wight) I have to aim high. :) But as I said, it will be fun. I use her everyday but she was brought as a hobby something to tinker with while the other half is playing with her horses.

It may be bleak now but for every part you fix you'll get 10 fold amount of pleasure when she's done and drives like new again. I've always said, owning a classic what ever it is, is not about economics, it's about fun.
I look forward to see the pictures and the work you do. Good luck. :)
 
It's great though, every time you fix something, no matter how small, that sense of achievement makes it all worth while.

I had a small (so I thought) problem with the NS inner headlamp. There was 12V at the socket and the bulb worked ok in the OS socket?

It took me two hours of head scratching until the time when I pulled the switch and all 4 of them came on. :)

Best of luck with it

1. It won't go around corners without trying to roll onto its roof
Isn't that normal ? :LOL: :LOL:
 
So you'll be finished and on to the wife's Triumph by next weekend then, Guy? Bad luck with the state of it. I guess the brakes are sort of predictable, but I'm intrigued to hear what is wrong with the steering and suspension.

Best of luck

Chris
 
Wise man say "Underseal hide many sins".
I have now stripped the front suspension out of the car and the brakes are off to be rebuilt. the most intriguing part is that they appear to have been rebuilt in the recent past, but the seals are all perished and crumbly. The several layers of underseal have been removed and the state of the base unit revealed. All is not well in toytown. There are a number of holes that have been skinned over with bitumen, and then painted. Photos to follow.
Another wise man said "If factory tools no longer available, grab file and make your own". I have managed through sheer bloodymindedness to make a ball joint separator that won't destroy the balljoints! :D This is very similar to the tool 601476, but operates on a single lever for twice the power. More photos when I can compress them a little more. Maybe tomorrow.
I have one of my mates comming around tomorrow morning to fit the new front end, and it will look very nice, all shiney and glossy. Just waiting for the radiator, the brakes, the new alternator, various bits of rubber, a new steering tie arm, and assorted other bits and the car will be ready to go back on the road! (once the rear suspension is rebuilt, and the diff overhauled, and the new wheels and tyres arrive......)


My wifes triumh may have to wait a little longer. :p

Cheers

GUY :D
 
Finished for the day. Just the passenger side to finalise in the morning and the car will be back on it's wheels.
Then there is the new radiator, brakes etc.
I will try and remember to take some photos of the passenger side BEFORE I put the wheel back on. :oops:

Cheers

GUY :D

Wise man say "If it comes apart easily, you've broken it" :roll:
 

Attachments

  • 100_1688.JPG
    100_1688.JPG
    41.1 KB · Views: 2,247
  • 100_1690.JPG
    100_1690.JPG
    51.9 KB · Views: 2,251
  • 100_1693.JPG
    100_1693.JPG
    40.8 KB · Views: 2,253
Days work completed; refit passenger side suspension. I must have shed enough blood to satisfy the Rover Gods since the parts went together really easily. The car is now back on its wheels and I am now waiting for the Radiator (Monday) and the brakes (Who knows?), then I will be able to road test the car.
During my rumaging around i found out why the power steering fluid was getting lower, the low pressure return line was only just resting in place. No clip or anything to hold it in place, so the fluid just quietly dripped all over my driveway :roll:
The car looks a lot better now, and the engine is getting there, just a little more cleaning then a retune of the carbs.

The more observant may pick that there is no steering tie arm on the passenger side. I am waiting for new dust seals before I fit the arms back on. :!:

I have removed the stupid A/C that was not connected and have tidied up the engine bay. The interior is enough to make a grown man weep (its the smell) and the wiring is an abomination. I will be tackling that once the mechanical side is completed, also i hate electicity (white mans magic) adn will get a professional to rewire the interior. :wink:

I am going to take a few days off to allow the cuts and abrasions to heal, and for the new parts to arrive, then the car will be (mostly) done and drivable again. I just need to look at the back end to see if there is any work needed there...... More photos soon

Cheers

GUY :D
 

Attachments

  • 100_1694.JPG
    100_1694.JPG
    48.8 KB · Views: 2,189
  • 100_1692.JPG
    100_1692.JPG
    52.6 KB · Views: 2,190
  • 100_1695.JPG
    100_1695.JPG
    59.2 KB · Views: 2,192
I see you use grooved discs as well Guy! I prefer what people over here call micro-groove, ie with around double the number of grooves you have there. Do you have any views either way? With those grooves I presume you'll be using Greenstuff pads? With Kevlar pads the grooves allow them to work properly by allowing the gasses to escape from under them. MIne has micro-grooves on a vented disc wearing a widened P6 caliper and with the Kevlar pads.

Chris
 
Chris

Grooved discs with kevlar pads that are approx 15% more swept area than standard. The calipers are standard, and the disc was one of a pair that I found online new in the original box. I grooved them on a CNC milling machine and the grooves are approx 5mm deep to assist with outgassing the pads.

I am looking at a new set of ex Jag XJ6 discs and calipers for the blue car, since I can get brand new discs that are vented and grooved. i just need to adjust for the width of the new caliper and disc when ordering new wheels etc. it should widen the car slightly, and with the airbag suspension make it low and sleek.

Cheers

GUY :D
 
I've just caught up with this thread again (for some reason it went missing) & it makes very entertaining reading. I'm very impressed with your rate of progress I wish I could be so motivated. You should have a play with the electrics all you need is a wiring diagram & not to be colour blind, it's not all that complicated especially on cars of that age when all you had was a wire going to that light & a wire going to another light & a switch in the middle to make it work, not like modern vehicles with Can Bus systems where if one ECU doesn't talk to another one the wipers wont work.

Regards Colin
 
Ron

Two other P6B in darwin. One rather ratty red one that I have seen on the odd occasion, and a rather nice white one that appears when the sun is shining. I am of course not counting my blue car since it is yet to run. :oops:

I have had a day of many emotions ranging from mild pleasure to incandecant rage. I spent the morning at work ( :cry: ) then went part hunting. My local Supercheap auto store has a suprising amount of stuff for the P6, and I had a very pleasurable time giving the credit card a flogging. I then went to pick up the rebuilt brakes that I had been assured were finished and ready for pickup. They had not even been touched. The blokes at the shop said that they couldn't be bothered with working on an "Old piece of Cr*p". Hence the many unflattering names that I called them, questioning everything from parentage to future prospects of breeding by the time I was finished with them! :twisted:
The attitude rapidly changed (I am over six and a half feet tall and play rugby in the second row), and the brakes were then taken to a local chap who loves old cars and promised them to be ready on Thursday. This means that the car can be road tested at last so that I can do a front wheel alignment and finalise torquing down the suspension bolts.

I also changed the spark plugs today (forgot what with all the excitement), and the photos are below. Oh dear....... have a look at No 2 at the top right and the close up. The compression is 158 psi, which is within limits, and the others all range from 156 to 167 psi. This is pretty much spot on for a 9.25:1 engine, so I will give the engine a good run and see if the plug fouls again. :roll:

Just waiting for the last (rather important) parts and I will let you all know how the road test goes

Cheers

GUY :D
 

Attachments

  • 100_1704.JPG
    100_1704.JPG
    20.8 KB · Views: 916
  • 100_1703.JPG
    100_1703.JPG
    50.6 KB · Views: 916
Back
Top