

You are using an out of date browser. It may not display this or other websites correctly.
You should upgrade or use an alternative browser.
You should upgrade or use an alternative browser.
A wing and a prayer
- Thread starter Dave3066
- Start date
Dave3066
Well-Known Member
FrazzleTC said:Sorry to see this, Dave. At least you've caught it before it got to be a huge problem, but it still looks like a lot of work! I hope you can get it sorted fairly easily and be back out in the V8 soon!
Not half as sorry I was Fraser :shock:
I'm enjoying driving the 2000 about just now and there's a wee thing called christmas coming up which is diverting my attention away from Verity. I think it'll be weekend work only until she's whole again.
Dave
Hi Dave,
Hitting that rock appears to have been a blessing in disguise. Looks like you are making excellent progress too!
You'll have the V8 roaring around the mountains before too of that I am sure.
Best of luck with it Dave,
Ron.
Hitting that rock appears to have been a blessing in disguise. Looks like you are making excellent progress too!
You'll have the V8 roaring around the mountains before too of that I am sure.
Best of luck with it Dave,
Ron.
Dave3066
Well-Known Member
So I bet you're all wondering how things are going with this piece of work on the old girl.....
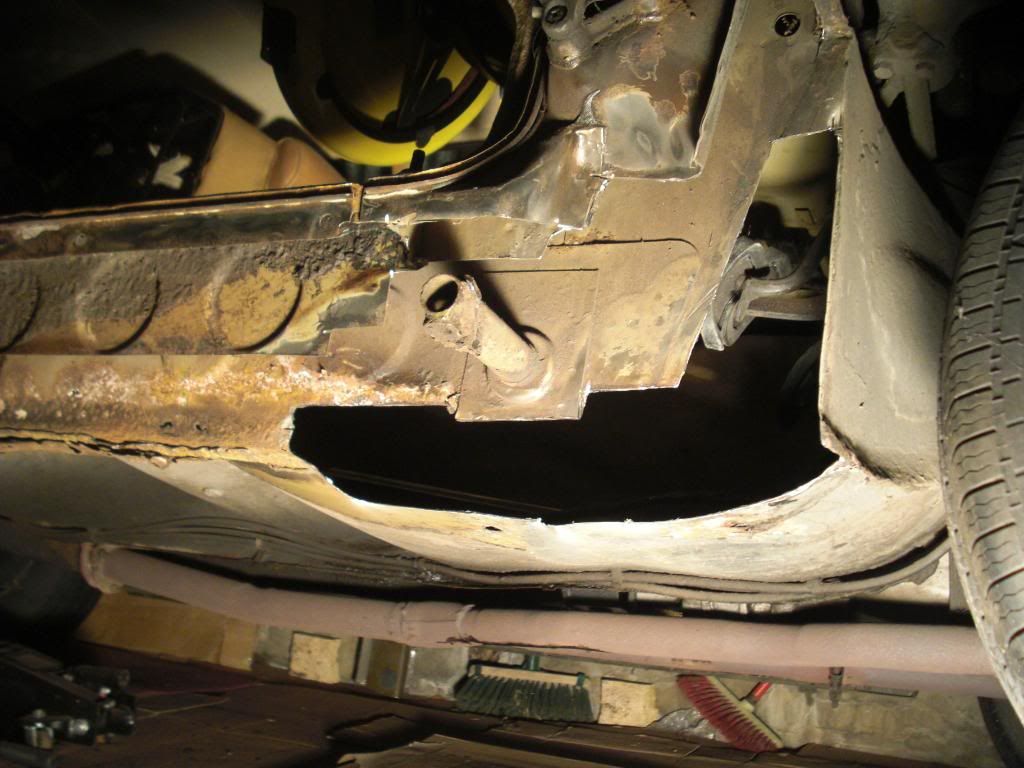
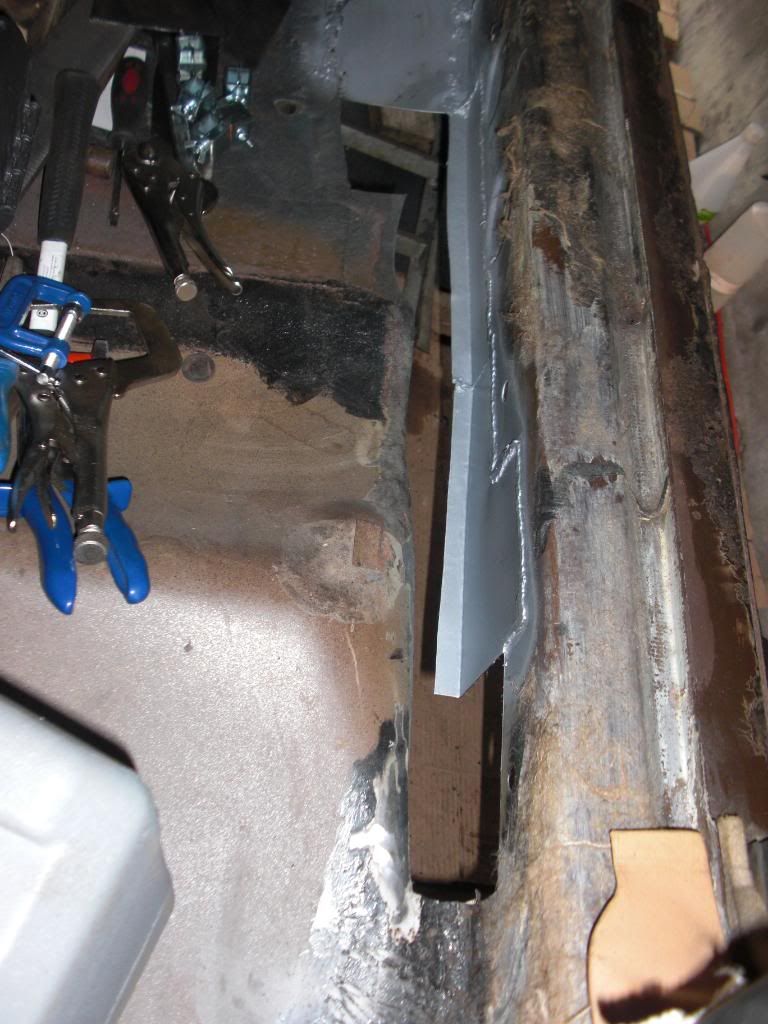
After much scraping of underseal all down the offside sill and floor pan it turned out that there was rot all the way practically to the rear jacking point. I was a bit nervous about affecting the structural integrity of the car by cutting too much out at once so decided to start at the front and work my way back. Mind you there was very little structural integrity left there anyway :roll:

I actually didn't get off to a very good start when I ran out of wire after the first run I'd made sure I renewed the gas bottle before the christmas hols but forgot to check the wire. Anyway I managed to get a couple of reels from our friends at that well know bike shop :wink: but after several attempts I discovered that the reel was bust and trapping the wire on each turn :evil: I persevered for a while, stopping to untrap the wire every now and again but eventually got fed up and decided to use the other reel I'd bought. There I was then, unwrapping the packaging when all of a sudden

That one will be bust too then :evil:
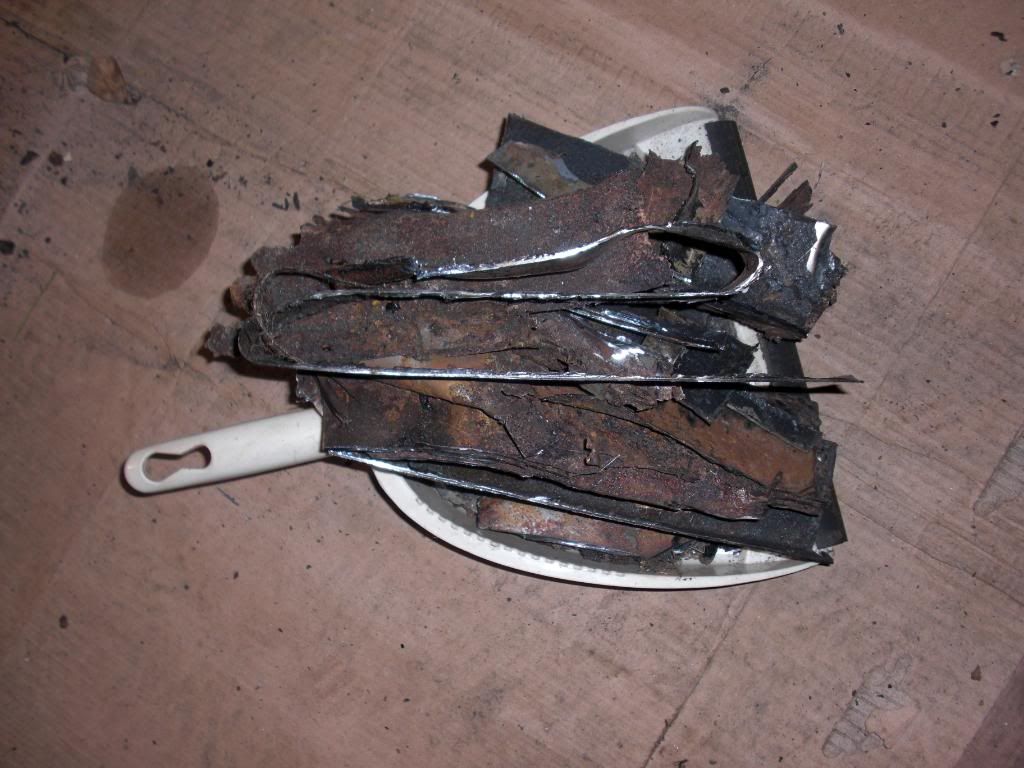
More wire acquired and onwards I went cutting out more rot
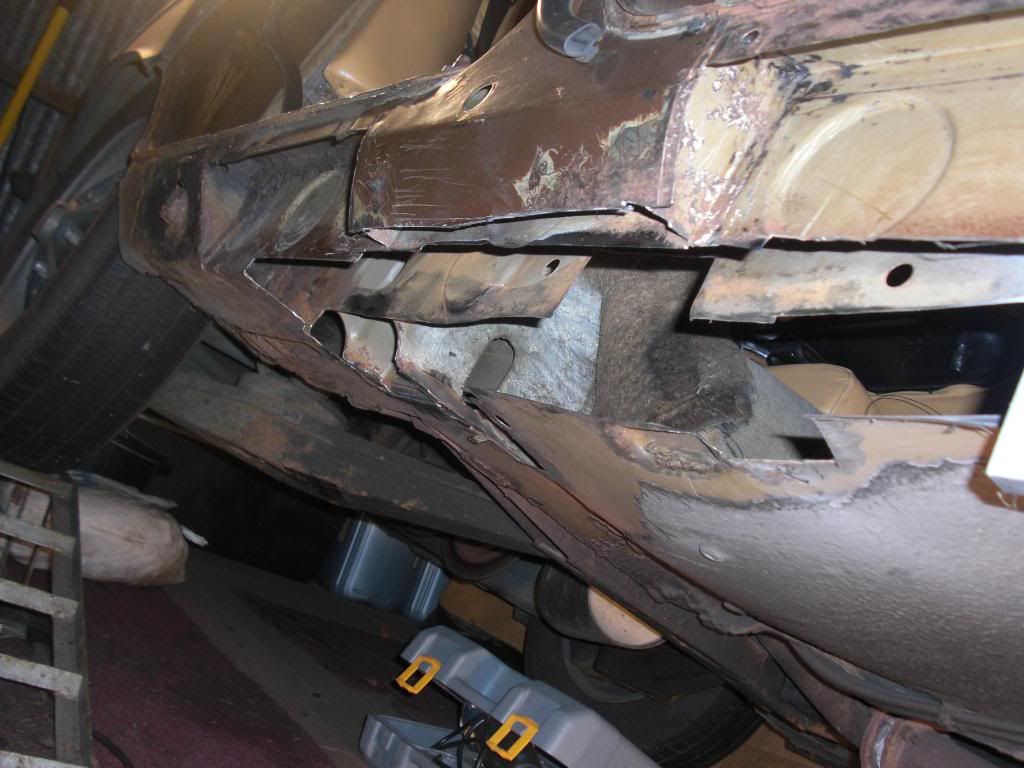
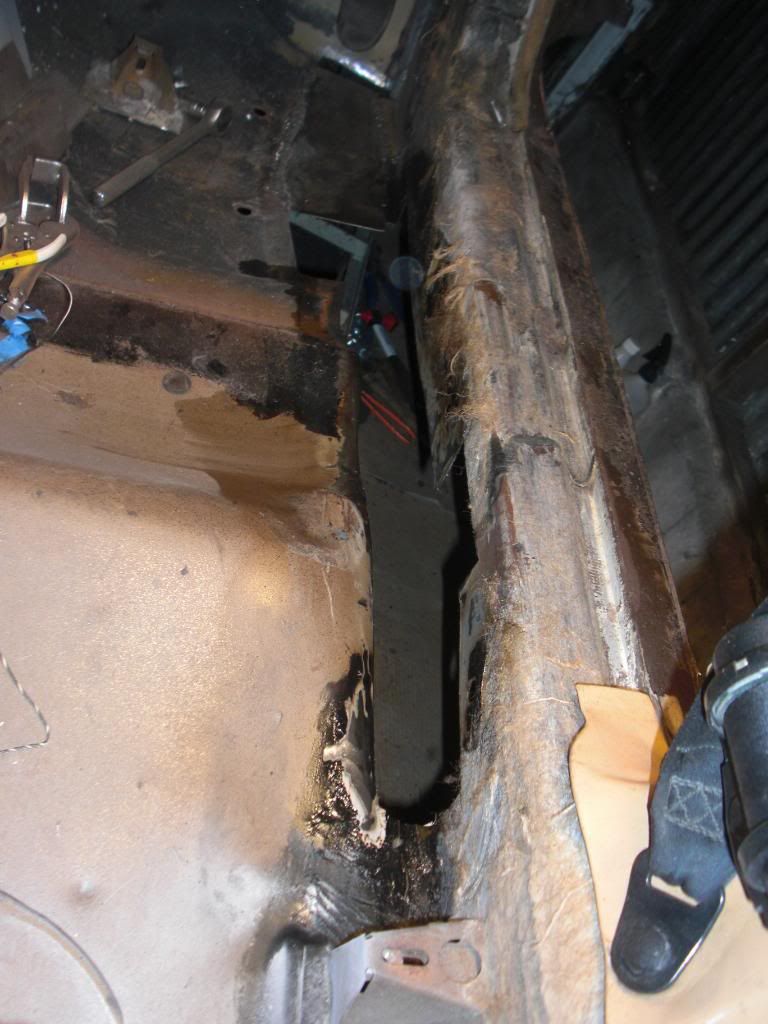
This is where I got up to last night. Slow progress but I breathed a sigh of relief when I'd finally cut out all rotten metal.
Must do something about those rear trailing arms too before they get too bad
Dave
After much scraping of underseal all down the offside sill and floor pan it turned out that there was rot all the way practically to the rear jacking point. I was a bit nervous about affecting the structural integrity of the car by cutting too much out at once so decided to start at the front and work my way back. Mind you there was very little structural integrity left there anyway :roll:
I actually didn't get off to a very good start when I ran out of wire after the first run
I'd made sure I renewed the gas bottle before the christmas hols but forgot to check the wire. Anyway I managed to get a couple of reels from our friends at that well know bike shop :wink: but after several attempts I discovered that the reel was bust and trapping the wire on each turn :evil: I persevered for a while, stopping to untrap the wire every now and again but eventually got fed up and decided to use the other reel I'd bought. There I was then, unwrapping the packaging when all of a sudden
That one will be bust too then :evil:
More wire acquired and onwards I went cutting out more rot
This is where I got up to last night. Slow progress but I breathed a sigh of relief when I'd finally cut out all rotten metal.
Must do something about those rear trailing arms too before they get too bad
Dave
Dave3066
Well-Known Member
vaultsman said:Dave, you're a braver man than I....
Stan, It's quite therapeutic cutting out all that metal and we all know it has to be done! I've got myself a Dremel for the difficult to reach areas where there isn't enough clearance to get the angle grinder in.
stina said:Looks a bit daunting Dave
Stina, the daunting bit is actually looking at the extent of the rot and tryng to figure out where to start cutting it out. Filling in the holes is relatively easy. A couple of hours a night and weekend work will see that completed in no time......he says :roll:
arthuy said:Thankfully it is all pretty standard P6 rot. Luckily your D posts look very good.
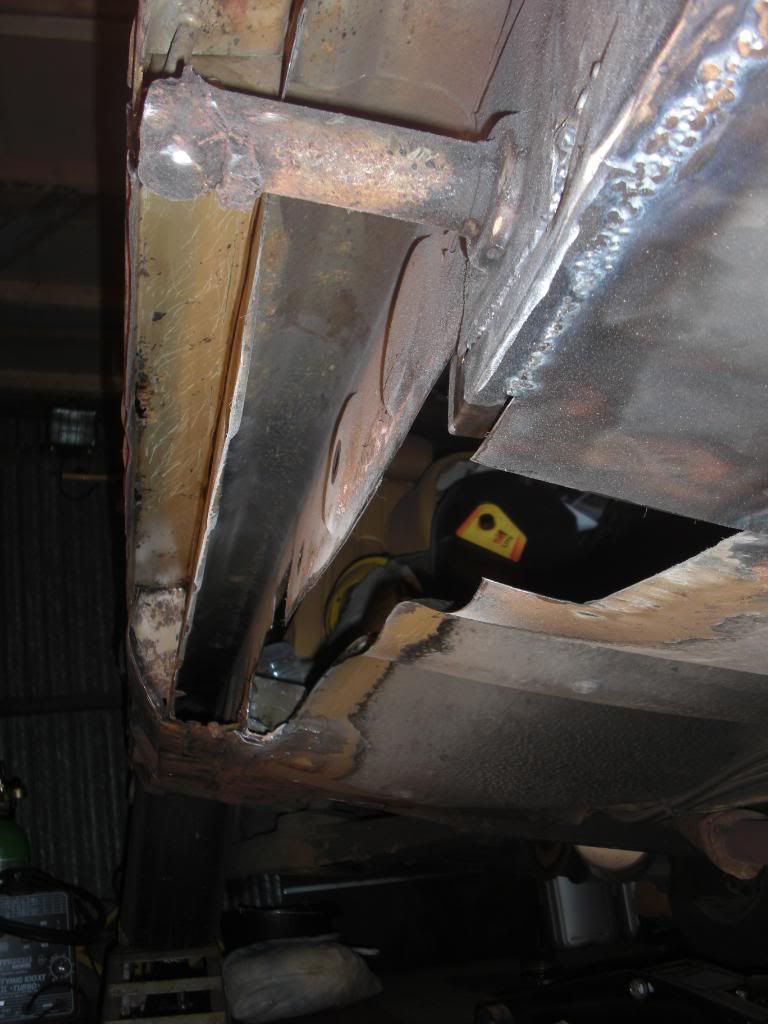
Yes, nothing too difficult in all that Colin. The D post on that side has a spot of rot down by the door seal channel where it curves so that'll be next once the rest of this is done. Having cut all the metal away I was able to shine a floodlight inside the remaining sill box section to the bottom of the D post to get a good look inside and it looks ok. I've got the work you did on AR J for reference if I need it though
Dave
arthuy
Well-Known Member
:cry: I am still having nightmares.
are you buying outer sills or making your own?
The way I did and looks like you are doing is fine but I find it a bit difficult clamping the new metal to the old cut back. It is easier if you line up the pressing and do the inner sill after that wa you can push from the inside. You will see what I mean when you come to it.
Colin
Dave3066
Well-Known Member
Colin
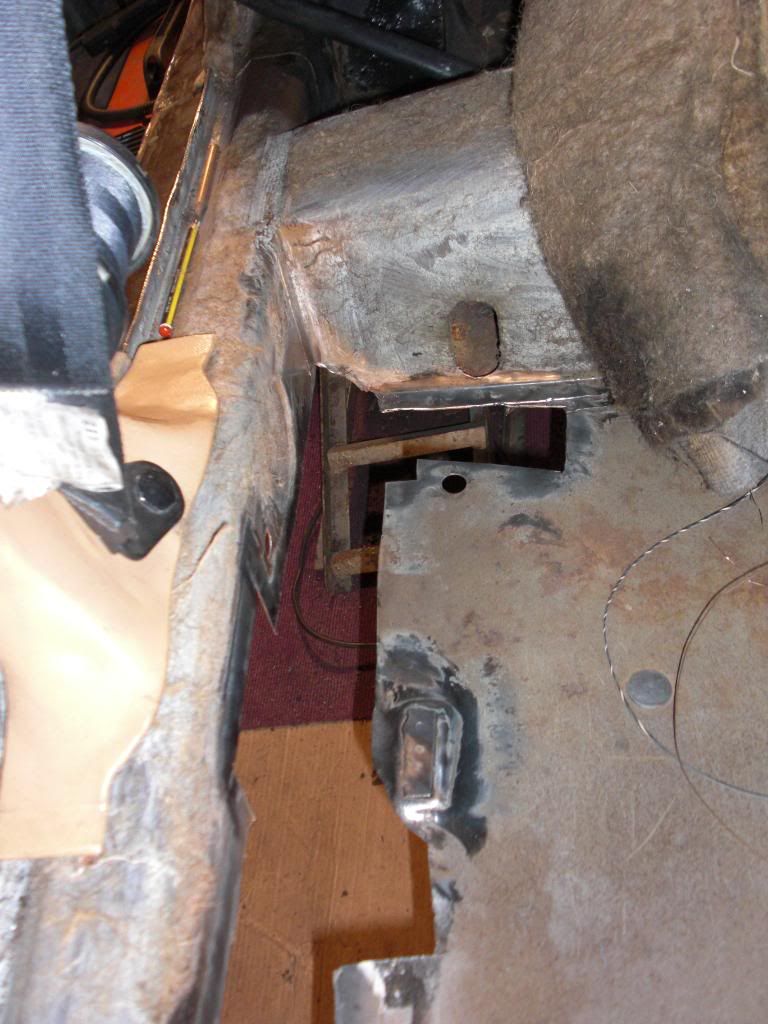
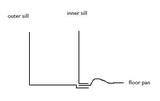
I'll be making my own outer sills. You'll see from the pictures that the outer sill vertical section above the circular pressings is ok. I haven't decided how many sections to make the outer sill in yet but I want to keep it to a minimum to prevent the lines from distorting. The limiting factor is my sheet metal forming equipment ie a vice and some angle iron so I won't be able to bend anything longer than about a foot without introducing distortion. The inner sill is almost done now, in fact the last piece went in last night, just got to finish welding it. I'm butt welding everything. Once the inner is complete I'll do the floor pan to straighten the inner sill and provide rigidity before attaching the outer. I've been trying to figure out how it all fits ie inner sill, floor pan, outer sill and had a look at Richard's (webmaster) sectional drawing through the sills. I still can't figure out if the floor pan, inner sill and outer sill overlap or is the floor pan and inner sill one pressing? :?
You'll see from the pictures that I've created a flange pointing inwards from the inner sill. The way I'm planning to build it it up is to overlap the floor pan outside the inner sill ie so the floor pan effectively attaches to the underside of the inner sill flange then overlap the outer sill over that. Like this:
That'll make that interface 3mm thick and pretty strong. The front seat mounts should provide enough of a reference for getting the dimensions right, but a good engineers plumb line comes in handy to get straight lines too :wink: The tricky bit will be how to clamp the floor pan to the inner sill as I don't have a clamp big enough to go over the door step. Probably just use something wedged against the ground to push up from underneath but we'll see.
Dave
Willy Eckerslyke
Well-Known Member
Looking at your drawing, I'm concerned that your lower weld on the outer sill will be a tricky one - welding uphill facing outwards. When I did mine, to avoid that problem, I made the outer sill in two sections. The first looked like yours but only reached upwards about 8mm. That left access to the inside so that I could weld in a more comfortable position running the weld along the join between outer and inner sill.

I could also paint over the weld before closing the gap with a section that represents the top of the outer sill on your drawing, tucking the lower part behind the 8mm upright.

I could also paint over the weld before closing the gap with a section that represents the top of the outer sill on your drawing, tucking the lower part behind the 8mm upright.
Dave3066
Well-Known Member
Willy Eckerslyke said:Looking at your drawing, I'm concerned that your lower weld on the outer sill will be a tricky one - welding uphill facing outwards. When I did mine, to avoid that problem, I made the outer sill in two sections. The first looked like yours but only reached upwards about 8mm. That left access to the inside so that I could weld in a more comfortable position running the weld along the join between outer and inner sill.
I like that Willy, I don't fancy plug welding upside down either. Did you butt weld outer to inner then or was there an overlap, any overlap would have to be seam welded too but I guess welding the inner interface would provide additional strength?
Willy Eckerslyke said:I could also paint over the weld before closing the gap with a section that represents the top of the outer sill on your drawing, tucking the lower part behind the 8mm upright.
Yes it would be useful to have access to paint it before closing up too. Tucking the lower part behind the 8mm upright creates another seam though so I presume you used some form of cavity wax in there after?
Dave
Looking at your drawing, I'm concerned that your lower weld on the outer sill will be a tricky one - welding uphill facing outwards. When I did mine, to avoid that problem, I made the outer sill in two sections. The first looked like yours but only reached upwards about 8mm. That left access to the inside so that I could weld in a more comfortable position running the weld along the join between outer and inner sill.
i did this on PAE.
Rich
not sure if i've done it 100% correctly but i did the sill then joined the floor to it at the end. I did this so I could plug and seam weld the inner to outer sill first (plugs down the centre of the bit where they over lap then seam welded from inside the box section and also from inside the car... )
Might be overkill but i was a little unsure of how these pieces of work would stand up having never done it before...
Rich.
Might be overkill but i was a little unsure of how these pieces of work would stand up having never done it before...
Rich.