HS8 Carb Fuel Leak

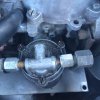
Hi all. After recently pulling over at the smell of fuel in my 72 2000 TC, my father and I popped the bonnet and have not been able to identify the source of the fuel leak directly.

Fuel gathers atop the front float chamber of the carb almost instantly and with the exhaust manifold so close I dare not even start it at the moment.

We have checked both pipes and connections to the chamber and have found no leaks, cracks or loose fittings. We have also checked the valve within the chamber and it is free and unobstructed. We did replace the gasket to the chamber during a recent service due to the old one perishing but with the location of the fuel buildup we do not believe it to be the cause. The brass float within the chamber had a small crack so a new one was installed, however, it did nothing. Our last inspection was of the choke, in hopes that it was a simple flooding/overflow issue, just to find that it was working correctly.

EDIT: I've just had a look and it seems that the fuel is coming from the bottom of the plate clipped on. shown below.10432332_10205889165533554_585920138_n.jpg

Any ideas at all would be greatly appreciated to say the least!
 

Attachments

  • IMG_0438.JPG
    IMG_0438.JPG
    762.5 KB · Views: 7
Last edited:
Welcome to the forum.
If the fuel spills out from there, it means that the float chamber is overflowing.
So, either the float level isn't set correctly, or the needle valve doesn't seal very well, or there was something temporarily stuck in the needle valve and didn't allow it to seal. Or any combination of the above! Remove the float chamber lid, identify the problem, and correct it.
 
Hi Demetris, Thanks for the reply. I have checked the needle valve and it seems to be working correctly without any debris or wear on the little rubber seal. The only thing I can think of now is the float level. I'm going to swap the chamber lid with one from my dad's storage shed (with his permission) just to double check that it isn't a crack in the lid or in one of the copper tubes. I am unsure how to adjust the float level without the help of my dad as my knowledge of mechanics goes about as far as keeping the fluids in check at the moment! I hope to improve through the ownership and work on this car though :) I'll be posting tomorrow to, hopefully, confirm the issue is resolved. Thanks once again!
 
Also i forgot to tell you that you check that the float does actually what its name implies and it isn't full of fuel!
Cracks on the lids are not really common. The procedure to adjust the float level is described in the workshop manual (which is imperative to own if you like to work on your car) and if i remember correctly you should also find it in this forum somewhere through the seach facility.
 
That was the reason behind the new float, the old one had a small crack. Even with the new one it was still leaking :L I have a manual at hand however, most of it may as well be in another language to me if I'm honest! Although it doesn't stop me attempting to learn from it :) I will read into the adjustment tonight and see if I'm brave enough to go it alone until help arrives. Thank you for the help once again Demetris :D
 
Easy way to test the float valve is to pull the cover, hold it upside down so the valve is held closed by gravity and try and blow into the fuel pipe. Hold you finger over the fuel outlet pipe. If you can blow past the valve there's your problem. I would also check for debris in the float chamber showing that crud from the lay up hasn't got inside the valve and is stopping it from seating properly. If you find crud I would suggest getting yourself a fuel filter fitted to protect the carbs.

On the float, pull that out and shake it. If you hear fuel sloshing around inside, congrats you have two bad floats in a row :(. You can buy new floats from burlen's website if you have run out of spares.
 
And you can solder the cracks up too, if you're at all handy. I can post pictures of that bodge I think, for these particular floats as it happens.

Yours
Vern
 
So I finally got to have a good look around today and made a couple of discoveries. Firstly, the old float AND the new float both had hair line cracks in them. Soldering the crack on the new float was a success. I think. I can't really tell at the moment because as I was removing the chamber cap, the tube for the fuel line leading to the rear chamber came out of it's socket somehow (Has anyone had this problem before??). I don't know if I was applying too much force due to the threads being seized, or if it was damaged already, but I now need a new cap. Luckily I have found a place that can supply me with not only a new cap but also a new "Modern design" float that can replace the bodged new float from a local garage.

On another note, there seems to be another leak. Under first inspection, with my untrained eye, I think it is something to do with the petrol reserve. I noticed the leak and saw a cable connected to the same unit. Following the cable it lead to the petrol reserve cable inside the car, pulling on which, confirmed this. However, I have no idea what the unit actually is! Or where the leak is coming from. I will be having a good look on Friday when I'm not working and I've had enough time to consult the manual. I'm just having to settle driving my dad's 57 Consul for now... oh the woes!

Thanks for the help Gentlemen, I will hopefully return with good news soon!
 
Good afternoon everyone, after a couple of hours and a lot of wasted fuel, I've finally done both the "o" ring and the float chamber. Thank you Roverp480 for the link, I managed to find one at a local garage thankfully so I didn't have to wait for postage :)

I changed both front and rear floats, to hopefully prevent future float issues, with this setup http://www.jrwadhams.co.uk/browse-p...edles-gaskets.html/carburretor-float-hs8.html

That's one more ticked off the list, thank you for your help and advice Gents! Took her for a nice drive today and wow! My first leisure drive was amazing and I can't wait to go out again!

Here's a picture I just couldn't help but take :)

Black_Betty.jpg
 
Last edited:
The original brown paint was a bit rough here and there so we had to give it a new coat. It's black for the moment but I intend on doing something different when I can. My dad has had a couple over the years and has done some nice work, unfortunately he didn't get many pictures. This is one of his, and I quite like the idea of 2 colours.
Dad's_TC_01.jpgDad's_TC_02.jpgDad's_TC_03.jpg

(My apologies if this content shouldn't be here, and this problem thread is now resolved :D Once again, thanks for the help!)
 
I was the one who asked :) people around here are pretty easy going. You should start a project thread on 'members projects' though. We'd all love to see your progress.
 
Back
Top