JVY MOT 2011

Argon / CO2 is definately better, (Argoshield I think BOC call it), but CO2 works well for steel, and has the advantage that you can use "pub" gas which you can get in much bigger bottles, without paying a rental, either find a bottle and have it filled, or some places charge a deposit for the bottle and then just charge per refill. That's what I use, and I've only had it refilled twice in about 6 years, at about £15-£20 a time.

Smooth reliable wire feed is pretty key to the whole operation.

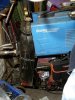
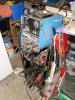
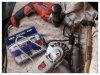
Here's my setup, just an old Clarke 100EN, I've had this welder for roughly 20 years, used no-gas wire for at least half that time, bought the trolley and switched to CO2 pub gas when I got the garage to work in.
 

Attachments

  • SL373293.JPG
    SL373293.JPG
    139.9 KB · Views: 708
  • SL373294.jpg
    SL373294.jpg
    169.6 KB · Views: 708
Check your pinch and drive wheels as well as the tensioner that applies pressure to the wire. If the sip machines are known to have a weakness, then chances are good that's your problem.
Stuttering will most likely be down to feed speed being a bit low and the wire being burnt off by the arc until it loses electrical contact by being too short then coming back into arcing range as the feed advances starting up the arc again. Gas will also play a part here, just to make it interesting.
The frequency of the stutter will give you an indication of how slow the feed is, it will speed up as the feed gets closer to optimum until it stops.
Spatter is generally current related along with the volume of gas flow giving insufficient shielding. The spray and cook trick is simply to allow the spatter that does accumulate to not stick as tightly and also be easier to clean off of the gas cup, it won't stop it for you. You are spraying it on the little ceramic cup, right? Not the workpiece.. I can't remember if I mentioned that point.... :oops:

Don't lose heart that your first attempts look like a chicken crapped on your work, it's something everyone who has ever taught themselves to weld has gone through to a greater or lesser degree. I have been playing with welders since school back in the '80's and I still lay down some fine bird5h1t at times.
Percy Verence is the key, here.
 
Didn't have too much time today - SWMBO had me trimmimg hedges in the garden this evening :roll:

However, think I have made some progress with the MIG:-

1. I increased the pressure between the pinch wheels simply by removing the sprung steel lever that pushes down the top wheel and bending it a little.

2. Most importantly, I had a quick visit from someone with a bit of experience who came round to give me a loan of his MIG welder. As soon as I looked at his welder torch, I spotted the problem. On mine I had replaced the shroud. The new shroud was too short which meant the copper tip on the torch was protruding by about 1/4". I think this meant that the tip was touching the workpiece or weld and that was what was causing the wire feed to stick. Also, I guess that maybe the gas wasn't flowing onto the weld area very well. I rescued the old shroud from the bin and sure enough it was about 1/2" longer.

With the longer shroud it now works a treat and I can start on the car :D :D Plan is to tackle the holes on the A pillars first.

Thanks again Unstable for the advice & encouragement. I was feeing a bit frustrated - as you say Percy Verence is key. BTW, I had assumed you sprayed the cooking on the tip and inside the shroud. I found that just a light coating is best otherwise the oil starts to drip out when you are welding and it smells like chips cooking - it was making me feel hungry :)
I also got a loan of a proper faceshield which is good. The old school welding goggles I had only covered my eyes and I was starting to get a bit of a suntan on my face!
 
Listening to people's successes and ascent of the learning curve is one of the things I really enjoy about this forum. Well done JVY

Chris
 
I had exactly the same problems with my SIP, but managed to get them pretty well sorted. What made the biggest difference was changing from small wire reels to larger, 5Kg reels. You wouldn't expect that to help wire feed but it does, greatly. I guess it's down to the inertia of the heavier reel and the angle of the wire, both allowing for a much smoother feed.
I also 're-engineered' the tension spring on the pinch wheels, positioning it so that it's pointing upwards, then fitting a coil spring from its top end to the welder's handle. This prevents the pinch wheels from leaning away from each other, which will happen if the normal spring is over-tensioned. I'll take a photo of it this evening if I remember.

If you were having trouble with the welding tip touching the workpiece, that may me down to your technique. Try using something to rest your wrist on so that your arm is kept still and you only move your hand. For an idea what I mean, try it with a pen at your desk, moving it around at a constant distance from the surface. It's a lot easier to keep the gap consistent if your wrist is supported.
 
If you're still having trouble with the wire feed of your SIP MIG welder, this is how I cured mine:
sip_mig_1.jpg

sip_mig_2.jpg

sip_mig_3.jpg

The bit pointing upwards is the spring, which is normally down in line with the pinch wheels. The block (and wheel) it's attached to tends to lean outwards allowing the welding wire to pop out of its groove. My modification pulls the block back into line.
 
Good pic's Willy - thanks, Your MIG looks like mine. So I will keep the mod in mind if I have more trouble. Mine doesn't have the handle to attach the spring to. However, I am sure I could work out a similar fix.

I didn't get as far as welding this evening but I did manage to prepare the NS A-pillar hole so that I think it's just about ready for welding a plate onto. Of course, took some pics:-
 

Attachments

  • A piller hole NS.jpg
    A piller hole NS.jpg
    50.4 KB · Views: 565
  • A pillar NS marked off.jpg
    A pillar NS marked off.jpg
    80.1 KB · Views: 565
  • A pillar NS rust cut out.jpg
    A pillar NS rust cut out.jpg
    79.4 KB · Views: 566
  • A pillar NS zinc primed.jpg
    A pillar NS zinc primed.jpg
    65.7 KB · Views: 565
  • tools used for A pillar prep.jpg
    tools used for A pillar prep.jpg
    95.2 KB · Views: 565
That looks like a considered and professional approach. No doubt first welding attempts will ruin the image, but we'll never know once the stainless trim is back on! Well done!

Chris
 
That does look like good prep - The longer you spend now the better and easier the weld will be... Do you have any flapper disks? They're expensive in shops but on ebay you can pick them up much more cheaply....

Rich.
 
Thanks for the encouragement Chris & Rich.

Rain, rain, rain - been raining here since Friday which has meant no progress. I cannot recall a more wet/miserable May/June in the West of Scotland! Forecast is good for this afternoon though and I hope to get some work done.
 
Finally got a chance to crack on with my A-pillars.
 

Attachments

  • NS A-pillar repair complete.JPG
    NS A-pillar repair complete.JPG
    125.8 KB · Views: 498
  • OS A-pillar paint & filler removed.JPG
    OS A-pillar paint & filler removed.JPG
    173.7 KB · Views: 498
  • OS A-pillar repair plate welded on.JPG
    OS A-pillar repair plate welded on.JPG
    175.8 KB · Views: 498
  • OS A-pillar repair ground back.JPG
    OS A-pillar repair ground back.JPG
    165 KB · Views: 498
Looks good to me... Think the thin metal thing us best done in pulses like you suggest....

Rich
 
Looks pretty good to me.

There isn't much strength in the screen pillars anyway, so you won't be missing much (have a look at the crash test footage to see how they just fold up)

Once you've finished I would suggest spraying some waxoil down inside the pillars, I think you can get in at the top easily enough, hopefully keep the rot at bay for a bit longer.
 
Good idea on the waxoil Richard -thanks. I reckon that I could spray some down the hole at the top of the pillar that the wires go down. That shoud keep the lid on those little tin worm beggars for a while :twisted: . I did also make sure that I got plenty of zinc primer inside the pillars and on the back of my repair panels.

In terms of A-pillar strength, when I was doing the work, I did think myself that they don't look very strong and that they wouldn't support much weight (e.g. if the car roilled over). I guess this is one area where modern cars cars with their super chunky A-posts have their advantages. Though, perhaps the down side on modern cars is that they are so chunky and set so far forward, they hamper visibility and increase the probability of having an accident in the first place :?: Maybe a classic case of Health & Safety gone slightly wrong (reduced severity at the expense of increased likelyhood :) ).

It's raining again, so don't know if I will get much/anything done this afternoon. :roll:
 
It's only the MOT man who demands seam welding so I'd think what you've done is fine to restore strength

Does this mean P6's were not safe if they rolled over or do the B posts take the weight ?
 
I'm not sure if crash testing extended to rolling the vehicle in the 60's.
I wouldn't want to be in one when it rolled.

The roof panel, although only bolted on probably helps to tie it all together, but all the pillars and roof rails can be twisted by hand when you've removed all the trim and glass.

The majority of the strength of a P6 is in the floorpan, the sills are enormous by modern standards, very deep. That explains why you can cut the roof off without additional strengthening.
 
For a little re-assurance I strongly suggest everyone reads this true story:

http://www.ruediger-wicke.de/Testberichte/Unorthodox.htm

If you're not in fits by the end I want to know why!

This is, in fact, a Rover Co authored article. I think it demonstrates the sort of people who designed the car - Pythonesque humour well on display 5 years before the real thing.

As regards the strength of the screen pillar - that isn't the problem, strength wise, with the P6. Crash testing shows that the front bulkhead tilts backwards on the sills and, as a result, or as part of the cause, the roof rail cripples upwards above the drivers door. The tilt is fairly minor, not enough to damage the occupants, but the roof rail cripple means the door cannot be opened afterwards. That equates to around an NCAP 3 star, which is as good, or better than, most modern Korean imports. Quite stunning for the time!

To take the car up to NCAP 4 or 5 star, you would need to strengthen the roof rail, at least across the screen and down the sides as far as the B post, and I'd be inclined to try and triangulate the sill to A post joint a little better. The latter woulkd be a good idea for your convertible, Rick. You could also insert a high grade steel rod down the screen pillars. And a little more bulk in the top screen rail will actually help you attach the hood!

Chris
 
Excellent link Chris thanks - I hadn't read this before :D Airborne for 49.9m and the occupants survived a rollover. So maybe the A-pillars aren't too bad after all.
Is the account true :?: Where did Rudiger get it from :?:
 
DaveHerns said:
It's only the MOT man who demands seam welding so I'd think what you've done is fine to restore strength

Does this mean P6's were not safe if they rolled over or do the B posts take the weight ?

Know what you mean - I was worried that what I had done wouldn't meet MOT standards. However, I did notice that the various sections of steel that make up the A-pillars looked as though they had originally been arc spot welded at the factory? So, I was thinking it odd that modern MOT standards demand seem welding on a replacement panel that was perhaps originally spot welded?
At the end of the day, the A-pillars weren't mentioned on the MOT form as the inspector obviously can't see behind the chrome trim. So I took took a comprimise between doing a repair that I reckon restored the pillars reasonaly close to original condition as opposed to potentailly wrecking the thinner metal on the pillars.
 
I believe the rules refer to welded repairs, rather than replacement panels. If you replace a complete panel that was originally spot welded, then I'm fairly sure it's ok to spot weld the replacement on, that's certainly what a main dealer bodyshop would do. Where you need to seem weld is where you are introducing a joint that wasn't there originally, i.e. in a repair section.

When doing this type of repair, I would generally seam weld where there was no original seam, but spot weld (or plug weld) where the repair replaces a joint that was originally spot welded (after removing the remains of the original spot welded section).
 
Back
Top