KDK907P - 1976 2200sc

Willy Eckerslyke said:
If the mount is OK, then my trick for removing the threaded part of the old mount is to clean it up with the grinder then build up a "nipple" of weld, taking care to avoid welding the mount itself. I then weld an old bolt onto the nipple and let it cool down before undoing it. This method has worked for me four times so far, they always unscrew easily after exposure to all that heat. With your obvious skills with a welder, you'll find it a doddle.
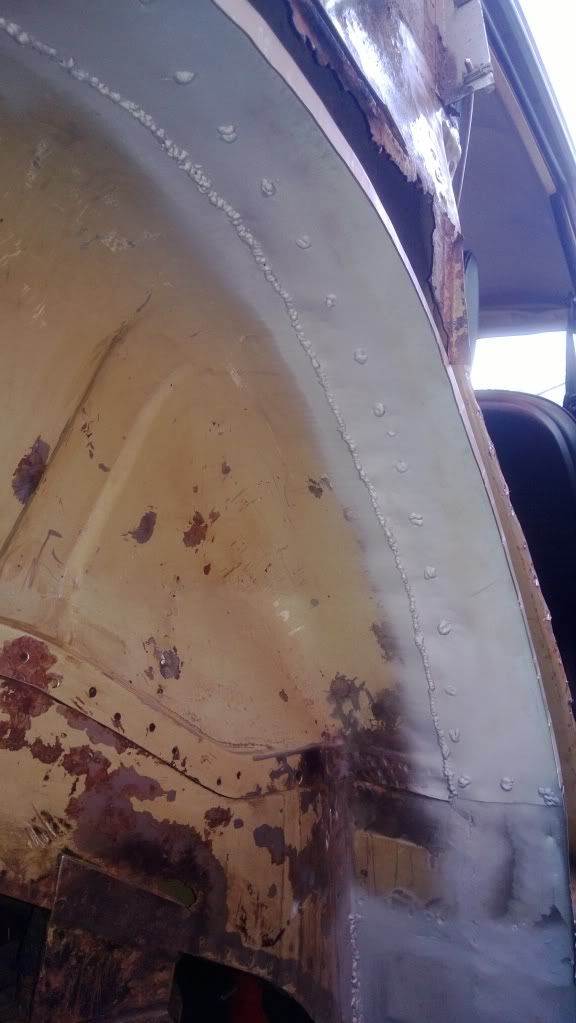
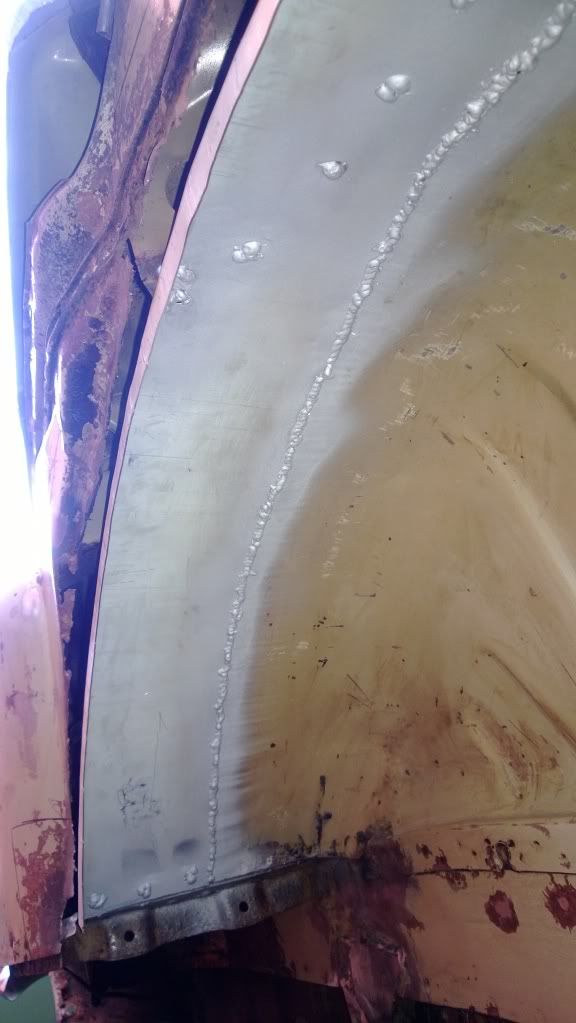
i did exactly that, and about 3 turns out it went snap! Ive used this approach so many times in the past and its worked but this time no cigar!

my welding is rubbish, in getting there with seam welding but my plugs are atrocious!
 
a bit more progress today, the weather has been so changeable recently its hard to get out and do some work!

been doing some bits in the garage to fill the time when its been raining, the battery box fell to bits when i took it out (the after effects of fitting a battery thats too big for the box!, im not even sure that the straps under the metal bit are actually original) but the metalwork seems ok, so i submerged it in a mixture of citric acid which has lifted the rust right off, its now got a couple of coats of por15 on it.
temporary_zps5d3663b4.jpg


I also collected some rear wings off Ian on tuesday
temporary_zps3e98a331.jpg


and also did some bodywork today

as you can see ive now closed up the sill (although there is still a little patch of rust at the bottom of the arch which needs cutting out but it is very localised so not too bad at all
ive also replaced the arch lip which was corroded, im pleased with how this went in actually
temporary_zpsa6ac78d2.jpg

temporary_zpsbfb1690d.jpg


i still need to grind my plug welds down and clean it up but dont think ill get a chance to work on it this weekend so thought id coat everything to stop it corroding, atleast with the arch now in place ive got a position to rebuild all the vertical panelling and the rear inner wing.
 
OK first day off this year and whilst ive not done alot ive started to actually make some progress... today i cut the holders for the striker plate bases off the old D post and welded them onto the new ones.


I've also noticed that i forgot to spray a whole section of new panelling on the car with zinc primer and its gone all rusty, ill have to grind and wirebrush it all back to get back to fresh metal. Fun and games! :mrgreen:
 
I ve just seen your post and excellent work going on. I used wadhams panels to fix mine snd the d posts are excellent as are the sill panels. Can i ask how did you get all the underseal off . Looks like you done a good job at it.
Marcus
 
marcus/rosie said:
I ve just seen your post and excellent work going on. I used wadhams panels to fix mine snd the d posts are excellent as are the sill panels. Can i ask how did you get all the underseal off . Looks like you done a good job at it.
Marcus
thanks marcus/rosie and rockdemon


I'm a bit in 2minds with jrw panels at the mo, some of them are never going to fit in a million years but the dpost looks ok....just wish id put the jacking post in the right place and not 1/4"too far forward!

underseal... And waxoil...Heatgun and a scraper for all the underseal and then wiped ot down with brake cleaner to get off any residue of waxoile...a thoroughly enjoyable task!
 
ok bit more work today, got all the vertical panelling closed up (tiny tiny piece still to do)


(this picture is at lunch break so i hadnt seam welded it to the inner sill or cleaned up the plugs at that point.

i then turned my attention to the Dpost, now this is being an absolute pig, for some reason the panel from JRW is 2mm steel which means whilst its nice and strong the inner cross section where it sits over the jacking point assembly is too small (despite it being a JRW jacking point)meaning the panel does not sit flat against the seam it should do! so ive tried all sorts but ive now resorted to having to cut that section out of the new panel (grumble grumble...) and ill then reform a new piece from 1mm plate once its all fitted in place.

good progress today I though!
 
bit more progress over the past 2 days, i cut a section out of the base of the dpost where it should fit over the jacking tube and managed to get the post to fit in place

tack welded it on yesterday to check position although i stupidly forgot to mount the lock hardware on to check lock position, so re tacked it today to make sure, its now in position and ready to be properly welded on tomorrow once the wind has died down a bit!


as you can see ive had to cut out around the jacking point at the bottom, utter pig of a job!


as view from the back, the door does shut properly against the locks (unlike this image suggests) but will clearly need properly positioning better after paint and once the seals are all in position

any ideas how to form the straight bits of seal channel into a curved section for the edge of the dpost?

I feel i'm making some progress at the moment
 
Its great work your doing. Im pleased to see another 2200 being restored. It goes to show that if you have the will rovers can be repaired and saved.
Marcus
 
The cars got a lot of sentimental value so regardless of cost its worthwhile restoring!

OK bit more progress today, final welded the D post in place then turned my attention to the inner d-post and closing panel.

I'd bought one of the new inner d-posts from JRW and initially didn't think it would fit but this is likely to be more the fact that as most of this corner of the car had succumbed to the rust monster i had to freestyle alot of it and its probably not where it should be. i still think the JRW panel would benefit from a flange on the inner edge to allow it to be welded to the seam of the arch. as it was i had to weld along the edge and there isnt really enough space to get the mig torch into it let alone to control it wel enough to get a good well.

as you can see the panel didnt quite fit my application but with a bit of fettling it fitted relatively well along the inner edge.


I created the upper closing panel from 2 parts, thought it would be easier to fit in.... annoyingly I dropped the cardboard template for the upper section into the dpost and it slid down to the bottom, luckily i managed to drag it out again.


and the top section welded in

Tomorrow ill get the splash panels welded on and bar a couple of small patches around the bump stop (and the bump stop assembly itself) that's that for this side of the rear of the car....
 
bit more progress this week but as weather hasn't been great its been quite limited to what i can actually do what with working outside.

Finished off the splash panelling at the rear.


wing fitted to check splash panelling position!


jacking point finished off


i've also fixed the few small rust holes in the wheel arch and im just waiting on a new bump stop and seal channel so i can box off this side of the car and move to the other side ive also scraped the underseal off all the underside of the boot, to look for any more rot, not found any bar a few bits of surface rust.


now the big question is what have I been doing when its been raining......

well ive replaced every panel in the drivers side Apost of my mini, floor, flitch, door post, strengthener and sill! poor welders earned its keep this week that's for sure!
 
Whitewash,

Fantastic work! One remark on the welding; maybe try a higher current or lower wire speed. Your welds lay on the metal. With a higher current or lower wire speed, the welds will be more bedded in the sheet metal then laying on top of it. Try it on some scrap metal.
You have a long way to go but when ready, you are Sure , you have a solid car.
Peter
 
cheers P5B,

ive been experimenting with a slightly lower wire feed and yes i am getting better results with better penetration, i think i was trying to be too safe and not blow any holes so had wound the wire speed up slightly :oops:
 
Back
Top