Water leak at fuel filler grommet ?

jp928

Well-Known Member
Was out in the wet this morning - probably a first for me and the car. Found some water in the boot on return, and with a bit of contortion found it coming off the bottom of the filler grommet. Anybody have any wisdom relating to work in this area please? Will I need to remove the rear deck panel, and/or cut and remove the filler hose?
thanks.
PS the P6club soft copy of the manual is missing this section......
 
Good morning, the rear deck does not need to be removed. It is enough to unscrew the fuel filler cap.
 
water is heavier than petrol - does this mean the bottom of your petrol tank has water in it?
 
Thanks Bernd! So if I understand you correctly removal of the filler cap will give me access to the grommet?
I doubt there is water in the tank, its just the grommet around the filler neck leaks water coming off the rear deck and going under it....I hope.
 
The other thing to check is that the forward fixing stud for the decker panel in not letting water past, because that is lower than the filler hole in the base unit.
 
Care to elaborate on that please? So far all I have been able to confirm is that pouring some water over the filler cap it runs straight into the boot behind the angled brace, immediately.
thanks
 
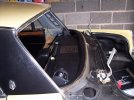
My mistake it may not be lower, but I've had the fixing stud leak. Just something to check. Have a couple of pics to show its location, there's usually sealant of some sort under the top nut. -

Rover p6 base unit fuel filler area.jpg
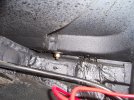
Although the right side, this shows how far forward it is (angled brace on right out of shot).

Rover P6 base unit decker panel area.jpg

Colin
 
Thanks. Still open in my mind is - does the opening cap assembly come off without cutting or removing the big hoses? The parts book shows the filler as one assembly, screwed to a plate under the decker panel..? Getting this out would require cutting at least the first hose..? I think the leak is too fast to be through a loose or rusted bolt. Will try to feel that bolt for signs of water.
 
There’s a large jubilee style clip that holds the rubber hose to the underside of the cap assembly inside the boot. (You sort of have to work upside down). Open the fuel cap like you’d do at the patrol station. Then undo the self tapping screws (I think there’s four?) around the opening for the filler.

Then pull and twist the cap assembly up and away from the rear deck. It should then come away.
 
And if the hose has been glued on, as mentioned in the book? Gets a bit difficult?
 
The "glue" on mine didn't up much fight, after all this time it had evolved into a something like dried orange icing, definitely not adhesive properties
 
Thanks all. The bolt most forward is , for me, unreachable with the hose in place. Watching in the gap between the decker panel and the boot panel, water poured on the filler cap appears on the underside of the filler pipe. Cannot see any sign of the wire mentioned in the book - should it be visible. Some aspects of the car make me think its had a panel off repaint. Parts ordered....waiting impatiently, not driving in the rain again until its fixed.
 
Unstable said "A cotter pin remover should be able to get in between the pipe and the stem to loosen things off a bit for you."
Obviously 'cotter pin' is not universal.
I was brought up that this 9.5 x 42mm Cotter Pin with Nyloc Nut - each 9339506005914 | eBay
was a cotter pin, used to lock a bicycle pedal arm to its shaft. What you refer to I call a split pin. Looking this up on the web I see splits being also listed a cotter pins....
 
Beat me to it! Churchill? Can anybody clarify how the grommets fits into the whole assemble please? I cant visualize where it goes, or where and how the piece of wire fits in there - the parts book is no help.
 
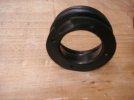
If I remember correctly, once you’ve removed filler assembly you can pull the old grommet away from the hole in the base unit sheet metal. Fit the new seal in place making sure cutout for the catch is aligned correctly push assembly back into the base unit through the newly fitted seal. Secure with the four screws. Pic of seal. 1712756718099.jpeg
 
Last edited:
Back
Top