

You are using an out of date browser. It may not display this or other websites correctly.
You should upgrade or use an alternative browser.
You should upgrade or use an alternative browser.
Welding, How much ?
- Thread starter happy days
- Start date
happy days
Active Member
All in all about an hour, not much I know but it won't be seen :shock:
GrimV8
Active Member
It will, we want picshappy days said:All in all about an hour, not much I know but it won't be seen :shock:

webmaster
New Member
If you've not done much before, then an overlap joint will be easier, i.e. make the plate a bit bigger than the hole and weld it over. Getting a good flush butt joint can be quite tricky unless both sides are really good steel, you tend to blow through the gap. It's also easier to weld down from inside the car, but might not give you the finish you want underneath.
I generally use 18 gauge (1.02mm) mild steel for repairs, it's a little thicker than was used originally (depending on the section), but helps to make the repairs last.
Old washing machine panels aren't bad actually, I've also used old PC cases in the past (some of the early ones are more like 16 gauge !). If you don't want to cut up the PC or Washing machine, then most shops that sell car panels will sell small sections of steel in various thicknesses, you don't have to buy 8'x4' sheets like I do
In fact, I'm not sure but B&Q might even do some, I know they usually have a section of tubes/bars and plates etc...
For MOT repairs you need continuous weld beads, so no spotting it on and covering it with underseal
For welding tips, visit http://www.mig-welding.co.uk/
GrimV8 said:It will, we want picshappy days said:All in all about an hour, not much I know but it won't be seen :shock:
Damn right we do Mr HD :shock:
We want pics of before you start, after the cutting out, making up the repair panel and after the fire engine has gone.
Seriously though, have a spray bottle full of water handy as they can burn very easily and its amazing how a small spray bottle can put it out.
Richard
I may have a small piece of 20 gauge lying around somewhere if you're stuck.
Dave3066
Well-Known Member
Mick
Good welding is all about setting the welder up correctly for the job (and every job could require different settings), preparation of the metal, good protective clothing, such as an auto-darkening visor, thick leather gauntlets and practise off the car. Best to practice getting the weld right in the middle of a plate before trying to join metal together. Make sure the area has plenty of light on it so you can see what you're doing and if your eyes are anything like mine you'll need some strong reading glasses so you can focus on the weld and see what's going on. What size wire do you have in your welder? I use 0.8mm but 0.6mm will give you better control on thin metal and minimise the risk of blow through. You can also put a flat copper bar behind the area you're welding to help. But this is probably getting ahead of ourselves here.
The important thing is to not do anything other than preparation on the car until you are comfortable that your welding is up to the job. I think if you read most welding threads on here they will all say that the longer the welding goes on the better it gets, hence the practise. We would all want to go back to the first few welds and redo them knowing they will be much better next time, but time is always against us, so take your time and get it right first time. You'll be much happier after.
Fire safety is also very important as there are lots of combustible materials around the area you're repairing so a bucket of water with a cloth in it nearby is what I have. Alternatively if a small bit catches fire whilst you're welding, the gas from the welder is also quite a good fire extinguisher A quick blast of gas from the torch will usually put most small flames out. Just watch out for latent heat causing re-ignition and make sure you only press the trigger enough to release gas and not feed wire :shock: . As to the thickness and type of metal. My tuppence worth would be to use 1mm mild steel. Galvanised would work but you get toxic fumes given off when welding galvanised steel. Stainless would also work but the long term effects of welding stainless to mild steel are unknown so I would just do what Rover did and use mild steel. Whatever you use it will need some form of protection anyway.
Ok have I put you off yet......?????? Hopefully not.
The link that Rich posted to the mig welding forum is an excellent source of information and advice. You will also see lots of examples of good and bad welding. This is another good source.
If in doubt at any stage post pictures so we can see what you're doing and offer advice.
Dave
Good welding is all about setting the welder up correctly for the job (and every job could require different settings), preparation of the metal, good protective clothing, such as an auto-darkening visor, thick leather gauntlets and practise off the car. Best to practice getting the weld right in the middle of a plate before trying to join metal together. Make sure the area has plenty of light on it so you can see what you're doing and if your eyes are anything like mine you'll need some strong reading glasses so you can focus on the weld and see what's going on. What size wire do you have in your welder? I use 0.8mm but 0.6mm will give you better control on thin metal and minimise the risk of blow through. You can also put a flat copper bar behind the area you're welding to help. But this is probably getting ahead of ourselves here.
The important thing is to not do anything other than preparation on the car until you are comfortable that your welding is up to the job. I think if you read most welding threads on here they will all say that the longer the welding goes on the better it gets, hence the practise. We would all want to go back to the first few welds and redo them knowing they will be much better next time, but time is always against us, so take your time and get it right first time. You'll be much happier after.
Fire safety is also very important as there are lots of combustible materials around the area you're repairing so a bucket of water with a cloth in it nearby is what I have. Alternatively if a small bit catches fire whilst you're welding, the gas from the welder is also quite a good fire extinguisher
A quick blast of gas from the torch will usually put most small flames out. Just watch out for latent heat causing re-ignition and make sure you only press the trigger enough to release gas and not feed wire :shock: . As to the thickness and type of metal. My tuppence worth would be to use 1mm mild steel. Galvanised would work but you get toxic fumes given off when welding galvanised steel. Stainless would also work but the long term effects of welding stainless to mild steel are unknown so I would just do what Rover did and use mild steel. Whatever you use it will need some form of protection anyway.Ok have I put you off yet......?????? Hopefully not.
The link that Rich posted to the mig welding forum is an excellent source of information and advice. You will also see lots of examples of good and bad welding. This is another good source.
If in doubt at any stage post pictures so we can see what you're doing and offer advice.
Dave
happy days
Active Member
Thanks guys, good information as always, will be a slow step by step process be sure. Its not a big area so will post pics as i go, worst case I stop wherever I am stuck and scrap the car . No would then take it or get someone who knows what they are doing to take a look to help, bit daunting but hey whats the worst that can happen.
. No would then take it or get someone who knows what they are doing to take a look to help, bit daunting but hey whats the worst that can happen.happy days
Active Member
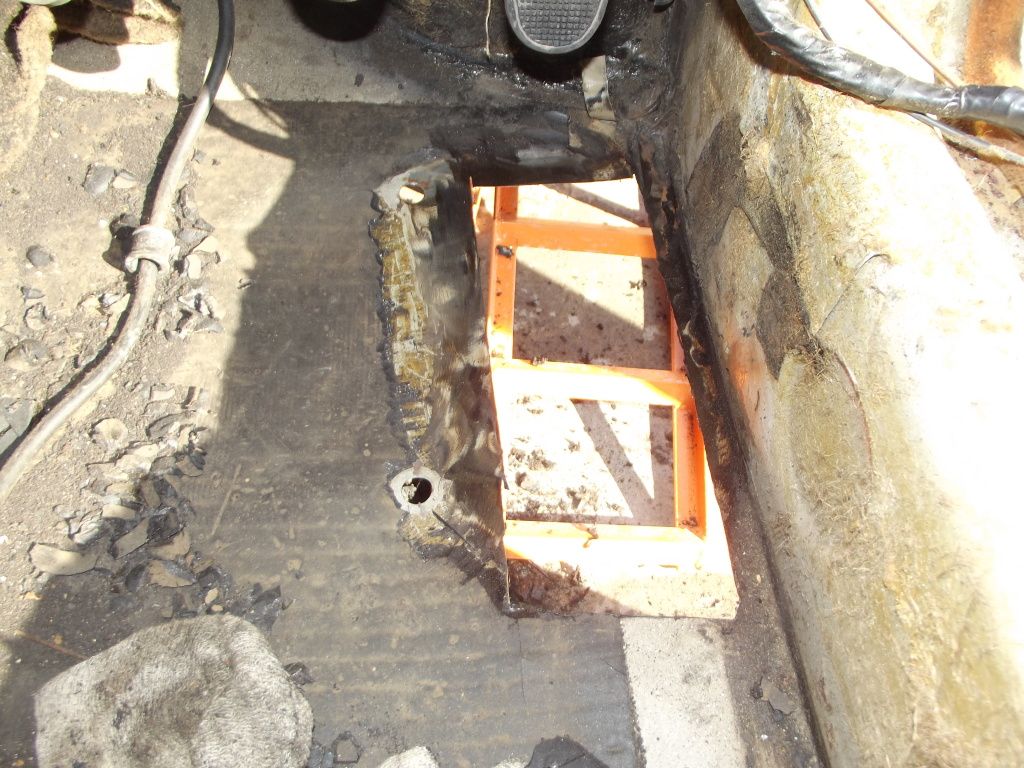
Cut the old bit out, it feels strong, and not thin, could when they jacked the car it just split good metal and when nothing was done caused that bit to turn a rusty colour ? Anyway all this is out now so just to clean it up. How is this so far ? does the underside need to be cleaned as well ? I am probably going to lay a piece on top of what you see, overlap od say 10mm all round, would that be ok ? Cheers guys
webmaster
New Member
That looks like a good size section, and the metal around looks solid.
I'd scrape off the area of bitumen that is still close to the joint, near the bottom of the picture, and just wire wheel around the edge to make sure it's nice and clean, welding always goes better with clean metal.
Underneath I'd do the same, just clean it all up 2-3 inches around where you're going to weld, also helps prevent paint / underseal etc bursting into flames while you're welding on top.
On the fire front, those left over threads from the carpet that are stuck to the sill burn really well, so just keep an eye on them.
Plate about 10mm bigger than the hole as you say, pop it on and tack it around every 2 or 3 inches to hold it, then go back and fill in the gaps, no rush nice and steady.
testrider
Active Member
You've got the idea Mick, it's exciting taking a cutting disc to your pride and joy isn't it?
A bit more cleaning up to do as Rick says, as the underseal on the outside will melt and burn if you don't clean it off too. Don't forget to clean the welds with a wire brush when you start to join the stitches up.
Once it's on you'll need to paint it and get some seam sealer on the overlap on the outside.
Dave3066
Well-Known Member
I recognise that hole I used to have one just like it
A good start Mick. It's unlikely that a jack would have ripped good metal apart, but then it depends what sort of pad was on the jack and where it was placed. There's a good chance the metal was already corroded and weak.
Ok so you have a hole now.
If you are going to place a single repair sheet over the top of that from the inside you need to think about how you're going to clamp it in place. The only point I didn't mention in my last post was the importance of a good ground when welding. That means you need get a nice clean bit of steel, preferably as close to the repair as you can get it, to clamp the ground onto, but equally as important you need to have good contact between the repair panel and the car. This is usually done by clamping. You need a pretty big clamp to get over the doorstep and clamp a panel top and bottom. That's one of the reasons why I prefer to butt weld and use these. You might get away with weighting the panel down until you can get a few tack welds on it from above. Also remember that you have a different thickness of steel to weld to along the outer edge where there is a double skin where the outer sill overlaps inner so you'll need more power there than the other 3 sides.
Looking good so far
Dave
I used to have one just like it A good start Mick. It's unlikely that a jack would have ripped good metal apart, but then it depends what sort of pad was on the jack and where it was placed. There's a good chance the metal was already corroded and weak.
Ok so you have a hole now.
If you are going to place a single repair sheet over the top of that from the inside you need to think about how you're going to clamp it in place. The only point I didn't mention in my last post was the importance of a good ground when welding. That means you need get a nice clean bit of steel, preferably as close to the repair as you can get it, to clamp the ground onto, but equally as important you need to have good contact between the repair panel and the car. This is usually done by clamping. You need a pretty big clamp to get over the doorstep and clamp a panel top and bottom. That's one of the reasons why I prefer to butt weld and use these. You might get away with weighting the panel down until you can get a few tack welds on it from above. Also remember that you have a different thickness of steel to weld to along the outer edge where there is a double skin where the outer sill overlaps inner so you'll need more power there than the other 3 sides.
Looking good so far
Dave
happy days
Active Member
Why disconnect the battery ? good idea about attaching a piece for the earth.rockdemon said:Don't forget to disconnect the battery. I would weld a piece to the patch that the earth wire then has a really good connection.
Rich
testrider said:You've got the idea Mick, it's exciting taking a cutting disc to your pride and joy isn't it?EXCITING not what I would call it Paul
Good clear easy to understand advice Richard and Dave, you 2 should write a book. Those clamps look good Dave, I think half the battle is having the right gear to do it.
So I will need seamsealer, and a coating for the new metal before reapplying the underseal.
Is their any need to refit that bracket under the car ? Cheers guys
Dave3066
Well-Known Member
Mick
Disconnecting the battery prevents 100 or so amps from the welder frying things like your alternator and anything alse connected to the car's electrical system.
You're quite right too in saying that half the battle is having the right equipment, but that is only half the battle
There's no need to refit that bracket either. Unless you want to enter a concourse competition at some stage in the future the bracket is completely redundant.
Dave
happy days
Active Member
ahhhh through the bodywork which is earth ?
Dave3066
Well-Known Member
happy days
Active Member
You learn something every day ! ! !