Wild Rover - NADA 3500S

Hi guys,

Thanks for the interest. I am obviously at the early infatuation stage where I am out doing something on the car every day - I know that sooner or later I will run into a problem or an issue that will take the shine off the whole project; however, I have known that from the start.

Graham, I had seen that company in the UK before, but I figured something stateside might suit me better - looking at the pricing it will probably come down to shipping charges. At today's exchange rate the UK company is a little cheaper, but as I am not ready today only time will tell where I shop. Can anyone tell me how I can know if I have a ballasted coil? I hate things related to elektrikery so please forgive my ignorance.

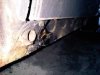
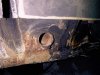
I took some time the other evening and removed the left sill - I ran the risk of encountering the Black Widow that lurked in the region and luckily I survived. The sill proved every bit as solid as the right hand side and I am of course well pleased. I scraped some of the undeseal and paint off to confirm my findings and it all seems to be good metal. Does anyone have any tips on how to get the underseal off? Am I just faced with a really time consuming and tedious job or is there a short cut? I am guessing no short cut, but any tips gratefully received.

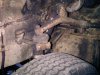
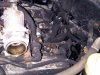
I am looking forward to a weekend playing with the car - I would like to get the radiator out and get it prepared for removing the engine, anything else that I get done will be a bonus...
 

Attachments

  • Left sill 1.jpg
    Left sill 1.jpg
    31.8 KB · Views: 699
  • Left sill 2.jpg
    Left sill 2.jpg
    43.2 KB · Views: 699
  • Front left.jpg
    Front left.jpg
    51 KB · Views: 699
  • Engine bay.jpg
    Engine bay.jpg
    45 KB · Views: 699
  • Mystery.jpg
    Mystery.jpg
    71.2 KB · Views: 699
I would have thought it would be easy enough to piece in a 2nd hand loom soldering and using heat shrink on the joints - nice thick wires , not like new cars
As for the collapsed OSF suspension , jack it up and if the spring is rattling around ,you'll know it's lost it's springiness
 
Removing underseal - heat gun and a paint scraper... THe fire has probably done the job for you in places??? ;)

Rich.
 
The more I look at the pictures of Wild Rover the more it looks like a recommissioning job rather than a restoration. With the exception of the fire damaged wing you might even get away with a cut and polish on the paint!

Have you spoken to Ian Wilson at Rover-Classics? A number of NADA's he's brought into the UK have been converted to RHD. It's just possible he has a 2nd hand NADA loom knocking around. I'd much rather use one of those than try to get someone to make a new one. The chances of then getting it right first time must be very small.

Chris
 
Dave,

Thanks for the tip on the springs - I will take a look at that. All the rattling right now comes from the burnt out bushings. The further I get into the car the more fire damage I find - under the bonnet, just about every rubber item is burnt or crispy, all of the plumbing for the carbs and the vacuum lines are toast; the same is true for a lot of the wiring. I realize that I am going to have a real headache putting this all back together. I am taking pictures of most stuff as I take it apart so that I will have a reference for reassembly, but for the bits that have gone up in smoke it's going to be a real pain - luckily I know that keynsham has thousands of pictures from his restoration - he has kindly offered to help as needed. Ian at Rover Classics has been a great help, as has everyone else here - too many names to mention, but my thanks to you all.

As for splicing in another loom - that was my initial thought. However, as I pull up carpet and move farther back in the car I can see where the heat has melted wires or turned them brittle. Combined with the age of the car it just seems like a false economy to buy second hand and try to bodge something together. I have been quoted $500 for a new loom from a company on the East Coast, the UK company recomended by Graham (TokyoP6B) is slightly cheaper at the current exchange rate. All in all I don't think I will take a chance on a second hand wiring harness. Although the fire didn't get into the cabin it burnt quite merrily underneath it and the damage is quite obvious when the carpet was stripped.

Rich,

I figured it was going to be the heat gun and a scraper - I was just hoping for something less arduous :( The fire did remove some of the underseal, just not enough...

I was just checking out your work on PAE - I feel very lucky that I don't seem to have the rust issues that you are fighting. You are doing fabulous work and are clearly a whole lot closer to the finish line than I am - keep it up.

Thanks for all the input - please keep it coming.

Alan.
 
Chris,

Without the fire I think that it would have been a good roling resto - of course that changed when bonfire night came early.

It isn't the smartest thing I have ever done, but I did get the polisher and t-cut out to see what results I could get - the paint certainly had some potential and even after this morning's rain shower it looks quite nice where I polished it up. It's on closer examination that you realize it needs more work - everything is okay, but borderline.

Everything flammable under the car has gone with the right side being hardest hit. The heat in the cabin took it's toll - the smell inside the car is awful - I don't have a sense of smell, but when I open the doors anyone within 10 feet comments on how bad it is.

I have started stripping underseal from the sills and I am well pleased with the metal I am finding - especially when I see some of the work that others have had to do.

In a way the fire might be a good thing - now I will take this car back to the bare shell and start again - otherwise I might have been tempted to try and cut corners. And, it keeps me out of trouble, well it sort of keeps me out of trouble.

I have been talking to Ian - he has been a big help, as have you and as have a lot of folks - I will be depending on the goodwill of everyone here for quite some time to come - thanks.

Alan.
 
I purchasesd a fairly newish Hilman Hunter many years ago that had had the same under bonnet fire storm as yours, mine was perhaps a little worse as the fire had taken a hold and gone into the interior taking out front seats and dash and roof linings. After I had replaced all the wispy crispy bits replaced the loom and a whole load of work I had a good looking Hillman Hunter ( I wont say good working as in the case of a Hilman Hunter that is an oxymoron) a few years down the track I had an engine seizure due to lack of oil pressure, the cause was that origional fire. The heat had cooked the old oil inside the engine block forming carbonized deposits which after several years and many thousands of miles later had blocked up the oil intake. So add to your list drop sump , remove rocker cover etc and check.

Graeme
 
Graeme,

I had a Hunter GLS when I was 18 - lovely motor, bit of a sleeper as no one expected a Hunter to be packing a 1725 Holbay under the bonnet - I read there aren't very many of them left in the UK - shame.

The plan is to pull the engine and rebuild it - as far as I know it only has about 48,000 miles on it, but I don't think a tear down and rebuild will hurt, especially in light of the fire. I got the radiator and various other bits and bobs out yesterday and pulled the right valve cover off today - it looks pretty good inside.


The workshop manual is pretty good as far as it goes, but it presupposes that your car hasn't been well and truly cooked. Does anyone have a suggestion for a book or guide that will help me fill in the blanks? I don't follow written instructions so well, but I do well with illustrated guides... :?

I am feeling every bit of my age today after spending all day messing the car yesterday.
 

Attachments

  • Valves rhs 1.jpg
    Valves rhs 1.jpg
    58.2 KB · Views: 656
  • AED 1.jpg
    AED 1.jpg
    57.7 KB · Views: 656
  • Valves rhs 2.jpg
    Valves rhs 2.jpg
    63.9 KB · Views: 656
  • AED and crispy bits.jpg
    AED and crispy bits.jpg
    27 KB · Views: 656
Suggest you revisit the "Rover haul" you initially posted; camera +sketchpad in hand, and make notes based on comparing an identical model V8
I've restored a few motorcycles + this has proved priceless in getting correct details; Rover owners are a friendly bunch + I'm sure that owner would understand your situation + let you loose on one of his cars

The best workshop manual is the "Official" one which is damned hard to find; made for mechanics at Rover dealerships I would guess Vol1 + Vol2. run near 1,000 pages; and there were update supplements, which I don't own *Maybe* it's been scanned and uploaded online ( ?? ) I'll correct an earlier posting of mine that this does not contain the "Dual servo" brake system, in fact it does... ( pictured )

GW

genuinerover001.jpg


genuinerover002.jpg


genuinerover003.jpg
 
Graham,

I plan on visiting Matt and his Rovers for reference - he's a really nice guy and I am sure that he won't mind. Keynsham has over 2000 photos from his tear down and rebuild, so there is material out there. It's just a little bit of a pain to read the manual's description of the job you are about to do and realise that you have a molten pile of pooh that doesn't match the description.

I got my manual from Amazon UK, plus I bought the parts book - 70 quid for the pair. It seems to be the same book as your two, just a later printing - I am not sure about the second volume that you have though, mine starts at General Specs and ends with Service Tools - here are some pics...

I will follow up on those parts for you this week - the guy was supposed to call me back with pricing but didn't yet
 

Attachments

  • Manual 1.jpg
    Manual 1.jpg
    25.2 KB · Views: 913
  • Manual 2.jpg
    Manual 2.jpg
    27.8 KB · Views: 913
  • Manual 3.jpg
    Manual 3.jpg
    60.5 KB · Views: 913
I do have over 2000 photos of my car in all stages of rebuild. These cover everything from the suspension, engine, exhaust, intirior, etc, etc. I have also had to work out how all the systems such as emissions and dual circuit breaks actually work, so it you want any assistance, just ask!

Richard.
 
I stand corrected on how good the car looks! Clearly a sense of smell is critical here. I'll ask webmaster Richard to install "SmelloVision" for the next software release.

Inside of the rocker covers looks very good in Rover V8 terms. The degree of gunge in here is a leading indicator of the state of health of one of these. I echo the advice on a very thorough clean inside the sump though!

The good news is that the fire damage is going to force you to get all the top side engine powder coated from scratch, so you are going to finish up with an extremely attractive engine bay. I've had a careful think and I can't currently bring to mind any plastic or rubber bits in the engine bay that aren't pretty readily replaceable. I remain to be surprised! Even wiring loom clips now has an established easy answer!

I do have very serious concerns about the ability of any firm to produce a wiring loom without having the original to hand to copy. I guess I simply don't understand the process that they would follow to achieve this.

Keep at it!

Chris
 
I do have very serious concerns about the ability of any firm to produce a wiring loom without having the original to hand to copy. I guess I simply don't understand the process that they would follow to achieve this.

Chris, had an article ( likely in Hemmings IIRC ) about a USA company that specialized in nothing but replica wiring looms +their ability to repro. the gauge, color-coding + wrapping + terminations of a typical loom was good enough to fool Concours judges Yes, they had representative looms on-the-shelf ( miles of shelving ! )+ they copied them. Company was "Wire King" or "The Wire King" but a web search doesn't turn them up; they may have been folded into another company I know 'em 'cos I helped source a loom for a '57 T-Bird owner in Japan in the early 90's; the loom took about 10 days to come by courier ex-USA once ordered+ was exactly correct in every respect as if Ford had supplied it...

GW
 
local company here in CHCH (multinational) does wiring looms also, fascinating stuff, all the jigs and such. Chris I suspect the AED will bethe most tricky to source as it looks fairly toasty :LOL: but maybe the US has them off the shelf.

Graeme
 
Alan, I'm pleased to see you have your own project thread now. I know the soot blackened parts look a mess but at least it's not full of rusty holes. Most of that should clean up and be reusable. Then you've got a few rubber pipes and wiring to sort. It seems like it was a good find even with the fire - I can't believe how clean the rockers and pushrods look.

With regard to getting it back on the road, I'd advise sorting out a few jobs to getting sitting straight first, so perhaps get the front suspension sorted and the brakes freed off rather than spend a week scraping underseal off the sill. This will build morale and get you wanting to do more.
 
Back
Top