

You are using an out of date browser. It may not display this or other websites correctly.
You should upgrade or use an alternative browser.
You should upgrade or use an alternative browser.
Daily driver - now time for a freshen up
- Thread starter Tom W
- Start date

![P030910_11.03_[01].jpg](/data/attachments/1/1246-12638c5cf7408502d1647b040f2cffe8.jpg)
Tom W
Active Member
Re: Daily driver
The wiring requires changing slightly to get the unit to work. The ballast resistor needs bypassing. I ran a new wire along the path of the ballast wire, strapping it to the existing loom as I went. The ballast wire is still there, should the car need returning to standard any time. I wanted to minimise the amount of extra connectors floating about in the engine bay, and make the installation look factory so I unpicked the wires from the connector supplied with the electronic module and fitted that to the existing coil negative and ran a new wire direct to the coil positive along the same route. I think I've used thicker wire than was needed, but better to be too thick than too thin. I then reset the timing to the manual settings and job done.
So far, things seem to be a vast improvement. The car seems keener right through the rev range, and the missfire has been cured, though some of this could be down to the new coil. Economy has improved too, going from low 20s to mid 20s, though I've done more motorway miles recently.
Tom
Tom W
Active Member
Re: Daily driver
Well it's been a long time since I posted here, so I think it's time for an update....
The Rover has been comfortable and reliable daily transport until it came due for a service a couple of months ago. As winter was coming, along with the dreaded salt , I decided to do the sensible thing and take it off the road and garage it over winter. With the paint in it's current condition, I don't think the panels would stay rust free for long. Anyway, it's sat there for a couple of months doing nothing, so I thought it would be wise to start it up and go for a spin round the block. Problem is, I can't get it to start. I don't think it's the battery as it turns over fast enough, and a jump start made no difference. My guess is a fuel problem as it doesn't smell flooded. Plus, when I was using it, if it was left for a few days it took longer to start as fuel would drain back from the carbs. I've not had a good prod around yet, it's been too cold out there to do much.
With it now off the road, it has given me a chance to plan a mini spring rebuild/freshen up.
So far on the list I have:
Service.
Carb Rebuild.
Upgrade the wiring with relays etc.
Replace the water pump and side plates and de-sludge the engine.
Strip the seats out and restore the leather.
Remove the carpet and properly clean it.
Get everything waxoyled.
If funds allow, there's a few nice to haves too:
Strip all the panels and have them repaired and painted.
Rebuild the suspension with new dampers
Replace all the cracked rubbers.
Fit a central locking kit.
I'm itching to get going with things again, but first I need to make the garage more habitable. I'll post more pics when I start making progress again.
Well it's been a long time since I posted here, so I think it's time for an update....
The Rover has been comfortable and reliable daily transport until it came due for a service a couple of months ago. As winter was coming, along with the dreaded salt
, I decided to do the sensible thing and take it off the road and garage it over winter. With the paint in it's current condition, I don't think the panels would stay rust free for long. Anyway, it's sat there for a couple of months doing nothing, so I thought it would be wise to start it up and go for a spin round the block. Problem is, I can't get it to start. I don't think it's the battery as it turns over fast enough, and a jump start made no difference. My guess is a fuel problem as it doesn't smell flooded. Plus, when I was using it, if it was left for a few days it took longer to start as fuel would drain back from the carbs. I've not had a good prod around yet, it's been too cold out there to do much.With it now off the road, it has given me a chance to plan a mini spring rebuild/freshen up.
So far on the list I have:
Service.
Carb Rebuild.
Upgrade the wiring with relays etc.
Replace the water pump and side plates and de-sludge the engine.
Strip the seats out and restore the leather.
Remove the carpet and properly clean it.
Get everything waxoyled.
If funds allow, there's a few nice to haves too:
Strip all the panels and have them repaired and painted.
Rebuild the suspension with new dampers
Replace all the cracked rubbers.
Fit a central locking kit.
I'm itching to get going with things again, but first I need to make the garage more habitable. I'll post more pics when I start making progress again.
Tom W
Active Member
Re: Daily driver
How do I test the fuel pump? As it's the mechanical type, presumably I can remove the fuel line from the carbs and run the line to a container. Then crank the engine and see if fuel is pumped into the container. I'll have a look in my manual and see if there's a guide to rebuilding the pump. Is it worth upgrading to an electric fuel pump if the standard one's broken?
How do I test the fuel pump? As it's the mechanical type, presumably I can remove the fuel line from the carbs and run the line to a container. Then crank the engine and see if fuel is pumped into the container. I'll have a look in my manual and see if there's a guide to rebuilding the pump. Is it worth upgrading to an electric fuel pump if the standard one's broken?
vaultsman
Well-Known Member
Re: Daily driver
Hi Tom,
Richard's probably on the money with the fuel pump. And you're spot on with your test procedure. While somebody (wife?) cranks the engine, check what delivery you get...should be a good, strong spurt into the container.
I'm a big fan of the AC pump and whilst I understand the urge to go electric, I think a rebuild kit will solve most problems.
I picked up a NOS pump for Rebekah from ebay for a tenner which I'll fit...but rubber perishes so I'll be prepared to refurb it if needed.
Good Luck....and (PS) I've loved this thread of yours.
Cheers,
Hi Tom,
Richard's probably on the money with the fuel pump. And you're spot on with your test procedure. While somebody (wife?
) cranks the engine, check what delivery you get...should be a good, strong spurt into the container.I'm a big fan of the AC pump and whilst I understand the urge to go electric, I think a rebuild kit will solve most problems.
I picked up a NOS pump for Rebekah from ebay for a tenner which I'll fit...but rubber perishes so I'll be prepared to refurb it if needed.
Good Luck....and (PS) I've loved this thread of yours.
Cheers,
Tom W
Active Member
I've spent the Christmas holidays pondering and planning, and I've decided to treat the Rover to a freshen up rebuild in the new year. The long term plan is still to have the car as a daily driver, and the work will still be focussed towards that, as well as generally improving the overall condition. The 4000 miles I've done so far have convinced me the car isn't a pup and is well worth improving. For once, I also seem to have bought a (comparatively) rust free classic, so I'd like to keep it that way, and I don't think daily use in all weathers is conducive to that in the condition it's in.
The rough list of work (in no particular order) is as follows.
Find out why the car's currently refusing to start.
Service the engine.
Rebuild the carbs.
Replace all the side plates and water pump and flush out the cooling system properly.
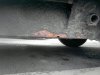
Replace the rotten and bodged exhaust with a proper stainless version.
Identify what is clonking on the rear suspension and fix.
Replace all 4 dampers with adjustables (pocket money permitting).
Replace the front brake discs and pads.
Remove all the external body panels and have them professionally painted in 2k.
Take the car, minus panels to the bodyshop to have a couple of small bubbles on the base unit painted and the whole thing undersealed.
Replace all the damaged/cracked window rubbers.
Remove the interior and give the carpet a proper clean.
Recolour the leather seats, and parcel shelf, plus any other parts that have faded and don't match.
Finish the stereo installation and find a way of sinking the modern head unit into the dash and engineer a system so I can use the original Rover blanking plate as a flip up cover.
Fit some rear seatbelts.
Fit a central locking kit.
The pace of the project is likely to be governed by available funds as much as time. I need to make sure I'm doing all the jobs in the best order, so I don't stall waiting to save up for parts.
Firstly, I'm going to start by removing the cover sills, and maybe the front and rear wings. These seem to be the bits that cover the most horrific areas of P6 rust. Hopefully there won't be anything scary hiding behind, and the whole project will prove to be viable. If I find serious corrosion, I'm going to have to have a rethink, as I can't weld yet. There was no corrosion mentioned at the MOT, but they're only able to test what they can see. Still, everything I've seen underneath points to the car being solid and rust free, so fingers crossed.
Next, I think I'll test the fuel pump, as discussed earlier, then remove the carbs and make a start on rebuilding them. That seems like a job I can do in the warmth inside and a carb rebuild kit isn't too costly.
Tom
The rough list of work (in no particular order) is as follows.
Find out why the car's currently refusing to start.
Service the engine.
Rebuild the carbs.
Replace all the side plates and water pump and flush out the cooling system properly.
Replace the rotten and bodged exhaust with a proper stainless version.
Identify what is clonking on the rear suspension and fix.
Replace all 4 dampers with adjustables (pocket money permitting).
Replace the front brake discs and pads.
Remove all the external body panels and have them professionally painted in 2k.
Take the car, minus panels to the bodyshop to have a couple of small bubbles on the base unit painted and the whole thing undersealed.
Replace all the damaged/cracked window rubbers.
Remove the interior and give the carpet a proper clean.
Recolour the leather seats, and parcel shelf, plus any other parts that have faded and don't match.
Finish the stereo installation and find a way of sinking the modern head unit into the dash and engineer a system so I can use the original Rover blanking plate as a flip up cover.
Fit some rear seatbelts.
Fit a central locking kit.
The pace of the project is likely to be governed by available funds as much as time. I need to make sure I'm doing all the jobs in the best order, so I don't stall waiting to save up for parts.
Firstly, I'm going to start by removing the cover sills, and maybe the front and rear wings. These seem to be the bits that cover the most horrific areas of P6 rust. Hopefully there won't be anything scary hiding behind, and the whole project will prove to be viable. If I find serious corrosion, I'm going to have to have a rethink, as I can't weld yet. There was no corrosion mentioned at the MOT, but they're only able to test what they can see. Still, everything I've seen underneath points to the car being solid and rust free, so fingers crossed.
Next, I think I'll test the fuel pump, as discussed earlier, then remove the carbs and make a start on rebuilding them. That seems like a job I can do in the warmth inside
and a carb rebuild kit isn't too costly.Tom
Tom W
Active Member
Some progress at last. After weeks of inactivity, and arm chair restoration, I've finally made a start!
I've fitted new the battery tray and reconnected the battery. I suspected the reason for it not starting was a fueling problem. Operating the plungers to raise the jets a couple of times seemed to free things off in the carbs. I removed the dampers from the dashpots too. A few pumps manually on the fuel pump showed some fuel flow through the glass bowl.
Anyway, after a few attempts, and a few coughs and splutters, she burst back into life!! After running up to temperature, everything seems to work normally
As the weather's good, and I can work on the drive, I've also started trying to remove the cover sills. So far, I've got all the screws out of the top edge, but am struggling with about half of them at the bottom. I think I need to get some molegrips or similar on them. Peering down at the sill structure from the top of the cover doesn't reveal anything horrific yet, so fingers crossed....
Tom
I've fitted new the battery tray and reconnected the battery. I suspected the reason for it not starting was a fueling problem. Operating the plungers to raise the jets a couple of times seemed to free things off in the carbs. I removed the dampers from the dashpots too. A few pumps manually on the fuel pump showed some fuel flow through the glass bowl.
Anyway, after a few attempts, and a few coughs and splutters, she burst back into life!!
After running up to temperature, everything seems to work normally As the weather's good, and I can work on the drive, I've also started trying to remove the cover sills. So far, I've got all the screws out of the top edge, but am struggling with about half of them at the bottom. I think I need to get some molegrips or similar on them. Peering down at the sill structure from the top of the cover doesn't reveal anything horrific yet, so fingers crossed....
Tom
Tom W
Active Member
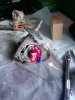
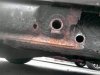
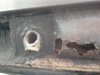
I managed to remove the cover sills this afternoon, and things look remarkably good behind there!!!
Unfortunately, it was too much to ask for it to be completely rust free, but I'm still happy. Having seen the photos the others have put on here of the corrosion the they've found when removing the cover sills, I think I've done very well.
I only managed to photograph the driver's side so far, as the light had gone by the time I'd finished on the passenger side and my mobile phone camera doesn't work well in low light.
Someone's obviously looked after this in the past, lots of thick underseal. I think that's all original metal under there.
Looks a little crusty beneath the jacking point
Scraping the flaky underseal with a screwdriver reveals solid metal underneath with just surface rust :shock:
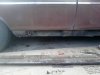
Not been quite so lucky here There's a hole in the bottom of the D-post and the flange in front of the jacking point has dissolved. The seam at the bottom of the D-post is starting to bulge too, but still seems solid.
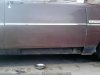
Things are slightly worse on the passenger's side. There's more corrosion on the curved section of the D-post, although the the flange round the jacking point is intact. It's also started to go slightly on the sill panel where the flange at the bottom of the D-post is spot welded on. There's a small hole on the crease of the 90deg bend in this area. The bottom surface has also started to rot around the last hole where the cover sill screws on.
The cover sills seem to be solid. There's flaky paint with rust under on the back of the driver's side, but the metal behind seems solid. There is some corrosion round the fixing points underneath, but this isn't terrible. The passenger side is better, and will just need stripping and painting.
So, now it's decision time. Do I learn to weld and fix this myself, or do I pay the bodyshop to do it? I'm worried that because I don't know how to weld, I won't be able to do a job that I'll be satisfied with. Because the car's so solid, I don't just want to stick crude patches on with blobby welds. But there's also cost to consider.... :roll:
The underseal that's on there seems to have done a very good job of protecting the body, but it's starting to flake in places and the metal is corroding underneath. This will need to come off, but I might leave this to the bodyshop as they will be able to do a more thorough job. Or, do I massively increase the scope (and cost :roll: ) of the project and strip the car back to the base unit so I can get it dipped? I think I'll take some more panels off and see what else I find before I decide. That will have to wait until next weekend, though. I'll get some photos of the passenger side at the same time too.
Tom
Unfortunately, it was too much to ask for it to be completely rust free, but I'm still happy. Having seen the photos the others have put on here of the corrosion the they've found when removing the cover sills, I think I've done very well.
I only managed to photograph the driver's side so far, as the light had gone by the time I'd finished on the passenger side and my mobile phone camera doesn't work well in low light.
Someone's obviously looked after this in the past, lots of thick underseal. I think that's all original metal under there.
Looks a little crusty beneath the jacking point
Scraping the flaky underseal with a screwdriver reveals solid metal underneath with just surface rust :shock:
Not been quite so lucky here
There's a hole in the bottom of the D-post and the flange in front of the jacking point has dissolved. The seam at the bottom of the D-post is starting to bulge too, but still seems solid.Things are slightly worse on the passenger's side. There's more corrosion on the curved section of the D-post, although the the flange round the jacking point is intact. It's also started to go slightly on the sill panel where the flange at the bottom of the D-post is spot welded on. There's a small hole on the crease of the 90deg bend in this area. The bottom surface has also started to rot around the last hole where the cover sill screws on.
The cover sills seem to be solid. There's flaky paint with rust under on the back of the driver's side, but the metal behind seems solid. There is some corrosion round the fixing points underneath, but this isn't terrible. The passenger side is better, and will just need stripping and painting.
So, now it's decision time. Do I learn to weld and fix this myself, or do I pay the bodyshop to do it? I'm worried that because I don't know how to weld, I won't be able to do a job that I'll be satisfied with. Because the car's so solid, I don't just want to stick crude patches on with blobby welds. But there's also cost to consider.... :roll:
The underseal that's on there seems to have done a very good job of protecting the body, but it's starting to flake in places and the metal is corroding underneath. This will need to come off, but I might leave this to the bodyshop as they will be able to do a more thorough job. Or, do I massively increase the scope (and cost :roll: ) of the project and strip the car back to the base unit so I can get it dipped? I think I'll take some more panels off and see what else I find before I decide. That will have to wait until next weekend, though. I'll get some photos of the passenger side at the same time too.
Tom
Attachments
Outstanding condition for a P6, especially so for a 2200!
Why not leave decisions on how to repair until you've got the wings off. If there is nothing worse than that at either front or back, I'd let the bodyshop do it. There simply isn't enough to make it worth learning welding (this time!). If there's more under the wings, then have a go yourself.
A very promising start.
Chris
rockdemon said:I wish PAE had looked like that
Rich.
Ditto - insert the name 'Sparky' where 'PAE' is though 8)
Tom W said:So, now it's decision time. Do I learn to weld and fix this myself, or do I pay the bodyshop to do it?
Personally, I would strip the underseal from the areas surrounding any rust, right back to clean bare metal, then you will be able to see what is happening a lot better.
If the seams have swollen, there is rust in there and it would be best to remove it.
Then make the decision whether to get a professional to do the work, but be very specific about what you want done as you may just get a few panels welded over the rust, which won't last very long.
Looks great though, I hope the base unit is as good up under the wings.
Richard
Tom W
Active Member
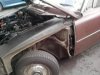
Not made as much progress as I would have liked recently, but I have managed to remove the front wings. Luckily there doesn't seem to be anything horrific underneath, just some minor surface corrosion where the underseal needs touching in. I've been reading with interest the work others have been doing stripping back the base unit and applying epoxy mastic. I'm assuming it's best to remove the existing underseal. It looks to be in generally good condition, but it's a bit flaky in places so could trap water if left on. What are peoples' preferred methods for underseal removal? I only have a single garage, so working down the sides of the car is difficult in there, and my drive is part of a communal parking area so I can't do anything that makes too much dust (or noise for that matter).
Here's some photos of the front wing area.
The wings themselves don't look too bad rust wise. Just a bit of corrosion in the arc lips, but no need to look for replacements. I plan to remove the front bumper and valance next, before moving onto the rear wings.
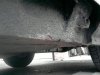
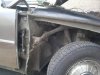
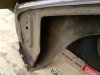
Here's the pic of the rust on the bottom of the passenger side D-post.
Here's some photos of the front wing area.
The wings themselves don't look too bad rust wise. Just a bit of corrosion in the arc lips, but no need to look for replacements. I plan to remove the front bumper and valance next, before moving onto the rear wings.
Here's the pic of the rust on the bottom of the passenger side D-post.
Attachments
![P220111_15.06_[01].jpg](/data/attachments/1/1673-489930cb106262911e444cd8344adfe4.jpg)
webmaster
New Member
That is certainly in pretty good condition, one of better ones I've seen that hasn't been restored.
I would say it is worth getting those sections repaired really well, don't let anybody "plate it up", get it all cut out properly and repair sections welded in. Clean up any other surface rust and apply a good anti rust paint / underseal.
I would say it is worth getting those sections repaired really well, don't let anybody "plate it up", get it all cut out properly and repair sections welded in. Clean up any other surface rust and apply a good anti rust paint / underseal.
Tom W
Active Member
So far I'm really pleased with the condition underneath, especially considering how little I paid for it As the ultimate plan is to use the car regularly, whatever the weather, any repairs are done need to be to a good standard. As you say, no patch job. I'm now daydreaming about taking it all to bits and get the shell dipped and coated. That would give it the ultimate corrosion protection, but is probably cost prohibitive, not to mention time and the space everything would take up. Also, it's likely to loose much of the patina it's developed over the years. Ideally, I'd like to achieve a sympathetic renovation. One that doesn't loose all the character of the car, but makes sure it's in good functional condition and is well protected from the elements.
As the ultimate plan is to use the car regularly, whatever the weather, any repairs are done need to be to a good standard. As you say, no patch job. I'm now daydreaming about taking it all to bits and get the shell dipped and coated. That would give it the ultimate corrosion protection, but is probably cost prohibitive, not to mention time and the space everything would take up. Also, it's likely to loose much of the patina it's developed over the years. Ideally, I'd like to achieve a sympathetic renovation. One that doesn't loose all the character of the car, but makes sure it's in good functional condition and is well protected from the elements.webmaster
New Member
A full on restoration is a very dangerous thing to start, Richard has been very persistant with Sparky, and he's getting close to completion now, but I see so many where they get stripped, and a few repairs done, then they sit there indefinately. I've got one myself !!
The great thing about your car is that there isn't much wrong, so it doesn't warrant a full strip down. If I were you I would just do the repairs as you go, try and get as many of the base unit problems sorted now, then just do the odd bit as it comes up. That way you get to use the car, you don't lose any of it's character / patina (you may even add to it !), and there's less chance of it running away with you.
The great thing about your car is that there isn't much wrong, so it doesn't warrant a full strip down. If I were you I would just do the repairs as you go, try and get as many of the base unit problems sorted now, then just do the odd bit as it comes up. That way you get to use the car, you don't lose any of it's character / patina (you may even add to it !), and there's less chance of it running away with you.
testrider
Active Member
Hi Tom, that's pretty much what my base unit looked like when I took the wings off too. There's not really any substitute for elbow grease to remove the old underseal I'm afraid. While it's nice a cold outside you can chip it off quite quickly with a chisel or scraper and then use white spirits on a rag to clean off any little bits left behind. You'll make a big pile of bits on the floor but i've been using an old vacuum cleaner to to clear up as I go along - every 15minutes or so.
I don't think it's possible to use power tools to clean off the underseal as the friction just melts it which makes it stick to the metal better.
Once you've got the underseal off and assuming there's not serious rot, you have a choice, either a blow over with some anti rust paint followed by new underseal or clean it all back to bare metal and paint it with Epoxy Mastic 121 as I have done. For a daily driven car I'd be tempted by a fresh coat of underseal rather than the epoxy paint as it will be a much quicker job.
I'd also advise you to just work on the bits you've exposed and finish them first, then move to another area, rather than stripping all the panels off in one go.