

You are using an out of date browser. It may not display this or other websites correctly.
You should upgrade or use an alternative browser.
You should upgrade or use an alternative browser.
My mean green hornet
- Thread starter corazon
- Start date
testrider
Active Member
I've thought about how a series 1 grill could work on a series 2 car a few times. I wouldn't want to lose the bonnet badge and I think that having the grill halves joined together might look a bit strange if the headlamp holes don't quite match up. You could make a finned insert to sit in front of the gap using aluminium strips -perhaps shaped to mimick the leading edge of the bonnet - and they could be held together by sliding and gluing them into slots cut in a vertical piece.
corazon
Well-Known Member
Thanks guys,
Like you Paul I've spent a fair amount of time wondering how/if it would work with the look I'm after, coming to the conclusion I just needed to have it in the flesh to make any real decisions.
It's definitely going the right direction. I like the idea of having a V piece with corresponding fins which could slot in to finish the lines.
If however I were to join it permanently, of course it would be tacked together on the car to make sure all the angles were correct.
I would use a piece from another grill cut to shape either straight or 2 smaller pieces going into a point to follow the bonnet as you said.
The more I look at it I do like the V shape nose it gives the car, it just needs to look deliberate and finished.
I'll try both a polished solid V piece and a black painted one next.
I could even try out a body coloured piece for a big change, like this era pontiac catalina..

Jim
Like you Paul I've spent a fair amount of time wondering how/if it would work with the look I'm after, coming to the conclusion I just needed to have it in the flesh to make any real decisions.
It's definitely going the right direction. I like the idea of having a V piece with corresponding fins which could slot in to finish the lines.
If however I were to join it permanently, of course it would be tacked together on the car to make sure all the angles were correct.
I would use a piece from another grill cut to shape either straight or 2 smaller pieces going into a point to follow the bonnet as you said.
The more I look at it I do like the V shape nose it gives the car, it just needs to look deliberate and finished.
I'll try both a polished solid V piece and a black painted one next.
I could even try out a body coloured piece for a big change, like this era pontiac catalina..
Jim
corazon
Well-Known Member
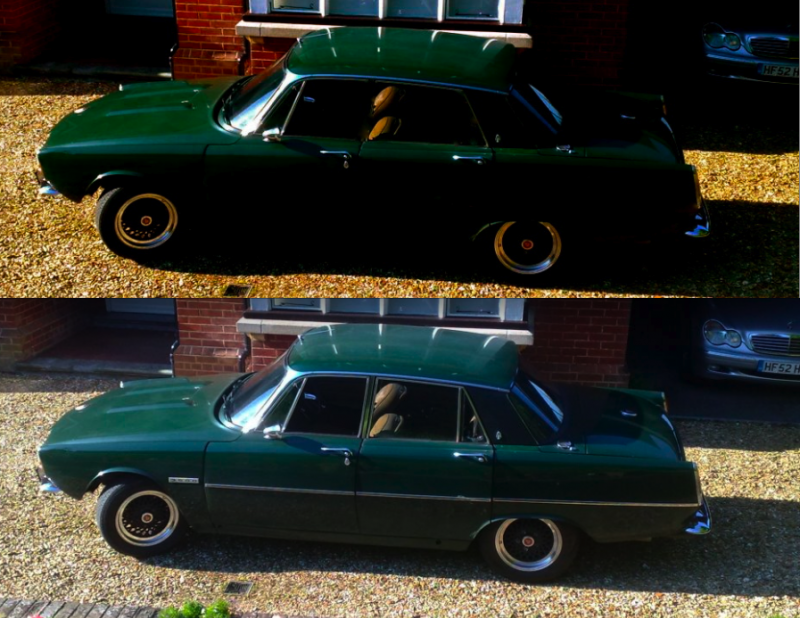
Here's a photoshop comparison of what I'd like to achieve ultimately with my car.
Frameless glass on the doors, pillarless, and only retaining the front quarter light window.
It really suits the car, accentuates the lines of the roof and looks more long and sleek.
I'm imagining it would be more comfortable from a driver and passenger point of view, being able to rest your arm further back when the windows are down.
It all comes down to the practicalities of how the glass will fit in the doors/temporary pillar when windows are up etc etc, and then of course making everything seal properly..Although currently my window frame to body seal is not very good as standard :wink:
Jim
Frameless glass on the doors, pillarless, and only retaining the front quarter light window.
It really suits the car, accentuates the lines of the roof and looks more long and sleek.
I'm imagining it would be more comfortable from a driver and passenger point of view, being able to rest your arm further back when the windows are down.
It all comes down to the practicalities of how the glass will fit in the doors/temporary pillar when windows are up etc etc, and then of course making everything seal properly..Although currently my window frame to body seal is not very good as standard :wink:

Jim
corazon
Well-Known Member
After much measuring and thought I've decided on -2.5" lower front springs initially.
The rear is a little saggy currently so I want to see what the effect is just lowering the front.
This should result in the arch being level or just lower than the top of the tyre tread.
I'll have to wait till pay day in a couple of weeks though, however depending on price I might take a leap and get them to also fabricate an uprated anti roll bar..
Most of my time recently has been spent upgrading my workshop with new (old) tools and building a super heavy duty bench which now supports a vintage Walker Turner drill press I've acquired. It was built to also straddle a large shamal 165 psi compressor
I'm still working on the front grill and have begun polishing my alternator.
Here's the voltage regulator at the end of hand finishing, prior to buffing

More to follow
Jim
corazon
Well-Known Member
Hey you and me both Paul
Simon (sowen) couldn't remember the specific poundage of the first set he ordered only that they were 25% uprated, and that the ride quality was still very nice.
Apparently Coilsprings know the P6 very well and his results seem to show this. You can just order the physical drop you want and they'll compensate the rate for you, but I'd want to make sure they aren't too stiff..so I'll probably go with -2.5" and 25% uprated as it's a known quantity if you like
Jim
corazon
Well-Known Member
And here's a development of the tougher looking front end.
I've blacked the top and bottom fins, uprights and lamp surrounds and polished the remainder (on one side :wink: )
Bonnet badge also removed.
Depending on the new lowered look, I may also space the front wheels out a touch with those hubcentric billet bolt on spacers.
I guess when lowering the front, not only does the vertical drop change but also the car sits forward over the wheels more due to the horizontal nature of the springs?..So there may be either no need for spacing or not much possibilty once lowered..I'll have to wait and see

Jim
corazon
Well-Known Member
After months of procrastination about my bootlid, I made some progress filling and smoothing.
I decided I was sick of looking at the terrible peeling paint which was revealed after removing the numberplate plinth and badging ages ago!
I filled all the holes with glass fibre, then smoothed a layer of filler. Rubbed back and etch primed and reached this stage yesterday

I was waiting on sorting a cable or actuated boot release so the lid is entirely smooth with no lock button, but this should be easy enough to fill, smooth and touch in at some stage. After all the car isn't going to stay in cameron green for that long :wink:
In a few days it should be green, blended in and polished
I really like the early R O V E R letters that the p5 shared, so if anyone has a nice set of them I might be interested for the final look.
Jim
A
Anonymous
Guest
Hey Jim, just to give you an idea, here's a photo of a little nose thing I made for the centre of the series 1 grille I had on mine:

It's not great but it fills the gap well enough, and I ended up painting those black bits in like you did either side of the 'nose'. It looked much better after that.
I gave the grille (and nose) away, but have since regretted it and bought another
Will

It's not great but it fills the gap well enough, and I ended up painting those black bits in like you did either side of the 'nose'. It looked much better after that.
I gave the grille (and nose) away, but have since regretted it and bought another
Will
corazon
Well-Known Member
Thanks for that Will, I really do want to get it TIG'd together at some stage into one seamless piece but for now am just going to paint and polish it and leave the middle I think.
I've just bought a pair of those Toyosports stainless headers from ebay, £169 delivered. So whilst I'm working on my cylinder heads on the bench I can take my time matching exhaust ports and making sure the fit is perfect before they get near the car :wink:
I'm holding off on the front springs until I can get the correct details for the uprated anti roll bar. Coilsprings can then fabricate them and post them out together as I'm not in a major hurry.
Oh and I've got a new 6" polishing setup on a bench grinder to start using now- I always did my polishing with a drill in a vice, should get even better results now The first test will be the alternator which is nearly at buffing stage
Jim
I've just bought a pair of those Toyosports stainless headers from ebay, £169 delivered. So whilst I'm working on my cylinder heads on the bench I can take my time matching exhaust ports and making sure the fit is perfect before they get near the car :wink:
I'm holding off on the front springs until I can get the correct details for the uprated anti roll bar. Coilsprings can then fabricate them and post them out together as I'm not in a major hurry.
Oh and I've got a new 6" polishing setup on a bench grinder to start using now- I always did my polishing with a drill in a vice, should get even better results now
The first test will be the alternator which is nearly at buffing stageJim
corazon
Well-Known Member
These arrived this morning. Shiny shiny, shiny piece of header :roll:
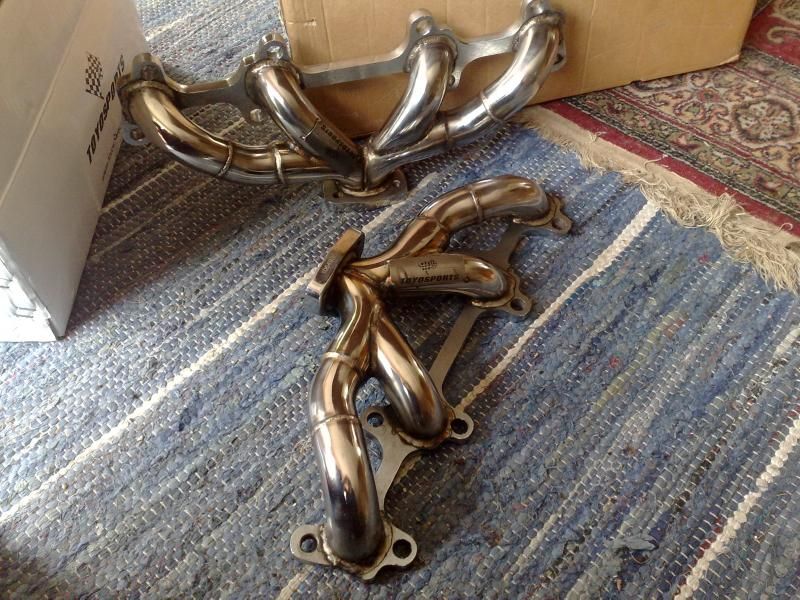
They need a bit of work to the insides where the welds haven't been ground very consistently, the clean up was rather hasty it appears..But overall the quality seems fairly good for the low price. I'll sort this out when I port match to the heads
Both bolting bars are poker straight at first inspection ( this was one of Desmo Duke's issues with his) and the finish is nice- I may make it a little nicer after removing the tacked on badge :wink:
Jim
Hi Jim,
Those extractors (as called here in Australia :wink: ) look nice don't they. If I could offer some advice,..it is actually not a good idea at all to port match the exhaust headers with the cylinder head exhaust ports. My understanding is that is the very best way to lose power, especially through the mid range. To see an improvement that might otherwise not be evident is to ensure that there is a mismatch at the top of the ports while the base of the ports align as evenly as possible. A few mm is all that is necessary, so if for example the cylinder head exhaust ports are 30mm in height, then the header ports should be at least 32mm in height.
Ron.
corazon
Well-Known Member
Bootlid painted, just. Ran out of paint but I managed two coats and it's only a temporary measure.
Not buffed up yet, need to get some more G3!


Been busy polishing my alternator now my new bench buffing set up is up and running, nearly finished on that.
The polished stainless headers I bought recently had a fairly good finish but decided to make them extra special, and have also removed the Toyosports badge plate.
Here I've buffed the extreme left pipe, still not to final finish. Note the clarity of reflection in comparison to next pipe which is untouched by me

Jim
Hi Jim,
You aren't going to have the tubular manifolds ceramic coated both inside and out? Thin walled stainless steel manifolds radiate an enormous amount of heat, far far more than the cast iron manifolds, so if you install them as they are, you'll probably melt plastic and rubber everywhere. Richard (quattro) had this very problem before he had them coated. Don't wrap them though as any warranty that they have is immediately null and void. Reason for that is that it expediates their demise.
Ron.
corazon
Well-Known Member
Thanks for your concern Ron.
I have been looking into cermachrome, it does look an amazing finish and has good feedback regarding heat reduction.
I think to begin with I'm going to see what I can do to aid cooling, such as the cowl induction bonnet idea I've previously mentioned which would draw out heat at idle/low revs and perhaps make some heat shields to complement.
The magnecor kv85 leads I run "have a service heat resistance of 600 degrees F (320 degrees C) and up to 1,000 degrees F (540 degrees C) for short burst 3 minutes" so these should be fine as the closest items..
Currently cost is the prohibitive factor in getting the cermachrome, but then I'm not fitting them until I've completed all the other top end work..
Jim
roverp5Bcoupe
Active Member
Hello Jim,
Your manifolds look very good!. I believe your manifold will go from a "silver" color to a goldish color once being used. I fitted stainless pipes to a motorbike and after a few runs, these got a more or less gold/ yellow color.
I also have an MG with an RV8 engine fitted with thin walled steel manifolds. These didn't cause any problems but i had these ceramic coated to prevent rust. After 5 year these still look good and no sign of rust.
Regards
Peter
ewokracing
Active Member
Nice extractors/headers/shiny things.
I got a set of extractors done for my Mazda, the ceramic coating is peeling off already with very minimal use. To say I'm annoyed is an understatement. I'm all for ceramic coating, but it looks like not all coatings and companies are the same in terms of quality. booo.
off to read about where you got the extractors from!