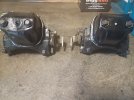
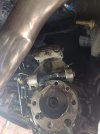
Scarab the Rover..

A tight place to work in. Fond memories from doing the ignition/steering lock on the other side.
The soldering looks a little like how I do stuff. Could be good -could be shite.
I would look at tiding up those raw joins. In the past Ive used a liquid insulation in tight places to great effect. Comes in a small tube, semi fluid and hardens off upon contact with air, making a nice insulated join and giving peace of mind.
All fuses have been upgraded to blade type - a good move.
 
Re the handbrake it sounds as though you haven't adjusted the calipers up properly when you fitted the pads. All I would do is put the handbrake on, and then look at the quadrants on the calipers and see how far they have travelled. If both are nearly full travel the calipers need adjusting, if one is going full travel and the other one isn't, the chances are that the one going full travel isn't adjusting up.
Beware who you get to look at it, because most talk a good job, but haven't got a clue.
I wouldn't disagree with you. 1st time I've seen or worked on anything P6 related. Not happy I've been beaten. I'm lost with this. If I took the whole lot off the car and dismantled it all to see how these calipers work, I'd have a better understanding. But I'm not doing that.
Fancy one last swansong on my P6 before you ride off into the sunset?
 
Dont give up! Put "rover p6 rear caliper operation" into google and watch some/all of the youtubes that come up. Note that these calipers are used on Mk IV zephyr and other cars as well. Get them fixed once, you will be good for lots of miles.
 
I've had a bit of time away from the car to have a think. I remember about 6 months ago that I'd stumbled across a pair of rear calipers for these wonderful cars. They were heavily corroded and probably seized. So into a bucket of white vinegar they went. Fast forward 2 weeks.

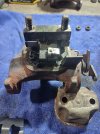
If I remember rightly the offside rear caliper clicked as it should but the nearside didn't. I think that's where the issue maybe. So it is time to look at how these calipers work. I've started with the nearside as I think this is the way to learn.

20240323_102028.jpg
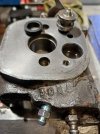
I've started to dismantle it and it isn't as bad as I suspected. I left the piston until last as I couldn't budge it with an airline. So I blanked off 1 port and fitted a grease nipple to the other. The hydraulic pressure of grease move the piston out slowly. I have now got to this position.
20240324_120833.jpg
Both bores look OK. So I think new seals will be sufficient. I'm waiting for the postman.

Plan is to fit this refurbished caliper to the nearside Nd then following Harvey's advice, adjust the handbrake BEFORE bleeding the brakes again.

I'll need some free time again......
 
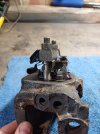
Completed
20240406_151638.jpg
Getting the spring in is a little tricky. I've worked the handbrake lever and the piston moves out slowly. Wind it back in and repeat. Once I'd worked out that the inner cup of the piston rotates anticlockwise as the rachet wheel turns, the rest is rather straightforward.
However I think it's over engineered for a simple caliper.

I just need to find time to swap it over onto the car now.
 
However I think it's over engineered for a simple caliper.
Bear in mind that there wasn’t that many examples of rear calipers at the time. Especially those that needed to use with an handbrake. It happens often with new technologies. I remember working on front hydraulic brakes for a Duesenburg Type A. The wheel cylinder was incorporated into the front swivel! As a friend commented: “No one had made hydraulic brakes before, so this is what they went for”.
 
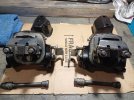
Little progress lately as I've been doing some work to my A35 Van for the warmer months ahead. The P6 is always simmering in the background. I have managed to rebuild both of the spare rear calipers I have though.
20240429_102946.jpg
20240502_110506.jpg
So both are good to go, but I'm curious to see why the nearside caliper isn't adjusting correctly.
I am going to investigate as soon as I have some spare time very soon.
 
20240504_112937.jpg
So this morning I've removed the driveshaft, disc and pads from the rear nearside to look at what's going on. Before this, I'd pulled the handbrake up it's full travel and the offside was halfway to its stop. The nearside (above) was at its stop on the rachet. So I think from Harvey's comments, this side is the fault.
When I disconnect the handbrake on this caliper and move the rachet by hand, the piston spins but doesn't move outward. So something isn't right inside. I'll remove the caliper and investigate. Whilst I'm at it, I'm going to modify the bleed screw location to make bleeding the brakes easier.
 
The piston which pushes the pad should be held steady by the tab, which should sit on top of it (the pad) to stop the barrel spinning. The ratchet is very fine toothed as is the thread it drives on the inside of the piston. Best way to get the piston out to where it should be is to turn the lever with tab around by hand till its somewhere near where it should be. it will take a spanner if its tight but be careful not to twist the sheetmetal as its only stamped onto the top of the piston. It helps to make up a spacer to measure the required setting. It doesn't need to be fully adjusted up as the car will do the final tightening quite quickly when you start driving. If you've machined the discs and are using new pads it may also be quite noisy for the first few miles but will settle down as the pads bed in
 
The piston which pushes the pad should be held steady by the tab, which should sit on top of it (the pad) to stop the barrel spinning. The ratchet is very fine toothed as is the thread it drives on the inside of the piston. Best way to get the piston out to where it should be is to turn the lever with tab around by hand till its somewhere near where it should be. it will take a spanner if its tight but be careful not to twist the sheetmetal as its only stamped onto the top of the piston. It helps to make up a spacer to measure the required setting. It doesn't need to be fully adjusted up as the car will do the final tightening quite quickly when you start driving. If you've machined the discs and are using new pads it may also be quite noisy for the first few miles but will settle down as the pads bed in
If I hold the piston and move the handbrake lever, it doesn't move outward. That's where the issue is.
 
The actual movement outward from one turn of the lever is very small, barely detectable at the pad, the ratchet is very fine toothed and takes lots of lever turns just to turn once round and it drives a fine threaded screw so one full turn of the ratchet wheel only moves the piston about 1/16" or less; however if the movement at the piston is definitely nothing and you cant push or pull the piston in or out by hand (hard to do but it means that there is probably no internal freeplay to be taken up. The piston has two parts and they are a loose fit till the adjuster loads both pieces against the pad back) and you can't hear the ratchet clicking then I would pull the thing back off, remove the cover and operate the mechanism on the bench. When sorted you can then use the pads and the disk to set the correct position for the piston on the bench ( back it off one turn to give enough slop to get the disk in and onto its shaft).

Note that the ratchet wheel is operated by friction but there needs to be a very fine layer of grease for it to work properly and not wear. Too much grease and it won't turn the ratchet or will gum up the mechanism. Too little and it'll stop working from wear (which can create wavy ridges on the disc - ruining it). I've been using ceramic brake grease, but the amount you need is tiny and regular lithium grease of High Temp Bearing grease is fine. Don't us Moly as it requires very high pressures and temperatures to work, it'll just wear the parts.
 
The picture is of the caliper on the car already. I have rebuilt a spare pair I have that work correctly. I can just swap a spare one over for the non working one on the car. I think this is where the confusion here is.
 
Back
Top