Took the plunge - got some pics now

Cheers Harvey.

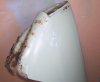
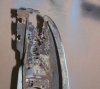
I do appear to have early mounts and late brackets, but then I am merely comparing the engine mounts I had on the car, and the new ones I have bought. From the picture the old ones appear thinner, or perhaps larger in diameter


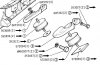
It could just be that the ones on there are from a Range Rover, Land Rover http://cgi.ebay.co.uk/LAND-ROVER-V8-4-C ... otohosting or Tonka dump truck.

I will have a careful inspection tonight to see if it causes any problems. If not, heat shields for the huge exhaust mainfolds, and bolt it all up.

Then onto the next highly confusing problem :shock:
 

Attachments

  • engine mounts.jpg
    engine mounts.jpg
    80.5 KB · Views: 1,219
Finally - the builders fitted door on Monday but didn't do it correctly so I have finally managed to get them back today, and its all finished now :shock:

So I have now got Sparky up on some chocks so that I can slide underneath and have a good look at those mounts.

Bad news :( :cry: :cry:

The new (larger but seemingly correct) mounts aren't close to the exhaust manifold, they are touching the exhaust manifold. :?

This is why he fitted smaller mounts, and now that I have managed to get a really good look at the problem, I can see that he has actually cut the metal away from the body, where the mount sits, to clear the manifolds too.

So now I either have to cut 1/2" off the side of the mount, or get some smaller ones, or get some other manifolds, or take up drinking!

I will be talking to the people who made the manifolds on Monday to see if there is anything I can do.
 
Ah! Of course, you have fabricated manifolds don't you? I used manifolds made specially for the P6 by RPi, very expensive but well designed tube size wise and very tight to the block. These are 4 into 1. Alan at Classeparts does 4 into 2 into 1's, but they are so tight they have to be assembled in situ, which doesn't appeal to me. Note that both my cars have the early small mounts.

Chris
 
chrisyork said:
I used manifolds made specially for the P6 by RPi, very expensive but well designed tube size wise and very tight to the block. These are 4 into 1.

Funnily enough, so do I. Or at least that's what I was told when I bought the car.

The engine and all of its components, including the mainifolds, were supplied by RPI.

I will have a scan through the invoices supplied with the car later, then its on the phone to RPI.

What is the gap between the O/S manifold and the engine mount on yours Chris? If you can see it that is.
 
Engine's back out again now, and 200 miles away! But I have driven the '68 car with this arrangement of manifolds and mounts without evidence of fouling and there were no "special measures" around the mounts. This car was the prototype for RPi's set up, and assembled by them - I wonder if they managed to copy it absolutely 100% for yours?

Chris
 
chrisyork said:
Engine's back out again now, and 200 miles away! But I have driven the '68 car with this arrangement of manifolds and mounts without evidence of fouling and there were no "special measures" around the mounts. This car was the prototype for RPi's set up, and assembled by them - I wonder if they managed to copy it absolutely 100% for yours?

Chris

Thanks anyway. :)

I have taken a few photos and sent them to RPI, hopefully he will have an idea.

This one shows the manifold on the engine with the new engine mounting in place. You can see that the mounting plate on the car has been modified (butchered) and that the correct rubber mount overhangs it now, touching the exhaust.

I have managed to get some smaller mounts (58mm instead of 76mm) and can rig up a strengthening plate under the mount and screw a heat shield onto it.

It's bound to work 8)

Either that, or dump the manis :shock:
 

Attachments

  • OS header from below.JPG
    OS header from below.JPG
    72.1 KB · Views: 1,095
quattro said:
I have taken a few photos and sent them to RPI, hopefully he will have an idea.

Not much help at all :( never mind.

I have fitted the heat shield with the correct size mounts and got the engine sitting level at last.

I have managed from my list: -

1/. Removing and dewiring the fog lamps :)
2/. Replacing both engine mounts. :)
4/. Fitting the Over Riders. :)
5/. Painting the silver bits on the grill. :)
6/. Fitting the uprated anti roll bar. (Thank you Classeparts) :)
7/. Changing the NS full beam bulb :) Nothing wrong with the bulb, some bad wiring causing the light to flicker on and off - mostly off - sorted.
9/. Fitting my new ET's (done that one) :)
10/. Change the thermostat to the 82C one. :)
11/. Clean out cooling system and change anti freeze. :)
17/. Repaint front valance and refit. :)

Still to do

3/. Putting the new 15" Vitesse alloys on. :( Not yet, trying to find some studs and nuts from an Sd1 - front ones are on to see what they look like.
8/. Work out why and fix the wiper parking problem. :( will get to that one
12/. Fit passenger side Winguard door mirror. :( will get to that too
13/. Clean out breather pipes and re route. :( got to get some new pipework
14/. Check the tacho wiring. :( Seems to be working now - may have a looksey anyway
15/. Find out where the boot is leaking, and fix it. :( will do when I have turned car around
16/. Check for any rust, and sort it. :( Done some on valance - very little on base unit.
 

Attachments

  • 6 getting there.JPG
    6 getting there.JPG
    170 KB · Views: 1,052
quattro said:
3/. Putting the new 15" Vitesse alloys on. :( Not yet, trying to find some studs and nuts from an Sd1 - front ones are on to see what they look like.
I think I've got enough to do one wheel the rest were on one of my cars that got crushed
 
That front end's looking smart now quattro. Painting the silver edging on the grill and headlight surrounds is a worthwhile investment of time too although in my case it was my other halves time not mine!

It'd be good to see it in the metal if you're going to be at any of the shows this year?
 
One thought on your problem with the manifolds. One tight spot where they might be fouling is against the "flange" which sticks out horizontally from the chassis rails. I'd expect to have to do a bit of strategic grinding there. It's there in the first place so that lazy old Pressed Steel Fisher had something to get their spot welders round. An eacceptable alternative would be to chop it off completely and seem weld instead.

Chris
 
chrisyork said:
One thought on your problem with the manifolds. One tight spot where they might be fouling is against the "flange" which sticks out horizontally from the chassis rails. I'd expect to have to do a bit of strategic grinding there. It's there in the first place so that lazy old Pressed Steel Fisher had something to get their spot welders round. An eacceptable alternative would be to chop it off completely and seem weld instead.

Chris
Hi Chris.

Tha manifold misses the flange ok.

It touched the engine mount - the actual rubber mount was touching the manifold and obviously getting a little warm.

I have fitted a smaller mount now, jacked the back of the engine up about an inch to gain a small amount of clearance, and fitted a heat shield between the two.

The base unit has been modified by the previous owner to gain a little clearance as you can see by the fact that the correct 76mm rubber engine mount now hangs over the side of the plate on the base unit.


I spoke to the supplier who refused to believe anything could be wrong with the manifolds as there was plenty of clearance, and he had sold dozens of them. He then passed me over to another person who told me that I had to modify the engine mounts to get clearance :roll: This person then sent me an email but I could not make head nor tail of it, and he hasn't answered my email to ask for clarification.

So, I will see if the heat shields work, and if not I will save up and get a local company to make up a set of manifolds for me and fit them to the car. After unmodding the engine mounting plate that is.

All good fun LOL :shock:
 

Attachments

  • OS header from below.JPG
    OS header from below.JPG
    32.4 KB · Views: 936
Tried to finish off for the time being today - want to go for a drive!

The front wings were showing signs of tin worm so I thought I would try out my new toy (£17.50 sandblaster from ebay :) )

The NS wing was the worst


After 10 minutes of setting up, 15 minutes of blasting and 2 hours of cleaning up :shock:


OS wasn't as bad, but bad enough.

I do have 4 new wings for the car, came with it when I bought it, but I don't want to use these until I can afford to have it resprayed.

So a fibreglass repair kit and a bit of filler was nicked from work (its ok, I am allowed to take what I like :) ) and after most of the weekend, I am now here -


Just the bolts to put in and the side lights and off down the road for a test drive :D :D

I can't wait to try out the new anti roll bar.

I'll be glad when I've had enough of this :?
 

Attachments

  • 7 NS tin worm.JPG
    7 NS tin worm.JPG
    92.4 KB · Views: 886
  • 7 NS Blasted.JPG
    7 NS Blasted.JPG
    126.8 KB · Views: 883
  • 7 all painted.JPG
    7 all painted.JPG
    146.7 KB · Views: 885
Any chance of the link to the sandblaster you bought? Was it a business or just someones old toy?
 
chrisw said:
Any chance of the link to the sandblaster you bought? Was it a business or just someones old toy?

It's a new one. This is the one I bought and from this chap too - so he obviously had a few of them.

http://cgi.ebay.co.uk/PORTABLE-SANDBLAS ... 240%3A1318

Works very well too. I have only used it for about 15 minutes, so cannot give you any idea of longevity, but it certainly does what it says it does, and for £17.50 (ok plus carriage) I thought it would be worth the risk.
 
You can get sand blasting attachments for jet washers too, I got mine for £20, can't remember how much the grit was. Got it from of all places B&Q! Possibly not as good as air ones as you get water too. But for blasting old paint of an engine block and cleaning crud off my auto box, was stunning. :)
 
If that was the result of blasting from the outside , imagine what would have been left if you'd blasted the inside of the panel

I assume you have to wear breathing equipment when blasting ?
 
DaveHerns said:
If that was the result of blasting from the outside , imagine what would have been left if you'd blasted the inside of the panel

I assume you have to wear breathing equipment when blasting ?

I did the inside as well.

I used gloves (that hurts when it comes back at you :shock: ), a tea towel over my head, saftey goggles, dust mask and a towel round my face. It didn't actually cause that much dust but that grit does smart a bit when it catches you unawares.

Trouble is, by the time I have my glasses on, then the goggles, then the tea towel, then the dust mask and the towel tucked into back of my neck, my glasses have steamed up and I can't see a thing :?
 

Attachments

  • 7 inside.JPG
    7 inside.JPG
    72.1 KB · Views: 1,191
quattro said:
I used gloves (that hurts when it comes back at you :shock: ), a tea towel over my head, saftey goggles, dust mask and a towel round my face.

I wish you had a picture, sounds a very funny sight. :LOL:
 
richarduk said:
I wish you had a picture, sounds a very funny sight. :LOL:

I would have taken a picture but I couldn't see the camera!

I did look a little silly I must admit, but stuff hurts when it catches you on the chin. Very effective though :)
 
Took Sparky out yesterday for a run - I had to see some people and thought I would see how Sparky would do long distances.

170 miles, didn't miss a beat - did produce some strange odours though. :?

So this list gets longer. This one is done :D

3/. Putting the new 15" Vitesse alloys on. Looking great, just need a couple more centre caps. I have to go to Lincoln next week so might pop in to Rimmers.

These are nearly done

13/. Clean out breather pipes and re route. New silicone hoses on the way, flame traps cleaned out, bulky 25mm pipes and hose clamps in the spare parts bin.
16/. Check for any rust, and sort it. Found a small hole (10mm) under the rear wings on the top of the D post. Cleaned back to solid metal and filled it for now - must get a welder.
14/. Check the tacho wiring. Loose on coil, soldered a new spade on and shrunk a sleeve on it. Still wanders now and again ?

Still to do :(

8/. Work out why and fix the wiper parking problem. will get to that one
12/. Fit passenger side Winguard door mirror. will get to that too
15/. Find out where the boot is leaking, and fix it. will do when I have turned car around

And more stuff

18/. Remove and inspect fuel regulator to find out why it stinks of petrol :shock:
19/. Replace sump gasket - some of the bolts were less than hand tight and its only slightly more oil tight than the Tory Canyon.

I have sorted the leaking top hose where the kenlowe fan pipe goes in (used some silicone in desperation - I know :roll: )

Checked the steering thoroughly for the loose bit. Found it to be the small bolts under the steering wheel centre cap.

Off to the garage :)
 
Back
Top