Yet another Rover.......

Work has kept me away, but I have returned (again).

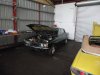
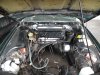
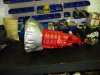
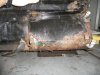
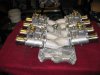
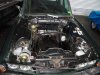
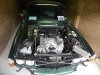
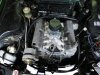
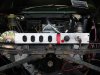
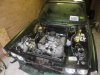
Pooh has been sitting in the workshop for the past few weeks gathering dust, but I have at last managed to get something done. Parts are on thier way (supposedly, I will believe it when they arrive), and Pooh has yet again had his heart torn out and dumped on the workshop floor. The old engine (fitted 12 months ago and with 1000km on it since overhaul) had no oil pressure, but it turns out the pressure relief valve was stuck open, and the pump has just lost its prime but is otherwise OK (thankyou unstable load, I should have noticed that one myself :oops: ). So like an idiot I got carried away and ordered ANOTHER engine, this one a full bore 4.0L with forged hi-comp pistons, billet rods, light crank and flywheel, cross bolted mains, big valve, stage 3 heads, Wilpower mainfold and a Holley 670CFM Avenger :twisted: . We are expecting this one to pump out around 380 smooth, tractable horsepower and lots or tourques. The gearbox is now a full race (yet still road legal) Muncie 4 speed, still with a H pattern shift but rated to 450 HP. Lots of other goodies to go on as well, such as oil coolers, oil catch tank, electric fan etc but they are on hold until the big expensive bits arrive. We have gone for the Holley as setting up the Webers can be a real pain ( I intend to fit 4 webers in the future anyway). Anyone in the Sydney area want a overhauled 3.9 set up for the P6B? Let me know.......( I have to pay for all this somehow and I only have so many organs that I can sell off :LOL: )

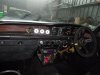
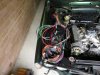
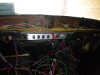
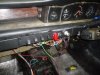
I pulled the heater out as it looked a bit daggy, and the guts had fallen out (medically you would probably call it a herniated heater core :? ) and as luck (?) would have it I had a rebuilt one standing by, easy you would think, but as ever, not even close :roll: . ALL of the sound insulation was contaminated with oil, dirt and a suspicious stcky substance, with a small rust hole under the wiper motor (which had fallen off ALL its rubber mounts, no wonder that it sounded like an out of balance tumble drier !). I will be fitting a fire and heat proof firewall material (when it arrives) and putting the new heater into place as I dont like being too cold.

I fully intended to take some photos this morning but having the attention span of a duck at the moment (flu + medication = distracted) I forgot the camera :evil: . I start a new course at work this coming week that will take around 12 months but I will have time to keep working on the car and will update each weekend (the only time I will have to work on it). As my mechanic gets stuff done I will also see about ducking (there's that word again) and get some photos for your entertainment.

Cheers

GUY :D
 
I'm just going to leave this here...

GrandSportWeberIntake_1000-700x522.jpg


(yes it's for a Chevrolet but you know you want to... or rather, I know I want you to!)
 
I am back and I have actually made progress this time! :shock:

I have spent a very enjoyable afternoon working on the old car and it now has a working heater. The rest of the parts have arrived and the next big job is to get the engine and gearbox mated then fitted into the car to work out where the new gearbox mounts have to go. The new box is approx 9mm longer than the old one, bellhousing to flange, this means that the shifter is 9mm too far forward. I can probably live with this but we are also looking to move the engine back and down slightly (about 9mm as it turns out) to free up a little bit more space for electric fans, oil coolers etc. I just need to work out if I can still get at the aft spark plugs if we do this! :roll:

I have made a start on the new fuel system, and it is all braided steel which looks AWESOME (as inside I am really 10 years old!) but since it is now feeding a Holley 4 barrel it only needs a one way, full stop system with no return line. This requires a full system as the standard lines are not quite big enough (or safe noting the 37 years since the factory fitted them!) so a full kit is going in with -8AN braid and half inch aluminium hard line. The quad weber route had two major probelms: 1. they are a right little sod to set up properly, and 2. they cost over $7500! But a man can dream .....(and save up without telling his wife :twisted: )

Work has been keeping me very busy lately, with at least one exam a week, with lots more until mid-year. I will update the car as we get stuff done but with only one day a week (exams allowing) it will be slow progress. At least Pooh has a friend to talk to now…

Cheers

Guy :D
 

Attachments

  • Pooh with friend small.jpg
    Pooh with friend small.jpg
    692.6 KB · Views: 1,099
  • Pooh heater back in small.jpg
    Pooh heater back in small.jpg
    827.8 KB · Views: 1,100
  • Pooh New gearbox small.jpg
    Pooh New gearbox small.jpg
    737.8 KB · Views: 1,100
  • Pooh mangy old heater box small.jpg
    Pooh mangy old heater box small.jpg
    886.2 KB · Views: 1,099
  • jed-xover1.jpg
    jed-xover1.jpg
    170.2 KB · Views: 1,099
I think it was a 351 (358?) as described to me. All fat heavy lumps of Yank pig iron look the same to me :wink: Whatever it was it was huge, heavy and required a dirty great hole to be cut in the bonnet for the air cleaner to hang out of. Now that it is getting the Rover engine the front cross member has to be replaced and the front springs will need to be softened up as they are stiffer to hold up the old engine. Should be an interesting car when finished, as the owner is after a 'Go' car rather than a 'Show' car it will not actually get painted but just made to go fast :twisted:

More work on Pooh this weekend as the new fuel system has to go in, with lots of lovely shiney bits.

Cheers

GUY :D
 
1. they are a right little sod to set up properly, and 2. they cost over $7500!

1. Agreed; but these only need setting up once, and you will get a fairly close approximation of the base setup you require from Webers own setup manual + the (out of print) John Passini Theory/Tuning books

http://www.amazon.com/Weber-Carbure...FQ/ref=sr_1_10?ie=UTF8&qid=1307754454&sr=8-10

Time on a dynanometer spent changing ( readilly accessible! ) air jets, main jets +air correction jets will dial-in the best performance; but you will get very close to your ideal setup by comparing the carbs./manifold/displacement +charts/graphs to choose venturi, emulsion tubes + jets that the math would suggest is close to where you wanna be...

2.Re: Pricing/Picture of the sidedraft Webers setup, these are the latest "Made-in-Spain" Webers, you can tell by the casting flash, which is easilly cleaned up +these are quite favorably priced ex-USA ( Pierce Manifolds or Redline/Webers Direct )

http://cgi.ebay.com/ebaymotors/WEBE...ptZMotorsQ5fCarQ5fTruckQ5fPartsQ5fAccessories

The JED ( John Eales, UK ) swan-neck inlet manifold is £385 pds here;

http://www.rover-v8.com/jeales/web.nsf/pages/used

S-o-o-o: AUS$1200 for 4 x 45DCOE carbs + another $600 for the manifold would leave you over $5 Grand ahead for additional setup if that's "over $7K" in Oz :shock:

The John Eales site also lists the weber Crossover manifold at £560.00; prices likely include VAT which won't apply when shipping to you

My pricing for a Rover /Weber setup was: 48IDFs U$399 x 4: US$1,600 ( Ebay ) plus Harcourt inlet manifold US$1,100 ( ex-manufacturer ) plus aircleaners, UN fuel connectors, braided fuel line, throttle linkages, fuel filter, fuel pressure regulator + gauge + fuel pump ( + US$900, various suppliers )

US$3,600, about AUS$3,400 at todays rate

Chevrolet manifold is an "Inglese" setup, they're now owned by CompCams, very pretty, *very* expensive ( ! )


Happy to copy the Weber setup manual if you need it, gives all the Weber part numbers + jet sizes + suggested setups

"Spanish Webers" quality passes muster, but there is one essential set-up needed the Italian carbs won't require

http://www.youtube.com/watch?v=9wmAhIn8Q1A

Good luck! Great project!

GW
 
I have at last managed to get away from work and get some work done on Pooh.

My last exam was on Monday 22 Aug (I passed by the way :eek: ) so have had a few days playing. I was held up for a while there as I managed (through being an idiot :wink: ) to slip 3 discs in my back and had to spend 2 months taking it easy!

I am hoping to finish off the fuel system in the next few days and I promise to have photos. i have got the new electric fan wired up, and the fuel pump relay sorted. the biggest issue I have had is that some ham fisted fool has hacked (really it looks like it was done with a saw! )most of the wiring out of the fuse box and moved it somewhere else. i am finding random bits of wire that lead nowhere all over the car, but have devised a cunning plan to make it all work. The engine and gearbox will be sorted in the next few days, again i promise photos when they are done!

I have had a problem with the power steering for a while now with puddles of fluid whwn the car is not used. i have traced this to the hoses for the power steering so they will alll be replaced in the next few days as well. I looked at getting rid of the power steering altogether, but with a smaller steering wheel and fatter tyres it would have been a nightmare at low speeds and in car parks. As a aside I love taking "sporty" sounding cars/bikes into undercover car parks. I was asked to leave a car park recently because the Arrow open race pipes on my new Triumph Street Triple set off all the car alarms when I got a little.... Ahem..... enthusiastic, with the throttle! I know they are not strictly legal but they sound awesome (again i really am 10 years old inside :twisted: )

Progress is slow overall but we are getting there and I hope to have the car ready to tear up the track by December. I really promise that I will get some photos as Pooh now has MORE friends to share to workshop with!!!!!

Cheers

GUY :D
 
As promised some photos.

Fuel system done, just needs the engine in so that I can fit the front bits.

Wiring sorted (I hope) with all the power now running through a simple on/off ignition switch with a remote starter button. Actually quite easy to wire up once I had worked my way through the factory wiring diagram and the butchered remains of the loom. The fuel pumps now just need the relays wired in (I forgot to get any last time I was at the auto electricians :? ) but the system is ready for them.

Power steering sorted with new hoses, and new paint to make it look nice. The old high pressure hose was a most unappealing blue so a new on in black and white has gone in. The oil cooler is fitted in front of the radiator and just needs to be plumbed in and the welding finished. The engine is coming along and we hope to have it back in the car with the new gearbox by Friday.

Not much else to report apart from a lost of lost blood (wear gloves when doing braided steel hose, trust me on this one!) I will of course update as we go along, I have to go back to work on monday :cry:

Cheers

GUY :D
 

Attachments

  • Pooh and friends small.JPG
    Pooh and friends small.JPG
    103.6 KB · Views: 863
  • Pooh interior small.JPG
    Pooh interior small.JPG
    78.6 KB · Views: 864
  • Pooh fuel system small.JPG
    Pooh fuel system small.JPG
    83.9 KB · Views: 865
  • Pooh engine bay new hoses small.JPG
    Pooh engine bay new hoses small.JPG
    118.8 KB · Views: 865
Nice one Guy. Can you talk us through that shot of the fuel pump in the boot - it look pretty industrial! Which line comes from the tank?
 
No problems

The line that runs to the top of the surge tank is the fill line from the tank. It has a Facet pump as a lift pump and is filling at around 117l per hour. The second line down is the return to the tank, and the bottom line with the 40 micron filter is to the Holley red and the engine bay via half inch hard line. The biggest problem that I found with using the braided line (apart from the puncture wounds) is that the damn stuff won't bend through a tight turn. This means that it all has to sit out a bit. When the new fuel cell is made it will incorperate the lift pump and the whole setup will be a lot neater, but for the moment I hope that I wont have fuel starvation during tight corners and low fuel levels!

The braid also needs a certain amount of room to flex without being allowed to flail around. As I said this setup will do until the new fuel cell is made. After all it is a "Go Car", not a "Show Car" so I really only care if it works not how it looks, which is probably just as well :wink:

Cheers

GUY :D
 
Thanks Guy. So that's all there to make sure that the fuel line is constantly full on fuel no matter what gradient or g-force is on the car?

Are you going to put the fuel cell in the same place as the original tank?
 
After a long work and motorcycle injury related layoff, work has recommenced on Pooh.

He now has a engine and gearbox fitted, and only minor work needed to finish. Currently on the list is to finish the fuel system, fit the radiator/oil cooler and electric fan combo, finish the engine and rewire the car, oh and fit the new race seats, harnesses, instruments, fire system, as well as the suspension and brake upgrade, and new exhaust and the list gets longer the more I think about it! The moral of the story is not to think I suppose........ :?

Still lots to do (and spend :roll: ) but I am fortunate that I have an understanding (read revhead) wife so she actually encourages me to get the old cars and do them up. She says that she would rather have me under an old car than under some strange woman any day :LOL:

Pooh is home over christmas so that i can get some work done, and this involves the new wiring loom. This will hopefully prevent embarressing fires and possessed lights/radios, but knowing my skills with electrickery (all witchcraft really) I am just as likely to end up with the problems I am trying to remove :eek: At least my tame auto electrician has agreed to have a look BEFORE we hook up the car to power. This should keep me occupied over Christmas before work drags me away again and the car goes back to race shop for final work. The plan is to have the car back on the road mid next year, but only time will tell......

Cheers and Merry Christmas

GUY :D
 

Attachments

  • Pooh new 4.0l engine.JPG
    Pooh new 4.0l engine.JPG
    176.8 KB · Views: 755
  • Pooh new 4.0l engine1.JPG
    Pooh new 4.0l engine1.JPG
    187.3 KB · Views: 755
  • Pooh new wiring.JPG
    Pooh new wiring.JPG
    180.5 KB · Views: 755
Guy Engelsman said:
. She says that she would rather have me under an old car than under some strange woman any day :LOL:
Guy, do you have the address of this strange woman, she could be in demand :LOL:


John.
 
John, the strangest woman I know is more than any of us can handle! I will have a look in my little black book and see just how strange I can get for you..... :twisted: (just dont tell my wife :wink: )

It goes without saying that the oil cooler is NOT going to be mounted in its current position!!!! I still have to find a place that it can get decent airflow, and not get in the way of everything else. I am rapidly running out of room in the engine bay and we are giving serious thought to ditching the brake booster and living with higher brake pressures, I am pretty sure that I can handle the load. I still have to find space to put in the oil catch can from the breathers and a radiator catch can (from the radiator? :roll: ). The heater may be the next thing to get the big heave to make way for stuff (would save some weight anyway).

My new seats will be here in the new year. They are from Velo, an Australian company and are fully compliant with the rules to allow them to be used on the road. I dont want to have to swap seats all the time. My seat has to be custom made ($$$$$$$$$) as I am over 2 metres tall and they just dont make them that big. The passenger seat can be a standard size since I wont be sitting in it, so my lovely new Macroseude seats are to go in another car (or for sale if anyone in Aust is interested). I really wish I was more decisive, or perhaps not...................................whatever. it would save a lot of time and money!!!!!!!!!!!!!!!!!!!!!!!!!!!!!!!!!!!!!!!!!!!!!!!!!!!!!!

Some progress today, with the existing loom (mostly) removed. I have discovered that the new loom has no provision for a reversing light, or windscreen washer, or any earth leads (it was designed for simple hot rods (simple hot-rodders?)) and in the US these things must not be needed. Simple enough to add in anyway but a slight embuggerance as I was told the kit was complete :?

There is now a plan in place and I am definite (maybe) about what I want the car to be, for now, perhaps, but supercharging is cool.................... :LOL:

Much swearing and skinning of knuckles has taken place, and the work continues.......I just can't wait to drive it!

Cheers

GUY :D
 

Attachments

  • Velo GP90-XXL.jpg
    Velo GP90-XXL.jpg
    114.1 KB · Views: 708
I noticed a few times on American Hotrod, they put the servo in the cabin under the dash, this maybe an option ?
 
having had 3 different motorcycle accidents, I hope your recovery was quick and as pain free as possible.


ps I love that blue car too.
 
After the usual Christmas binge on overeating and over indulgence of the alcoholic kind I have actually managed to get more work done on Pooh. I have made up a new switch panel, and a mount for the fuse box, and have commenced wiring the lights etc in permenantly. It has been a bit of trial and error as the new loom is intended for either GM or Ford equipment and has required some lateral thinking to make it work with the Rover setup, but we are getting there. I hope to have the front end finished off in the next few days, and can then see about getting the back and middle bits done.

Few photos to prove that I am actually working :wink:
Cheers

GUY :D

PS I am aware that the switches are not actually straight but the panel is going to be covered in black vinyl so they will all be coming out again anyway :oops:
 

Attachments

  • IMGP0602.JPG
    IMGP0602.JPG
    173.7 KB · Views: 611
  • IMGP0606.JPG
    IMGP0606.JPG
    155.2 KB · Views: 611
  • IMGP0607.JPG
    IMGP0607.JPG
    188.7 KB · Views: 611
More progress over the last few weeks.

New switch panel (forgot the wiper controls :oops: ) covered in vinyl and fitted, all wires except the horn connected (I seem to have 2 power sources for the horn? ). Last little job is securing the last of the wiring under the dash and re-fitting the centre console, and the carpet and so on.......

I am yet to fire it up (poor choice of words perhaps :? ) as I am yet to get an electrician to look at it. Once it has been sanity checked and looked over with a critical (qualified? ) eye then it should be good to go.

Can't wait to get it flashed up and running, it is off for final engineering work in Feb and when I get back from O/S in Apr it should be all done.

Some photos to show where I am at, along with the shiney new bits on the engine ( I like shiney bits :wink: )

Cheers

GUY :D
 

Attachments

  • Pooh new dash bits.JPG
    Pooh new dash bits.JPG
    166.4 KB · Views: 542
  • Pooh new dash bits1.JPG
    Pooh new dash bits1.JPG
    165.5 KB · Views: 542
  • Pooh new wiring and bits.JPG
    Pooh new wiring and bits.JPG
    168.7 KB · Views: 542
Back
Top