Yet another Rover.......

Hi Guy,

I can see pegs for want of a better word sitting on either side of the engine bay panels. I am assuming that they will pass into the bonnet which will then be secured with disks and pins :?

The vinyl on the switch panel matched nicely.. :)

Ron.
 
Ron

Correct on all counts! The silver pins are to secure the bonnet at the huge :wink: speeds that the car will be capable of, and will be the main method of keeping it closed. The normal catch is also still in use, as it stops unsavoury characters just opening my bonnet and stealing my shiney bits.....

I found the vinyl in Spotlight and it cost about $7 for half a metre long by 1.5 metres wide! Nice and soft and thin and easy to stretch into shape as required.

Cheers

GUY :D
 
I wish I no longer had to work to keep food on the table! It takes valuable time away from messing with old cars :wink:

I have connected the battery (VERY carefully) and the car failed to burst into flames! The hazard lights worked, and one park light and that was it. Even the ignition was not working.....

After some head scratching (and constructive cursing) I have rectified most of the faults. I now have working lights (not inner high beam for some reason, I think the relay may be faulty), and the dash lights up when the headlights are turned on. Yet to turn the engine over as it is still not complete, but every thing else is mostly working.

New fuel system is in with an aluminium hardline from the engine bay to the back, braided steel line in the fiddly bits, and the new fuel cell on order. I am not putting a custom cell in the original fuel tank position as it is a bit beyond the budget right now (quoted $1800). But next weekend hope to have the fuel bits finished and order the custom race seat, then it can go off to have the new exhaust made and the gearshift extension made, and the propshaft, and other bits................................

The end is in sight however, and Pooh lumbers towards completion despite the best efforts of work to keep us apart.

Cheers

GUY :D
 
Right.

More progress on Pooh, with lots of time spent reading the Rocket Industries catalog. Spent a wonderful hour at Rocket out at Eastern Creek (Huge race track for those who are not Australian), and came home with MORE shiney bits. Photos included this time.

New fuel cell sort of half fitted, just the rear and front mounts to finish off and one fuel line to make. The half inch hardline is in under the car and the fuel system is complete from carb to fuel pump. Just the bit from the fuel tank to the pump to go. Work has been keeping me busy and is about to send me away for three months, but on the up side I will have time to save some more money for the new Exhaust :wink: The fuel cell is 75l of aluminium awesomeness, it is some of the best welding of alloy that I have ever seen, and it fits the space with barely an inch to spare. It has to be mounted flat as it has a 2" sump at the back and a foam filling to stop the fuel sloshing everywhere. This means that is has to be raised about 13cm off the floor at the front to sit level at the back. I am really pleased with it but it has a fuel sender that operates between 0 and 90 Ohms. What does the Rover gauge use, probaly some strange numbers that no-one else uses, but can I get this one to work or do I need to fit a new fuel gauge? If so then I will possibly look at fitting a whole new dash console anyway, I will just have to see how much money I have left after the new seats arrive!

For those with an electrical turn of mind, I have one speed on the wipers and that is when the switch is at the off position. How do I get two speeds, and no delay as I dont really need (or want) the delay function? I have perused the wiring diagram and I cannot figure out if the Light green and brown wire needs to be powered to get slow, or is it the purple wire? Short of chopping and changing I really need a bit of guidance on this, anyone :?

More as I get the opportunity

Cheers

GUY :D
 

Attachments

  • Pooh engine nearly done.JPG
    Pooh engine nearly done.JPG
    52.2 KB · Views: 639
  • Pooh Engine 1.JPG
    Pooh Engine 1.JPG
    51.7 KB · Views: 639
  • Pooh new fuel cell.JPG
    Pooh new fuel cell.JPG
    44.6 KB · Views: 639
  • Pooh new fuel line and gearbox mount.JPG
    Pooh new fuel line and gearbox mount.JPG
    43.6 KB · Views: 639
Right

After having to move garage at short notice and then work being kind enough to send me away for nearly 5 months I am at last at home (and in the same country as the car).

During my travels I managed to spend some time in New Zealand, and specifically in Auckland where I had the pleasure to meet a chap called Mal Clark at By'gone auto services. I turned up his doorstep unannounced and he happily dropped everything in order to spend half the day talking about Rovers! I managed to get a few photos of his orange car and I am going to have him make me a bunch of parts for Pooh. I have managed to get a few new bits but it is hard to work in a garage that is only just big enough for the car that also contains my tools, workbenches, spare furniture and motorbike :roll:

Hope to get some more actual work done soon but not holding my breath until I can get a new bigger garage. The photos I hasten to add are NOT of Pooh, but in a similar direction to where I am heading. These mods are all race proven and tested on numerous rallies over the years so should work :wink:


Cheers

GUY :D
 

Attachments

  • Anti roll bar small.jpg
    Anti roll bar small.jpg
    34.2 KB · Views: 844
  • AP racing front brakes small.jpg
    AP racing front brakes small.jpg
    37.6 KB · Views: 842
  • Coilover rear small.jpg
    Coilover rear small.jpg
    32 KB · Views: 844
  • Revised front suspension small.jpg
    Revised front suspension small.jpg
    36.3 KB · Views: 843
  • Outboard rear brakes 1 small.jpg
    Outboard rear brakes 1 small.jpg
    31.7 KB · Views: 843
Wow.
Awesome resource Guy...having Mal Clark to point you in the right direction.
As you say; literally years of experience there.
Your car will be a weapon. :)
 
Those pics are interesting. Would love to have s proper explanation of all the modifications.
 
Funny that, I have been mulling over the idea of coil-overs and wondering if it was feasible and
then it pops up.
A mate of mine in Cape Town mentioned fitting an anti roll bar to his car, much along those lines.

Again, the ideas go whizzing around my noggin......
 
Right, a quick explanation of the mods.

One. The coil has been replaced with a coilover that now runs through the bulkhead and is tied into the rollcage. The standard shock is left in place as a droop stop to prevent the coilover unseating as the wheel is lifted off the ground. Not sure of brand of coilover but I am planning on using AVO coilovers designed for horizontal use. The extra bar that can be seen is to tie in the outside of the swingarm pivot against the bulkhead into the top of the strut. This prevents the arm flexing under heavy cornering and is a quick and effective mod, I will be doing this one soon!

Two. Rear coil replaced with a coilover. Pretty self evident as to why but Mal tells me he runs the rear fairly soft. Requires a new bottom mount but depending on the brand you can get a top link that matches the Rover mount.

Three. Huge brakes, AP racing 4 pots off a Trans Tasman race car of some sort. Apparntly NOT powerful enough and options are being looked at how to get longer life and less fade. I am looking to go for Wilwood 6 pots (much cheaper, big pad volume and area, big piston area, dust seals so that they can pass roadworthiness requirements) but still only 305mm rotors to fit into the 15 inch wheels, just looking to be about 32mm thick and vented/grooved.

Four. Anti roll bar, off a VE(?) Commodore and fitted using custom fabricated mounts. Works a treat as anyone who has seen this car in action will know! A bit fiddly but well worth the effort. Mal has done away with the standard anti roll bar altogether.

Five. Outboard rear brakes. A fiddly conversion but allows bigger and more powerful brakes to be fitted and cooled. Also not powerful enough. I am looking to Wilwood again but will be retaining the inboard setup, just on a Jag diff. Mal has a Jag Limited Slip Diff in this car and there is just not enough room to get the size of brakes required into the space.

Overall it was an amazing chance to be able to spend time with this car and if I had enough cash on me I probably would have bought it as well! Hopefully I will be getting some bits made up and sent over, as my new (custom) race seat is being made in NZ as well.

Cheers

GUY :D
 
Managed to dig out some more photos of the Jag diff setup in the orange car.

By tying the bottom mounts to the front cross member the diff is anchored in the fore/aft direction, and by using the factory mounts (alloy bushes) the dif is prevented in rocking due to torque. A tidy setup but you can see why the car is now on outboard discs at the back.


The engine was in bits due to a blown head gasket on the day but it is still one tidy engine bay. Power steering uses a pump of a Toyota MR2, but runs out of puff if rapid changes of direction are needed, and can get a bit hot. A neat installation of the coolers for engine oil and steering fluid as well.


Cheers

GUY :D
 

Attachments

  • Jag diff small.jpg
    Jag diff small.jpg
    37.7 KB · Views: 731
  • Jag diff small1.jpg
    Jag diff small1.jpg
    35.3 KB · Views: 731
  • Jag diff small2.jpg
    Jag diff small2.jpg
    38.7 KB · Views: 731
  • Engine bay small.jpg
    Engine bay small.jpg
    44.1 KB · Views: 731
Hi Guy.
Do you know why Mal opted for the 4.0 litre motor as opposed to 4.2 or 4.6.
Nearly 400 RWHP out of the 4 litres, but I wondered if there was a particular reason for choosing it.
Cheers
Brenten
 
I have been away for a bit with work but have now returned and hopefully something will happen with Pooh. He has been sitting in the garage while I have been away and has been slowly gathering dust, but now things will kick off again.

New bits! :D My new race seat has arrived from New Zealand from a mob called Racetech. They provide seats for V8 Supercars and various other high end race series so I was pretty sure they could knock up a custom seat to suit my 6 foot 7 (slightly ample :oops: )frame. They called and said that the seat was out of the mould but they were not happy with it so they did it again! They have done a fantastic job and I highly recommend them to anyone wanting a seat.

It just fits in the car, and once the new mounts are welded into the floor pan it will be ready to go. As it is there is still some work to do with welding etc to finish it off. Soon I promise.

The more observant of you will notice that there is still no gear shift, it is in the process of being made and will allow me to dictate what gear I want rather than acepting what I get (neutral at the moment :LOL: ) it still needs a prop shaft too.......................................... :roll:

Still, I hope to be able to get more progress done over the rest of the year.

Cheers

GUY :D
 
Well the system will not let me keep posting photos, something about the "Board quota filled" or some other such rubbish.

For those new to my madness regarding my (long running) saga of buying a complete dog over the internet and replacing every damn part except the shell. I am now in the process of replacing all the replaced parts with new go faster parts so I will summarise where I am up to as it has been a while.

1. Buy complete dog for $1400 over internet from dodgy car yard on the strength of a few photoshopped pictures.
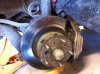
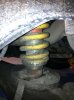
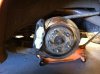
2. Replace entire front suspension and brakes after it becomes obvious the car is put together arse about and is dangerous to drive.
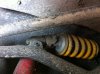
3. Replace entire rear suspension and brakes after realising (after a spirited drive) that the rear is also put together arse about.
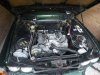
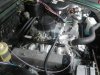
4. Replace 3.5l engine with a rebuilt 3.9l after it eats a valve and only runs on 7 cylinders.
5. Replace entire interior as it smells of elderly incontinent cats. Fit roll cage.
6. Replace wheels and tyres and conduct bare metal respray in green, (in my garage).
7. Move to Sydney from Darwin, destroy original gearbox in fit of unprovoked joy at getting car safely off the train.
8. Decide to rebuild car as Road Race car.
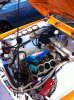
9. Replace previously fitted perfectly good 3.9l engine with 4.0l stage 3 race motor (380hp :D )
10. Replace rooted original gearbox with heavy duty race box.
11. Get carried away and gut car to replace whole wiring loom.
12. Remain carried away and fit race seat, gauges, fuel cell, and numerous bits that cut the weight down by over 120kg.
13. Plan to finish the car by Christmas.
14. Realise this is a stupid and unobtainable timetable and decide to finish the car when I can.

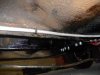
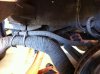
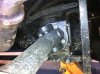
The latest work is that the new prop shaft is in and the new Gauges are mocked up, not allowed to post photos :roll: . Still a lot of fiddly bits to go but the main bits are done except for the exhaust. I will keep this as up to date as I can.

Cheers

GUY :D
 
Guy, you can still link to photobucket or flickr photos if you have one of those accounts?
I'm sure a lot of people would like to see your progress :D
Jim
 
Well the system will not let me keep posting photos, something about the "Board quota filled" or some other such rubbish.

Really sorry about this - as soon as i managed to get the server moved this will be sorted. Hopefully will have progress for you soon. If you want me to host pics for you, please send me a pm and i'll give you somewhere to send your photo's and when i get them i can add the images to your thread if that helps?

Thanks,

Rich
 
Back
Top