Pertronix Ignitor

vaultsman

Well-Known Member
Hi all,

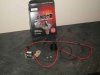
Ordered up my Pertronix Ignitor from Retro Rockets yesterday (less than 60 quid including shipping at today's $ rate :) ), so while I'm waiting for it to arrive....

There have been a few posts in the past on the ease/difficulty of fitting these, and sometimes tacho issues too. What's the latest view from people who have?

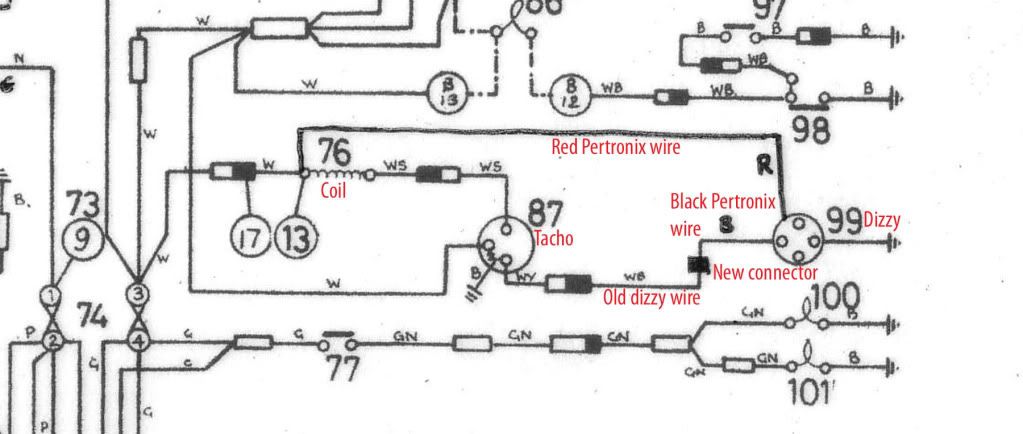
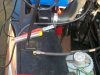
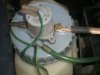
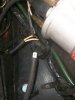
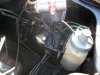
I'm keeping the existing coil and ballast resistor following advice from Carl at Retro Rockets and I know I've got to feed 12V to the Ignitor. Anybody taken this feed from the washer pump?

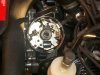
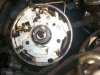
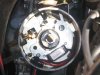
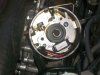
(Going on a V8 3500S with standard Lucas 35D8 dizzy)


Cheers,
 
Hi Stan,

On the 4 cyl, it's a piece of cake.

The only tacho issue I had is that if you follow the instructions to the letter, you could end up removing the tacho from the circuit.

My tacho is connected between the coil and the dizzy, so I had to connect the black wire from the pertronix to the old wire that was originally attached to the dizzy instead of to the coil -ve. The rest was as per instructions.

Of course we have learned that some tachos are on the negative side of the coil (like mine) and Fraser has his on the positive side of the coil. You'll need to know where yours is in your wiring diagram in order to make the right decision.

Hmm yours is an 'M' reg. I bet you've got the RVC voltage sensing rev counter rather than the RVI current sensing one like mine. My guess is you wont have any tacho problems.

I don't have a ballast resistor...

Cheers,
Bri.
 
Thanks Brian,

Mine looks conventional with the tacho fed from the -ve side of the coil and the return from the tacho to the dizzy. So I reckon black wire from coil -ve to Ignitor will be OK.

Just where to take the Ignitor 12V feed from. Did you pick up from the fusebox? Or somewhere closer to the distributor?

My tacho's marked RVI.

Cheers,
 
Hi,
I've fitted a Pertronix to my 2000SC and I picked up the 12v from the back of my rear screen heater. BUT, I think it may be interfering with my radio, not sure as the live feed to radio is damaged and have not had the time to check fully to see one way or another, thought I'd mention it as it bears thinking about (non supressed live etc). I still have the resisted coil but do not have a rev counter as standard. It does seem to make the car run better, just seems a bit more "spirited" all round. Good luck with your fitting.
 
The Pertronix ignitor will work fine via the ballasted supply. Just run the supply wire from the positive side of the coil. Very neat & simple. There's no need to make life complicated! Your tacho should function as per normal as well.

Roly.
 
Hi Stan,

Sounds like your tacho is the same as mine then, fed from the -ve coil, to the tacho, then to the dizzy. You need to disconnect this from the dizzy, then connect the black pertronix wire to it.
Then the current will flow from the coil to the tacho to the pertronix.

I took my 12v from the +ve side of the coil - but then I don't have a ballast resistor so I have full 12V from the coil.

Any idea how many amps the unit needs?

I laminated my wiring diagram, then I annotate it with CD/DVD pen to mark on all the changes, here is a scan - remember this is a 4 pot!
PertronixWiring.jpg


Bri.
 
Roly said:
The Pertronix ignitor will work fine via the ballasted supply. Just run the supply wire from the positive side of the coil. Very neat & simple. There's no need to make life complicated! Your tacho should function as per normal as well.

Roly.

Thanks Roly. I may try that and see what I get, but Pertronix seem to make great play of feeding a full 12V...

Ignitor instructions (See Q&A on Page 2)

Cheers,
 
Brian-Northampton said:
Any idea how many amps the unit needs?

Bri.

Can't find any reference on the net, but the instructions talk about using 20g wire which handles 11 amps max. So I'd be guessing no more than 5 or 6 amps (???)

I'm still thinking of picking up 12V from the washer pump, which is fed from a 25A fuse - which also protects the instrument gauges, reverse lamps, stop lamps and flashers circuits. Should be enough capacity on that - in an ideal world! :)

I'll have to check what the pump itself draws and how much current the cable can handle.

Cheers,
 
P6Rovers said:
We have some Pertronix experiences on our website under "Practical Tips":
http://www.roverclub.ca/electronic.html

If someone fits such a thing to a P6B, we'd like to have any pictures, experiences, circuit diagrams to match.
Your name will "go up in lights". :)

Eric

Hi Eric,

Some good stuff there. Particularly liked Ron Morey's writing style on the SD1...had me chuckling! :)

I'll post some pics, etc once I've got the Ignitor in my mitt and the bonnet (hood?) up.

Cheers,
 
Hello Stan,
Like you, I bought my Pertronix from Retro Rockets.Unfortunately, I sold my P6 last year so I no longer have the instructions that came with the system, but they definately said that it would quite happily function with less than 12v. They did state a minimum operating voltage, but I cannot remember what it was. I fitted it to an otherwise standard '72 3500S & the improvement was very noticeable. It helped completely eliminated pinking (10.5:1 cr, static timing 6 deg BTDC ) & misfiring & it pulled like a train! You won't regret it. The only problem I found & something to look out for, is that the magnetic trigger that fits over the cam lobes had the caused the rotor arm to be raised up enough that the cap was sitting on the rotor & not the distributor. Whilst checking the timing I noticed the cap had taken on a sort of rotating undulation! The few minutes of running like this created enough friction to render the cap u/s. When I checked the rotor arm with a couple of spare ones, I found that they all varied in depth. I ended up trimming a bit off of the bottom of one to ensure I had enough clearance.

Good luck!
Roly.
 
Hey..some good info there Roly...thanks mate! I'll check and double-check that when I come to fit it.

Cheers for now,
 
Roly said:
The only problem I found & something to look out for, is that the magnetic trigger that fits over the cam lobes had the caused the rotor arm to be raised up enough that the cap was sitting on the rotor & not the distributor. Whilst checking the timing I noticed the cap had taken on a sort of rotating undulation! The few minutes of running like this created enough friction to render the cap u/s. When I checked the rotor arm with a couple of spare ones, I found that they all varied in depth. I ended up trimming a bit off of the bottom of one to ensure I had enough clearance.


I had the same problem with mine but I managed to break the center contact on the distributor. The replacement cap was deeper so that solved that problem. Unfortunately the first Pertronix ignitor I bought was faulty and I haven't yet got round to trying the replacement. My car is also a '72 3500S but I've got a flamethrower coil which is recommended to run unballasted. I have routed a wire to bypass the ballasted wire but not connected it yet. Interesting to hear how well yours worked Roly. I have a 10.5:1 cr engine set to 6 deg BTDC too and get no pinking at all.

Dave
 
ghce said:
These guys seem to be a bit cheaper than retro rockets, any one dealt with them??
http://www.carshopinc.com/index.php/cPa ... _25/page/2

Graeme

Certainly another source Graeme. They don't list the LU-181 Ignitor which I needed - only the LU-183 (for the older 35D8 with triangular-style baseplate ) at $69.95 compared with the same item at $82.30 from Retro Rockets.

One issue might be shipping costs - Car Shop Inc. don't mention UK charges on their relevant page, but as Retro Rockets maintain a UK warehouse they only charge $12.50 for shipping an Ignitor.

Cheers,
 
vaultsman said:
ghce said:
These guys seem to be a bit cheaper than retro rockets, any one dealt with them??
http://www.carshopinc.com/index.php/cPa ... _25/page/2

Graeme

Certainly another source Graeme. They don't list the LU-181 Ignitor which I needed - only the LU-183 (for the older 35D8 with triangular-style baseplate )

One issue might be shipping costs - Car Shop Inc. don't mention UK charges on their relevant page, but as Retro Rockets maintain a UK warehouse they only charge $12.50 for shipping an Ignitor.

Cheers,

They list the the Ignitor II however 9LU-181 PERTRONIX Ignitor II Lucas 8 Cylinder $97.95, which is the upgrade to the LU-181, to my mind maybe offers a little more reliability than the earlier model and some extra goodies such as dwell extension and a few other improvements.

I emailed the company for the pricing to ship to New Zealand for the ignitor II and flamethrower II coil, Freight cost is US42.00 for priority shipping, though I suspect that shipping to the UK wouldnt be any more expensive :LOL:


Graeme
 
Ah...and probably not any less expensive! :LOL:

Did consider the Ignitor 2, but the perceived wisdom from Retro Rockets seems to point to the Ignitor for road use, the Ignitor 2 adaptive dwell really coming into its own in ensuring coil saturation as you near the redline. :shock:

Anyway...no more points and dodgy condensers to worry about soon for Occie!


Cheers,
 
Bright & sunny Saturday...if a little brass-monkey...perfect time to test one's circulation with the bonnet up!

This is what I got for my 60 quid...not sure what the bit of Perspex was meant to be for! :roll:


Starting point...


Dwell is preset with the Ignitor so, as well as the points and condenser, the dwell adjuster spring comes out and the screw's tightened as far as it will go. And yes, I managed to avoid dropping the locknut into the guts of the dizzy! :) Hardest bit though was getting the LT lead grommet/hard plastic *?;$=+%! free from the distributor body...Lucas certainly didn't mean that to fall out.


Module in...


The red lead from the Ignitor module needs a 12V supply, either from the +ve terminal of an unballasted coil or, in my case, courtesy of the Trico washer pump via a piggyback Lucar terminal soldered on to replace the ring terminal that the module came with.


to be continued...5 attachments maximum! :D
 

Attachments

  • 100_0446a.jpg
    100_0446a.jpg
    53.3 KB · Views: 1,077
  • 100_0449a.jpg
    100_0449a.jpg
    64.2 KB · Views: 1,077
  • 100_0455a.jpg
    100_0455a.jpg
    63.3 KB · Views: 1,077
  • 100_0456a.jpg
    100_0456a.jpg
    62.3 KB · Views: 1,077
  • 100_0457a.jpg
    100_0457a.jpg
    64.9 KB · Views: 1,077
The rubber sleeves are my additions..the Ignitor cables are actually quite slender - 20 AWG = (AFAIK) 0.5 sq.mm.)

Black Ignitor cable to be connected to the coil -ve according to the Pertronix instructions...but no. In my case ('73 Series 2) coil -ve connection is a White/Slate cable that runs up to the tacho and the return is a White/Black cable that originally ran to the distributor via a handily-sited Lucar connector. So...black Ignitor cable connects here. (The Pink/White cable in the centre of the pic is the infamous (and often elusive) ballast resistor)


Cables sorted.


Magnet sleeve fitted to the dizzy shaft...


Roly said:
The only problem I found & something to look out for, is that the magnetic trigger that fits over the cam lobes had the caused the rotor arm to be raised up enough that the cap was sitting on the rotor & not the distributor. Whilst checking the timing I noticed the cap had taken on a sort of rotating undulation! The few minutes of running like this created enough friction to render the cap u/s. When I checked the rotor arm with a couple of spare ones, I found that they all varied in depth. I ended up trimming a bit off of the bottom of one to ensure I had enough clearance.
..and I had to trim about 20 thou off the bottom of the rotor to get the dizzy cap sitting down nicely. Thanks for the tip Roly! :)

So...all set to go. Engine fired up sweetly on the second turn of the key and felt eager and responsive whilst warming up. And I had to take about 50 rpm out of the idle speed to get back down to 650 once warmed up. A good sign! :D

Timing checked and was still spot on at the 8 deg. BTDC I'm running at idle with vacuum disconnected.

Road Test! Blimey...ran like a dream. So smooth and no sign of pinking providing I stir the box as normal. Only intended to nip down to the local factors for some antifreeze...but found myself putting 30 miles on the clock.

All in all I'd have to say..so far..this is probably the best 60 quid I've spent on Occie to date. Highly recommended! :D :D :D
 

Attachments

  • 100_0459a.jpg
    100_0459a.jpg
    46.2 KB · Views: 1,074
  • 100_0462a.jpg
    100_0462a.jpg
    72.5 KB · Views: 1,074
  • 100_0464a.jpg
    100_0464a.jpg
    64.1 KB · Views: 1,074
  • 100_0466a.jpg
    100_0466a.jpg
    100.2 KB · Views: 1,074
  • 100_0468a.jpg
    100_0468a.jpg
    64.9 KB · Views: 1,074
Back
Top